Lochinvar 400-801 operation manual Gas conversions Model, 4Installing Propane Orifice Model

Models: 400-801

1 56
Download 56 pages 37.3 Kb
Page 12
Image 12

Outdoor Knight XL Installation & Operation Manual

2 Prepare boiler

Gas conversions

￿WARNING

Model 400

For a boiler already installed, you must turn off gas supply, turn off power and allow boiler to cool before proceeding. You must also completely test the boiler after conversion to verify performance as described under Start-up, Section 10 of this manual. Failure to comply could result in severe personal injury, death, or substantial property damage.

For the 400 Model you must install a propane orifice to operate the Outdoor Knight XL on propane gas. Verify when installing that the orifice size marking matches boiler size (Model 400 - 8.0 LP orifice stamping).

Models 501 - 801 do not require an orifice installation for propane operation, but they will require a valve adjustment.

￿WARNING After converting to LP, check combustion per the Start-up procedure in Section 10

of this manual. Failure to check and verify combustion could result in severe personal injury, death, or substantial property damage.

Model 400: Inspect the O-ring when the ￿ DANGER blower is disassembled. The O-ring must

be in good condition and must be installed. Failure to comply will cause a gas leak, resulting in severe personal injury or death.

Figure 2-4Installing Propane Orifice - Model 400

BLOWER

O-RING VENTURI

SCREWS

QTY. 3

1.Remove the top and front access covers from the unit (tools required for removal).

2.Remove the three screws securing the venturi to the blower. Note: When separating the venturi from the blower, take care not to damage the O-ring inside the blower (FIG. 2-4).

3.Remove the four star-drive screws securing the gas valve to the venturi (FIG. 2-4).

4.Locate the propane orifice disk from the conversion kit bag.Verify that the stamping on the orifice disk matches the boiler size (Model 400 - 8.0 LP orifice stamping).

5.Remove the existing orifice from the O-ring in the side of the gas valve and replace it with the orifice from the kit. Position and secure the orifice in the valve as shown in FIG. 2-4.

6.Reposition the gas valve against the venturi and replace the star-drive screws (FIG. 2-4) securing the valve to the venturi.

7.Inspect the O-ring inside the blower. Handle the O-ring with care, do not damage. Reposition the venturi against the blower and replace the screws securing the venturi to the blower (FIG. 2-4).

8.After installation is complete, attach the propane conversion label (in the conversion kit bag) next to the boiler rating plate. Attach the LP caution label (in the conversion kit bag) to the left side of the unit in the lower left corner.

9.Replace the top and front access covers.

SCREWS O-RING

QTY. 4

BRASS ORIFICE

GAS VALVE

12

Page 12
Image 12
Lochinvar 400-801 operation manual Gas conversions Model, 4Installing Propane Orifice Model

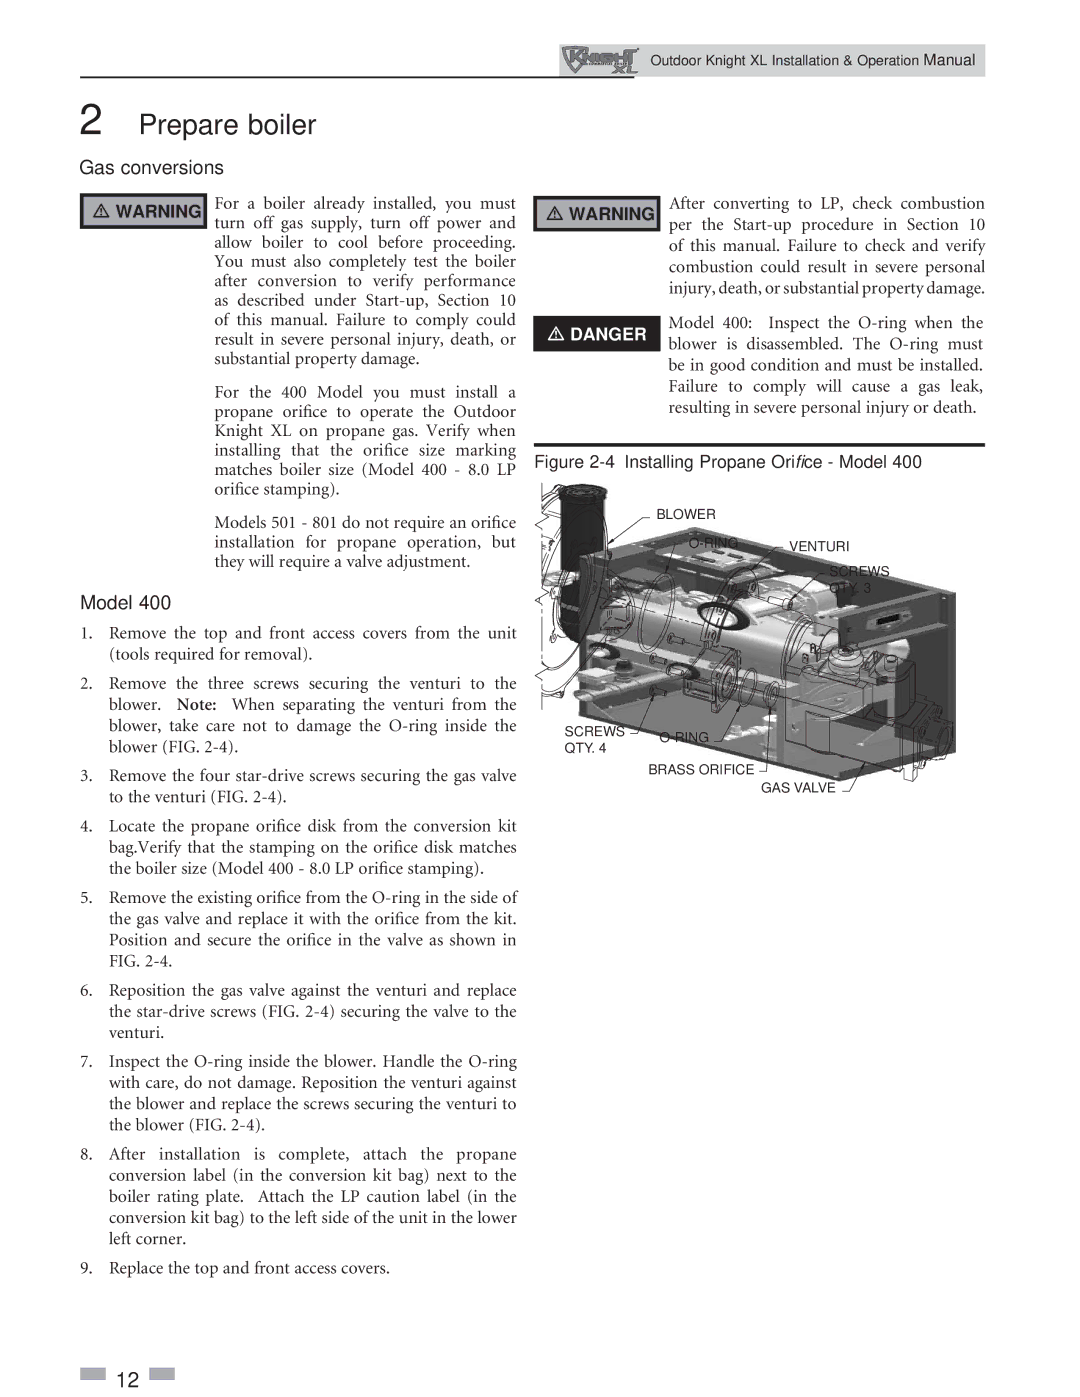
400-801 specifications

The Lochinvar 400-801 is a high-efficiency commercial boiler that embodies advanced engineering and cutting-edge technology. Designed for a variety of commercial applications, this boiler is known for its reliability, efficiency, and robust performance.

One of the standout features of the Lochinvar 400-801 is its high thermal efficiency, which can reach up to 99%. This efficiency not only reduces fuel consumption but also lowers operating costs, making it an economical choice for businesses seeking to minimize overhead. The boiler employs a stainless steel fire-tube heat exchanger that ensures optimal heat transfer and durability. This construction allows for enhanced resistance to corrosion, thereby extending the boiler's lifespan.

The Lochinvar 400-801 is equipped with advanced control technologies that enhance its performance. With its built-in SMART SYSTEM control, users can easily monitor and manage the boiler’s operations, optimizing performance while ensuring ease of use. This control system features a user-friendly interface that provides real-time data, including temperature settings, pressure readings, and operational status, allowing for quick diagnostics and efficient troubleshooting.

Safety is paramount in the design of the Lochinvar 400-801. The boiler includes a comprehensive safety system that incorporates multiple safety interlocks and a venting system that prevents backflow and ensures safe exhaust. Moreover, the unit is designed to operate with minimal noise, making it suitable for environments where noise reduction is crucial.

Installation and maintenance of the Lochinvar 400-801 are straightforward, thanks to its compact design and multiple venting options. The low-profile construction allows for flexibility in placement, making it an ideal fit for tight spaces. Maintenance tasks are simplified with accessible components, minimizing downtime and ensuring the system operates efficiently over its lifespan.

In conclusion, the Lochinvar 400-801 stands out in the commercial boiler market with its blend of efficiency, reliability, and innovation. With its advanced technologies and features, businesses can achieve significant energy savings while ensuring comfortable and consistent heat for various applications. The Lochinvar 400-801 is an investment in quality and performance, backed by a well-established brand in the heating industry. Whether for a new installation or a replacement, this boiler offers a comprehensive solution for commercial heating needs.