BUSINESS & HOME SECURITY
STEP 4
SETTING UP REMOTE SECURITY MONITORING (continued)
Port forwarding Your Router and the Creation of a DDNS Account with Lorex is required in order for you to have Remote Internet Access.
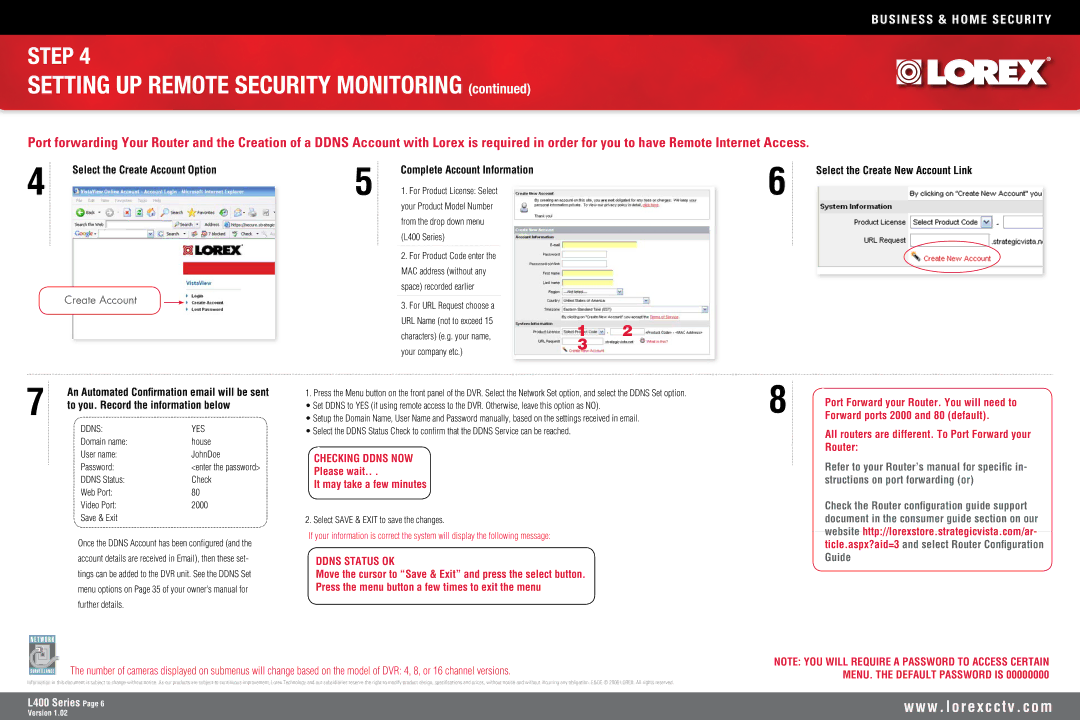
4 | Select the Create Account Option | 5 | Complete Account Information | ||
|
| ||||
|
|
|
|
| 1. For Product License: Select |
|
|
|
|
| |
|
|
|
|
| your Product Model Number |
|
|
|
|
| from the drop down menu |
|
|
|
|
| (L400 Series) |
|
|
|
|
| 2. For Product Code enter the |
|
|
|
|
| MAC address (without any |
|
|
|
|
| space) recorded earlier |
| Create Account |
|
|
| 3. For URL Request choose a |
|
|
| |||
|
|
|
|
| |
|
|
|
|
| URL Name (not to exceed 15 |
|
|
|
|
| characters) (e.g. your name, |
|
|
|
|
| your company etc.) |
|
|
|
|
| |
6 | Select the Create New Account Link |
| |
|
|
12
3
7 | An Automated Confirmation email will be sent | |
to you. Record the information below | ||
| DDNS: | YES |
| Domain name: | house |
| User name: | JohnDoe |
| Password: | <enter the password> |
| DDNS Status: | Check |
| Web Port: | 80 |
| Video Port: | 2000 |
| Save & Exit |
|
Once the DDNS Account has been configured (and the account details are received in Email), then these set- tings can be added to the DVR unit. See the DDNS Set menu options on Page 35 of your owner’s manual for further details.
1.Press the Menu button on the front panel of the DVR. Select the Network Set option, and select the DDNS Set option.
• Set DDNS to YES (if using remote access to the DVR. Otherwise, leave this option as NO).
• Setup the Domain Name, User Name and Password manually, based on the settings received in email.
• Select the DDNS Status Check to confirm that the DDNS Service can be reached.
CHECKING DDNS NOW
Please wait.. .
It may take a few minutes
2. Select SAVE & EXIT to save the changes.
If your information is correct the system will display the following message:
DDNS STATUS OK
Move the cursor to “Save & Exit” and press the select button.
Press the menu button a few times to exit the menu
8 | Port Forward your Router. You will need to |
Forward ports 2000 and 80 (default). |
All routers are different. To Port Forward your Router:
Refer to your Router’s manual for specific in- structions on port forwarding (or)
Check the Router configuration guide support document in the consumer guide section on our website http://lorexstore.strategicvista.com/ar- ticle.aspx?aid=3 and select Router Configuration Guide
The number of cameras displayed on submenus will change based on the model of DVR: 4, 8, or 16 channel versions.
Information in this document is subject to change without notice. As our products are subject to continuous improvement, Lorex Technology and our subsidiaries reserve the right to modify product design, specifications and prices, without notice and without incurring any obligation. E&OE © 2006 LOREX. All rights reserved.
NOTE: YOU WILL REQUIRE A PASSWORD TO ACCESS CERTAIN MENU. THE DEFAULT PASSWORD IS 00000000
L400 Series Page
Version 1.02
w w w . l o r e x c c t v . c o m