BUSINESS & HOME SECURITY
STEP 3
SETTING UP YOUR DIGTIAL VIDEO RECORDER (DVR) - RECORDING SETUP
CAMERA AND RECORDING SETUP - SETTINGS FOR GENERAL PARAMETERS. PRESS MENU BUTTON & SELECT RECORDING SET FOR CAMERA & RECORDING SETUP. CHECK YOUR OWNERS MANUAL FOR DETAILED INFORMATION.
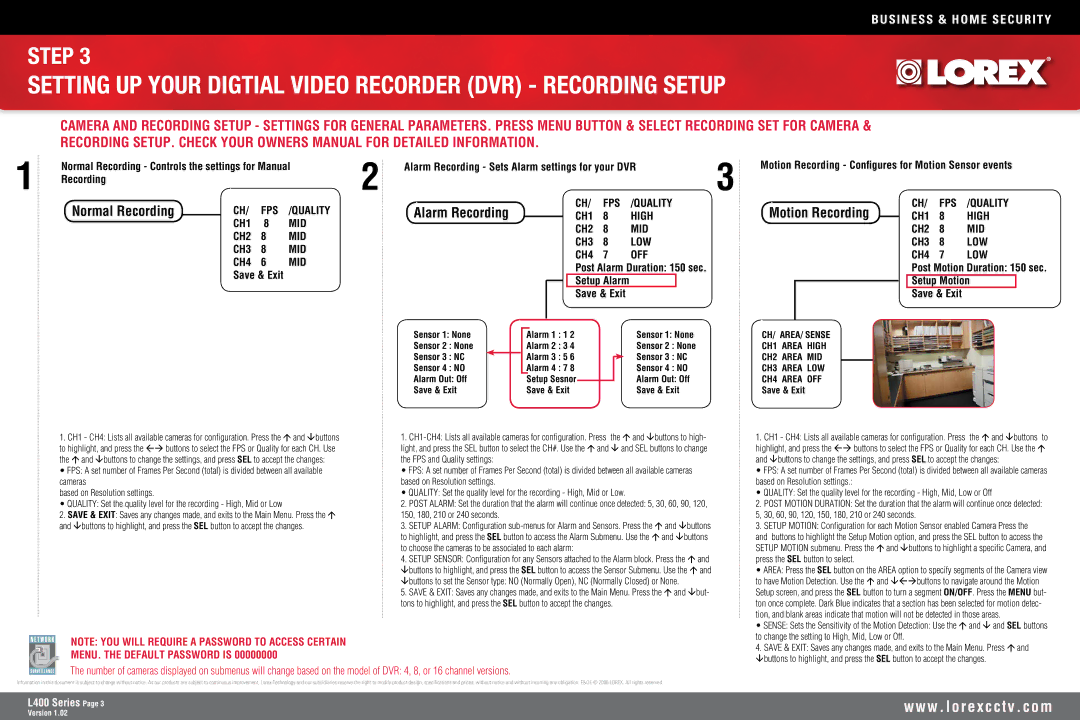
1 | Normal Recording - Controls the settings for Manual | 2 | Alarm Recording - Sets Alarm settings for your DVR | 3 | Motion Recording - Configures for Motion Sensor events |
Recording |
|
|
Normal Recording
CH/ FPS /QUALITY CH1 8 MID
CH2 8 MID
CH3 8 MID
CH4 6 MID Save & Exit
Alarm Recording
CH/ FPS /QUALITY
CH1 8 HIGH
CH2 8 MID
CH3 8 LOW
CH4 7 OFF
Post Alarm Duration: 150 sec. Setup Alarm
Save & Exit
Motion Recording
CH/ FPS /QUALITY
CH1 8 HIGH
CH2 8 MID
CH3 8 LOW
CH4 7 LOW
Post Motion Duration: 150 sec. Setup Motion
Save & Exit
Sensor 1: None |
|
|
| Alarm 1 : 1 2 |
|
| Sensor 1: None | CH/ AREA/ SENSE | ||
Sensor 2 | : None |
| Alarm 2 : 3 4 |
|
| Sensor 2 | : None | CH1 AREA HIGH | ||
Sensor 3 | : NC |
| Alarm 3 : 5 6 |
|
| Sensor 3 | : NC | CH2 AREA MID | ||
|
|
| ||||||||
Sensor 4 | : NO |
| Alarm 4 : 7 8 |
|
| Sensor 4 | : NO | CH3 AREA LOW | ||
Alarm Out: Off |
|
| Setup Sesnor |
|
| Alarm Out: Off | CH4 AREA OFF | |||
|
| |||||||||
Save & Exit |
| Save & Exit |
|
| Save & Exit | Save & Exit | ||||
1.CH1 - CH4: Lists all available cameras for configuration. Press the and buttons to highlight, and press the buttons to select the FPS or Quality for each CH. Use the and buttons to change the settings, and press SEL to accept the changes:
• FPS: A set number of Frames Per Second (total) is divided between all available cameras
based on Resolution settings.
• QUALITY: Set the quality level for the recording - High, Mid or Low
2.SAVE & EXIT: Saves any changes made, and exits to the Main Menu. Press the and buttons to highlight, and press the SEL button to accept the changes.
1.
• FPS: A set number of Frames Per Second (total) is divided between all available cameras based on Resolution settings.
• QUALITY: Set the quality level for the recording - High, Mid or Low.
2.POST ALARM: Set the duration that the alarm will continue once detected: 5, 30, 60, 90, 120, 150, 180, 210 or 240 seconds.
3.SETUP ALARM: Configuration
4.SETUP SENSOR: Configuration for any Sensors attached to the Alarm block. Press the and buttons to highlight, and press the SEL button to access the Sensor Submenu. Use the and buttons to set the Sensor type: NO (Normally Open), NC (Normally Closed) or None.
5.SAVE & EXIT: Saves any changes made, and exits to the Main Menu. Press the and but- tons to highlight, and press the SEL button to accept the changes.
1.CH1 - CH4: Lists all available cameras for configuration. Press the and buttons to highlight, and press the buttons to select the FPS or Quality for each CH. Use the and buttons to change the settings, and press SEL to accept the changes:
• FPS: A set number of Frames Per Second (total) is divided between all available cameras based on Resolution settings.:
• QUALITY: Set the quality level for the recording - High, Mid, Low or Off
2.POST MOTION DURATION: Set the duration that the alarm will continue once detected: 5, 30, 60, 90, 120, 150, 180, 210 or 240 seconds.
3.SETUP MOTION: Configuration for each Motion Sensor enabled Camera Press the
and buttons to highlight the Setup Motion option, and press the SEL button to access the SETUP MOTION submenu. Press the and buttons to highlight a specific Camera, and press the SEL button to select.
• AREA: Press the SEL button on the AREA option to specify segments of the Camera view |
to have Motion Detection. Use the and buttons to navigate around the Motion |
Setup screen, and press the SEL button to turn a segment ON/OFF. Press the MENU but- |
ton once complete. Dark Blue indicates that a section has been selected for motion detec- |
tion, and blank areas indicate that motion will not be detected in those areas. |
• SENSE: Sets the Sensitivity of the Motion Detection: Use the and and SEL buttons |
NOTE: YOU WILL REQUIRE A PASSWORD TO ACCESS CERTAIN
MENU. THE DEFAULT PASSWORD IS 00000000
The number of cameras displayed on submenus will change based on the model of DVR: 4, 8, or 16 channel versions.
to change the setting to High, Mid, Low or Off. |
4. SAVE & EXIT: Saves any changes made, and exits to the Main Menu. Press and |
buttons to highlight, and press the SEL button to accept the changes. |
Information in this document is subject to change without notice. As our products are subject to continuous improvement, Lorex Technology and our subsidiaries reserve the right to modify product design, specifications and prices, without notice and without incurring any obligation. E&OE © 2006 LOREX. All rights reserved.
L400 Series Page
Version 1.02
w w w . l o r e x c c t v . c o m