OPTIONAL KITS - CONTINUED

SIDE DISCHARGE ON CASING

SIDE DISCHARGE (With Extension Boot)

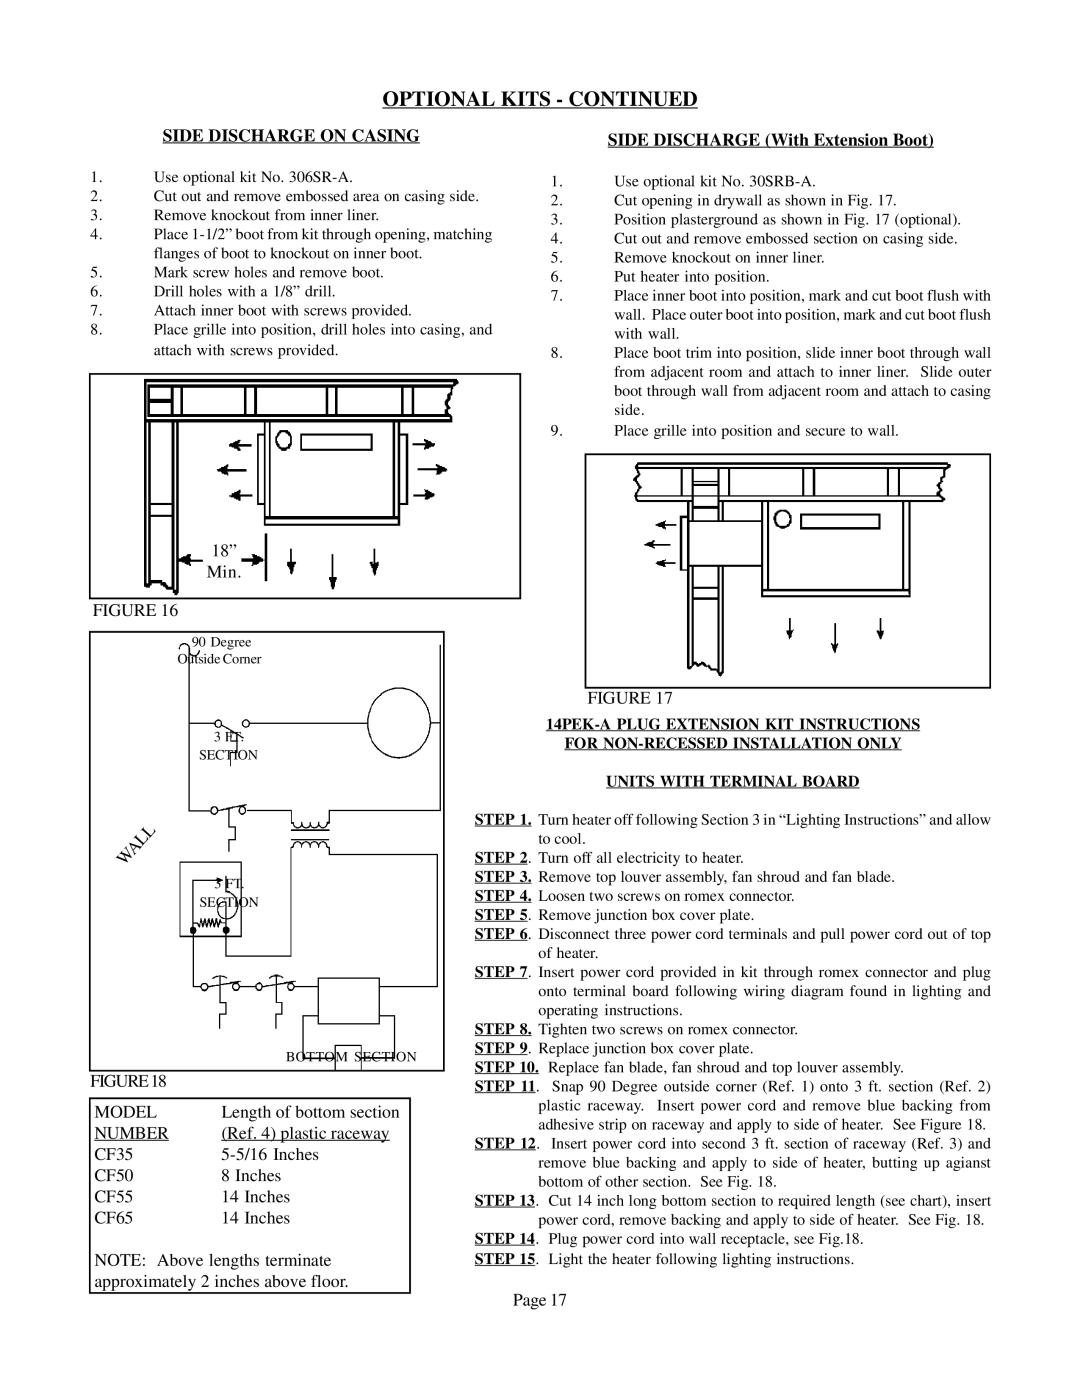
1.Use optional kit No. 306SR-A.

2.Cut out and remove embossed area on casing side.

3.Remove knockout from inner liner.

4.Place 1-1/2” boot from kit through opening, matching flanges of boot to knockout on inner boot.

5.Mark screw holes and remove boot.

6.Drill holes with a 1/8” drill.

7.Attach inner boot with screws provided.

8.Place grille into position, drill holes into casing, and attach with screws provided.

18”

Min.

1.Use optional kit No. 30SRB-A.

2.Cut opening in drywall as shown in Fig. 17.

3.Position plasterground as shown in Fig. 17 (optional).

4.Cut out and remove embossed section on casing side.

5.Remove knockout on inner liner.

6.Put heater into position.

7.Place inner boot into position, mark and cut boot flush with wall. Place outer boot into position, mark and cut boot flush with wall.

8.Place boot trim into position, slide inner boot through wall from adjacent room and attach to inner liner. Slide outer boot through wall from adjacent room and attach to casing side.

9.Place grille into position and secure to wall.

FIGURE 16

90Degree

Outside Corner

3FT.

SECTION

3FT.

SECTION


BOTTOM SECTION


FIGURE18


MODEL

Length of bottom section


NUMBER

(Ref. 4) plastic raceway


CF35

5-5/16 Inches


CF50

8 Inches


CF55

14 Inches


CF65

14 Inches


NOTE: Above lengths terminate


approximately 2 inches above floor.


FIGURE 17

14PEK-A PLUG EXTENSION KIT INSTRUCTIONS

FOR NON-RECESSED INSTALLATION ONLY

UNITS WITH TERMINAL BOARD

STEP 1. Turn heater off following Section 3 in “Lighting Instructions” and allow to cool.

STEP 2. Turn off all electricity to heater.

STEP 3. Remove top louver assembly, fan shroud and fan blade. STEP 4. Loosen two screws on romex connector.

STEP 5. Remove junction box cover plate.

STEP 6. Disconnect three power cord terminals and pull power cord out of top of heater.

STEP 7. Insert power cord provided in kit through romex connector and plug onto terminal board following wiring diagram found in lighting and operating instructions.

STEP 8. Tighten two screws on romex connector. STEP 9. Replace junction box cover plate.

STEP 10. Replace fan blade, fan shroud and top louver assembly.

STEP 11. Snap 90 Degree outside corner (Ref. 1) onto 3 ft. section (Ref. 2) plastic raceway. Insert power cord and remove blue backing from adhesive strip on raceway and apply to side of heater. See Figure 18.

STEP 12. Insert power cord into second 3 ft. section of raceway (Ref. 3) and remove blue backing and apply to side of heater, butting up agianst bottom of other section. See Fig. 18.

STEP 13. Cut 14 inch long bottom section to required length (see chart), insert power cord, remove backing and apply to side of heater. See Fig. 18.

STEP 14. Plug power cord into wall receptacle, see Fig.18. STEP 15. Light the heater following lighting instructions.

Page 17

Page 17
Image 17
Louisville Tin and Stove CF354C-R, CF654C-R, CF504R Optional Kits, Side Discharge on Casing, Model, Number

CF354C-R, CF504R, CF654C-R specifications

The Louisville Tin and Stove CF654C-R, CF504R, and CF354C-R are three distinctive models designed to provide efficient heating solutions tailored for various spaces and specific needs. Known for their stylish design and practical functionality, these units stand as a testament to craftsmanship in modern heating technology.

One of the main features of these models is their robust construction. Crafted from durable materials, they are designed to withstand the rigors of daily use while providing reliable heat. The units showcase a combination of classic aesthetics and modern functionality, allowing them to fit seamlessly in any home environment, be it traditional or contemporary.

The CF654C-R model stands out with its higher heating capacity, making it ideal for larger rooms or spaces that require significant warmth. It uses innovative heat distribution technology that ensures even warmth throughout the area, eliminating cold spots and enhancing comfort. The integrated thermostat allows users to maintain optimal temperatures effortlessly, further emphasizing energy efficiency.

The CF504R model, while slightly smaller, does not compromise on performance. It offers a perfect solution for medium-sized spaces, featuring a user-friendly interface that makes it easy to adjust settings to suit individual preferences. Advanced combustion technology maximizes fuel efficiency, resulting in lower energy bills while still delivering the heating power you expect.

The CF354C-R is tailored for smaller areas, making it the perfect choice for cozy rooms or as an additional heat source in larger homes. Despite its compact size, it is engineered with a high thermal efficiency rating, ensuring that it uses minimal fuel to produce significant heat. Its minimalist design fits easily into smaller spaces without occupying much room, making it a versatile addition to any home.

Each model integrates modern safety features, including flame failure safety devices and protective screens, ensuring peace of mind for users. Additionally, all three models are designed to accommodate a variety of fuel types, allowing homeowners to choose based on convenience and availability.

In summary, the Louisville Tin and Stove CF654C-R, CF504R, and CF354C-R are versatile heating solutions that cater to different needs, with a focus on durability, efficiency, and user-friendly operation. With their unique features and technologies, they remain a popular choice for anyone looking to enhance their home’s heating system.