Supplied Accessory
Precautions
Laser Safety
Before you start
Make your contribution to the environment
Precautions cont’d
Before you
Installation Location
Avoid the Hazards of Electrical Shock and Fire
Moisture Condensation Warning
About Copyright
Dolby Digital Recording
Maintenance
With an AM radio
Table of contents
Features
Symbol Description
Changing the Playing discs Editing Setup menu VCR
Start Connections Getting started Recording
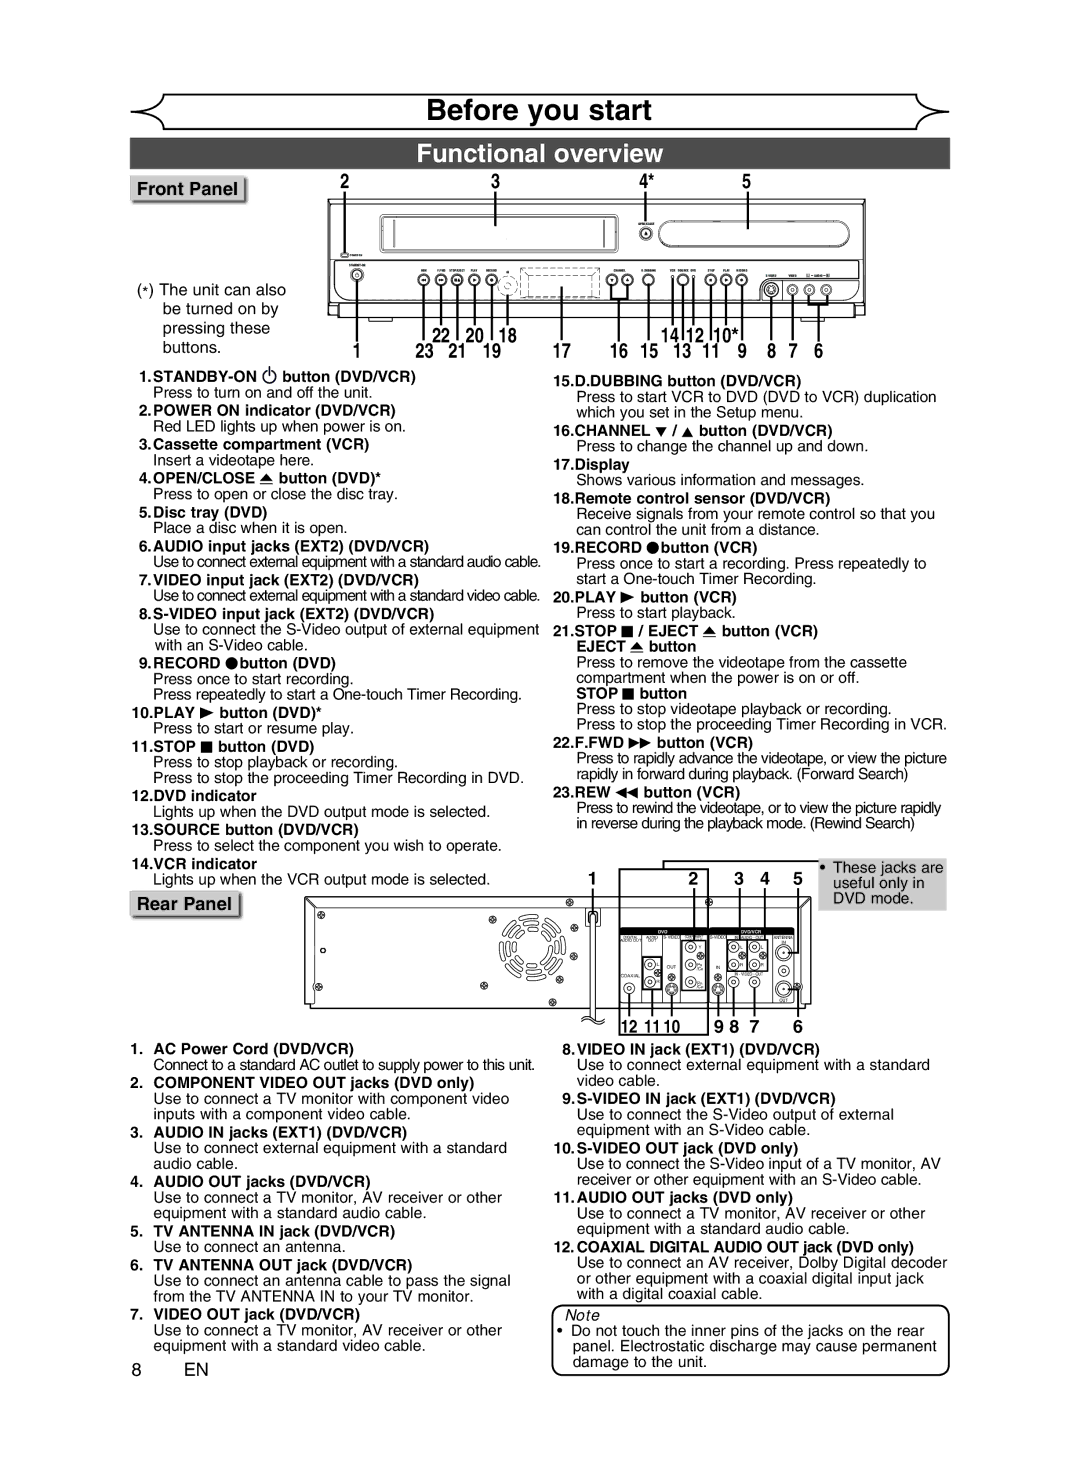
Functional overview
Front Panel
14 12
Rear Panel
Remote Control
Functional overview cont’d
Installing batteries in the remote control
Using a remote control
VCR/DVD recorder switching
10 EN
Setup menus
Display menu
12 EN
First DVD
First VCR
Front Panel Display Guide
VCR functions Others
Plug in the AC power cord of this unit
Connections
Connection to a TV
14 EN
Connection to a TV cont’d
Connection to a cable box or satellite box
Connection to an Audio System
16 EN
Audio OUT
Digital
Instructions continue on the next page. EN
Getting started
Easy DVD recording
Easy DVD recording cont’d
Channel Disc
Initial setting
Channel setting
Getting channels automatically
You
20 EN
Channel setting cont’d
Adding/deleting channels
Changing the Editing Setup menu VCR functions Others
Selecting the TV stereo or SAP
You start
Connections
Setting the clock
Auto Clock Setting
Using K / L, select Clock. Press OK
Press Setup to exit Press STANDBY-ON to turn off the unit
Changing the Setup menu
Setting the clock cont’d
Manual Clock Setting
24 EN
Setting the Daylight Saving Time
Selecting the TV aspect ratio
Recording mode
Recording
Information on DVD recording
Information
Information on DVD recording cont’d
26 EN
Setting for Auto Chapter
Press Setup Using K / L, select Recording. Press OK
Using K / L, select a desired time option. Press OK
Before recording
Basic recording
Disc tray guide
28 EN
Press OPEN/CLOSE a to close the disc tray
One-touch Timer Recording OTR
UsingDVD REC I and Stop C
First DVD Turn on the unit and load a recordable disc
You start Connections Getting started Recording
30 EN
Timer Recording
Setup
Timer Recording cont’d
Changing the Setup menu VCR functions
Playing discs Editing
Others
32 EN
Hints for Timer Recording
Priority of overlapped settings
Overwriting in the middle of the title
Overwriting an existing title
Overwriting from the beginning of the title
34 EN
Overwriting an existing title cont’d
Hints for Overwriting
Settings for an external source
Connection to an external source
Settings for an external source cont’d
Setting a disc to protect
Recording from an external source
36 EN
Finalizing a disc
DVD-RW only
Using K / L, select Auto Finalize. Press OK
Using K / L, select ON. Press OK
Playing the discs in other DVD players cont’d
Auto finalizing
Dubbing Mode
Using K / L, select Dubbing Mode. Press OK
Make sure
Start
Dubbing Mode cont’d
40 EN
Playing discs
Information on DVD play
Basic playback
Playback
Basic playback cont’d
Playing MP3 disc
44 EN
Playing discs using the disc menu
Playing discs using the title menu
Skipping TV commercials during play
Started
CM Skip
Playing
Special playback cont’d
Rapid play
Step by step playback
Slow forward / Slow reverse play
Marker Setup
Setup menu
Zoom
Changing
Using Skip H / G
Using Display
Search
Title/Chapter search
Setup menu Changingthe
Search cont’d
Track search
Time search
Repeat/Random/Program playback
Repeat playback
Random playback
50 EN
Program playback
Switching subtitles
Selecting the format of audio and video
Switching audio soundtrack
Switching virtual surround system
Selecting the format of audio and video cont’d
52 EN
Display
Switching camera angles
Reducing block noise
Editing discs Setup menu
Editing
Information on disc editing
Guide to a title list
Using K / L, select a desired title. Press OK
Using K / L, select Edit
Editing discs
Deleting titles
56 EN
Editing discs cont’d
Putting names on titles
Using K / L, select Add. Press OK
Setting chapter marks
Using K / L, select Chapter Mark. Press OK
58 EN
Using K / L, select Delete All. Press OK
Clearing chapter marks
Getting started
Playing discs Editing Setup menu Changing
Hiding chapters
Setting pictures for thumbnails
60 EN
Press OK Picture for thumbnail will be set
Data will be written onto the disc Momentarily
Dividing a title
Beforeyou
You can divide one title into two new titles
Number of recording chapter
62 EN
Editing discs Setup menu
Putting name on disc
Setting disc to protect First DVD
Editing discs Setup menu cont’d
Setting or releasing disc protect
Setting or releasing disc protect contd
Using K / L, select Disc Protect. Press OK
64 EN
Releasing disc from protect First DVD
Using K / L, select Erase
Using K / L, select Make Edits Compatible. Press OK
Erasing disc
Making edits compatible
Changing the Setup menu
Tour of the Setup menu
Setup Items highlight is the default Contents
66 EN
Language setting
Editing Setup menu Changing
Language setting cont’d
Display setting
Press Stop C if you are playing a disc
68 EN
Display setting cont’d
Audio setting
Audio setting cont’d
Settings for PCM Default 48kHz
Settings for Dolby Digital Default Stream
70 EN
Still Mode Default Auto
Video setting
Progressive Scan Default OFF
Settings for Parental lock level
Password has not been set yet
Password has been set already
Yes
Settings for Parental lock level cont’d
Settings for PBC Playback Control
PBC Video CD only Default on
Using K / L, select PBC Video CD only. Press OK
Recording and One-touch Timer Recording
VCR functions
Playback
74 EN
Index search
Recording and One-touch Timer Recording cont’d
One-touch Timer Recording OTR
Other operations
76 EN
Troubleshooting
Symptom Remedy
Others
As a cellular phone, away
Troubleshooting cont’d
Symptom
78 EN
You press OPEN/CLOSE a
Before you start Connections Getting started Recording
Cause Solution
Not work
RF output switch
Error message
80 EN
Cause
Glossary
Language code
82 EN
Frequently Asked Questions
Specifications
Memo
Funai Corporation
Customer Service Tel
Limits and Exclusions
Enter
Magnétoscope
Validez

