MDR533H MDR535H MDR537H
Symbol for Class ll Double Insulation
Safety Information
Safety Instructions
To Avoid the Hazards of Electrical Shock and Fire
Safety Information
Location and Handling
Dew Condensation Warning
Maintenance
Supplied Accessories
Dolby Digital Stereo Creator
Trademark Information
Contents
Switching Audio
Contents
Step by Step
All
Features
Features
Recording
Dubbing
Playback
Features
Editing
Compatibility
Front Panel
Functional Overview
Rear Panel
Functional Overview
Installing the Batteries in the Remote Control
Remote Control
Using a Remote Control
Open the cover Insert batteries
Introduction Connections
Display Message
Front Panel Display
Title/track/file and chapter mark
Current status of the unit
Antenna Connection Required
Connection
Overview
Quality
Connection
Connecting to a TV Using Audio / Video jacks
Connecting to a TV Using the S-Video Out jack
Connecting to a TV with an Hdmi Compatible Port
Connecting to a TV Using Component Video Out jacks
Copyright protection system
Hdmi Mode and Actual Output Signals
With this setup
Connecting to a Cable / Satellite Box
No Antenna RF Output
Connecting to a TV without Audio / Video jacks
Hdmi Audio Connection
Digital Audio Connection
Actual Output
Before YOU Start
Proceed to in Initial Setting on
Finding the Viewing Channel on your TV
After you have made all
Guide to On-Screen Display / Menu
Before YOU Start
DTV Program Guide
Autostart Recording Information
Hdmi Information
HDD / DVD Information / Menu
Title / File Name Information
Main Menu
General Setting Menu
Disc Edit / HDD Menu / Dubbing / Disc Playback Mode
How to Insert a Disc
Switching HDD / DVD Mode
HDD mode
Press HDD to activate the HDD mode
Broadcasting Signal, then press OK
Initial Setting
Then press OK
Use K/ L to select the type
Auto Channel Scan
Channel Setting
Preset, then press OK
Channel Setting
Adding / Deleting Channels
Use K / L to select Channel, then press OK
Use K / L to select Add or
Select the channel number to add or delete
Delete, then press OK
Press Menu to exit
Auto Clock Setting
Setting the Clock
Setting the Clock
Daylight Saving Time
Manual Clock Setting
Channel Selection
Tuner Settings
Switching Analog Mode / Digital Mode
Selecting TV Audio
Tuner Settings
Select, then press OK
Use K / L to select TV Audio
Use K / L to select Stereo or
SAP, then press OK
DTV Closed Caption
Use K/ L to select Caption Service, then press OK
Use K/ L to select Display, then
Use K/ L to the desired DTV closed caption, then press OK
Use K / L to select ON, then press
Closed Caption Style
Use K / L to select CC Style, then
Edge Type
Font Size
Edge Color
Font Style
Recordable Discs
Information on Recording
Unrecordable Discs
LogosAttributes
About HDD
Recording Mode
Information on Recording
Before Recording
Setting for Auto Chapter
Make Recording Compatible Recording the DTV Closed Caption
Recording from a Cable Box or Satellite
Press REC Mode repeatedly to Select a recording mode
On how to insert a disc
Refer to Recording Mode on
Insert a recordable disc refer to
Press Stop C to stop recording
Setup Recording
Press REC to start recording
Recording the Contents of the Autostart Recording
When watching TV programs
Autostart Recording
Press Stop C twice to stop Recording
Press Timer Prog
Timer Recording
Use K/ L to enter the date, then press B
Use K/ L / s/ B or
Press OK when all items are entered
Timer Recording
Use K/L to select a Recording mode
To exit, press Timer PROG. or Menu
To stop the Timer Recording in progress
How to Select a Channel Number for the Timer Recording
Skip the Timer Recording Period
Putting Names on Timer Programs
Each error number means
Priority of Overlapped Settings
Hints for Timer Recording
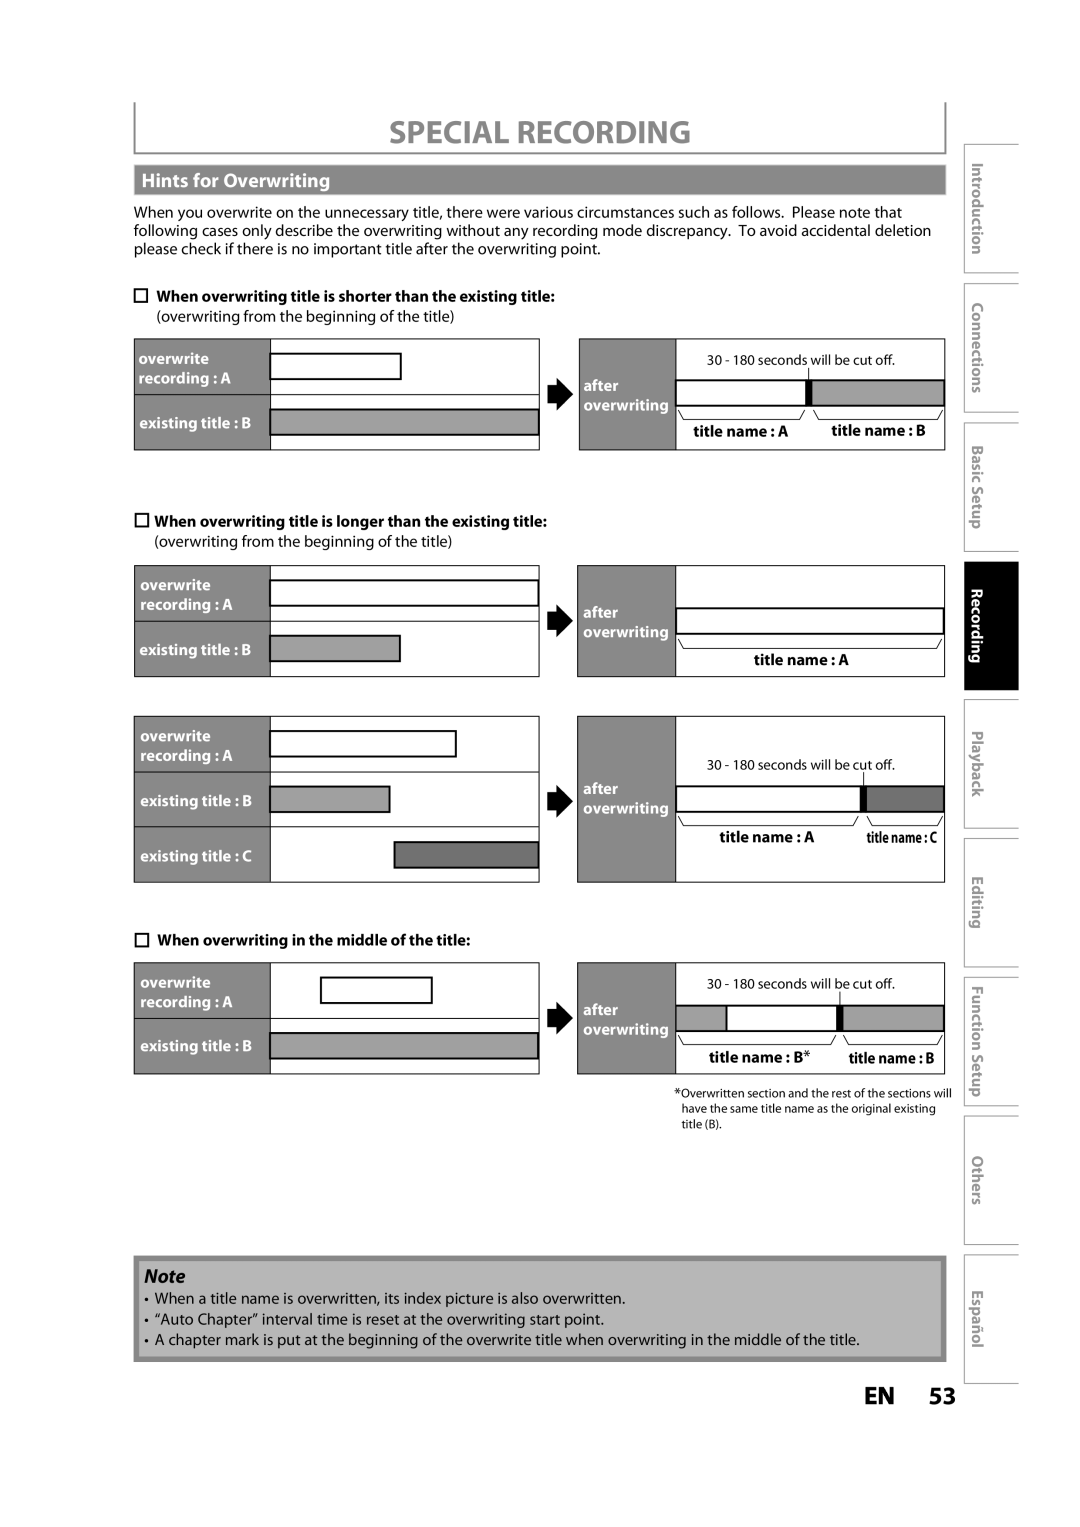
Special Recording
Hints for Overwriting
Special Recording
Dubbing
Recording Mode for Dubbing
Information on Dubbing
Guide to Dubbing Menu Display
External device
Setting for an External Device
Dubbing
Use K / L to select Video Input
Use K / L to select Video, then
Input, then press OK
Use K/ L to select the input jack
Recording from an External Device
Guide to DV and On-Screen Display
Information on DV Dubbing
Use Source or Channel / to
DVC to HDD / DVD Dubbing
Select L3DV-IN
Press Display Press OK to display the item
60 EN
Use K / L to select HDD DVD, then press OK
Selected Title Dubbing
Use K / L to select DVD HDD, then press OK
Title, then press OK
Use K/ L to select Yes, then press
Use s / B to select a desired
Recording mode, then press OK
Press HDD first Press Title
One Title Dubbing HDD to DVD only
Title to dub, then press OK
Use K / L to select Dubbing, then
Press Menu
Protecting a Disc
ON, then press OK
Use K / L to select Disc Edit, then
Use K/ L to select Finalize, then press OK
Finalizing a Disc
Finalizing is completed. Press Stop C to exit
Finalizing will start
Auto Finalizing
Playing the Discs on Other DVD Players
Use K/ L to select Recording
Use K/ L to select Disc Full or
Playable Discs and Files
Information on Playback
Unplayable Discs
Color Systems
Information on Playback
Disc Playback Mode menu will appear
PBC playback control for Video CD
Hint for HDD / DVD Playback
To insert a disc
Basic Playback
Temporarily
Insert a disc refer To page 27 on how
Playback from the Title List
Basic Playback
Use K / L/ /s / B to select a desired
HDD title list
Playback
Press Stop C once to stop playback Temporarily
Press DVD first
Playing Audio Discs and Picture Discs
Or track/file, then press OK
Insert a playable disc refer to
Kodak Picture CD
Using the Title / Disc Menu
Pause
Resume Playback
Special Playback
Fast Forward / Fast Reverse Playback
Variable Skip / Variable Replay
Step by Step Playback Chasing Playback during Recording
Special Playback
Slow Forward / Slow Reverse Playback
Simultaneous Playback and Recording
2Use / B to select to display the marker list
Zoom Marker Setting
During playback, press Display Use / B to select menu
Slide Show
Repeat Playback
Random Playback
5Press Play B
Program Playback Playing Back the Autostart Recording
Using Display
Using H / G
Search
Title / Chapter Search Track Search
Time Search
Search
Use / B to select e.g. DVD-video
Audio CD
For DVD-video Audio soundtrack will switch
Switching Subtitles Switching Audio Soundtrack
3Use K/ L to select a desired option, then press OK
Switching Camera Angles Reducing Block Noise
Selecting the Format of Audio and Video
DVD mode
HDD mode 2
Information on Editing
Guide to a Title List
Information on Editing
How to Access the Edit Menu
Edit Menu
Putting name on disc
Editing
DVD mode
Deleting a Title
Press Title Use K / L / / B to select a desired
DVD mode
HDD mode Title is now deleted
Editing
Use K / L to select Title Delete
Deleting Selected Titles
Use K/ L to select Edit Title
Putting Names on Titles
Edit menu
Use K / L to select Chapter Mark
Chapter Marks Add
Use K / L to select Add, then press
DVD
Edit Menu on page 84 to display
Chapter Marks Delete
Use H / G to go to the chapter
With the chapter mark number you
Use K / L to select Delete All, then
Chapter Marks Delete All
Press Return once or repeatedly to
All chapter marks are now deleted
When it comes to the desired point, press
Where you want to divide the title
Dividing a Title
Play back the title up to the point
You can delete a specific part of a title
Deleting a Scene of a Title
OK to preview the result
With Preview highlighted, press
Use K / L to select Yes then press
Start point end point
Press
Protecting a Title
With OFF On selected, press
You want to hide, then press
Hiding Chapters
Use K / L to select Hidden, then press OK
Use K / L to select Hide Chapter
New index picture is now set
Setting an Index Picture
Use K / L to select Index Picture
Putting Name on Disc
When you finish entering a title name, press OK
Use K / L to select Edit Disc Name
Then press OK
Use K / L to select Erase Disc
Erasing Disc
You can erase all titles on a disc
Press Stop C if you are playing back a disc
Use K / L to select Make Edits
Making Edits Compatible
Ble, then press OK
Use K/ L to select Yes, then press OK
All titles are now deleted
Deleting All Titles in HDD
Menu
List of Settings
Setting
List of Settings
104 EN
When you finish with the setting Press Menu to exit
Setups
Playback
Use K/ L to select a desired item, then press OK
Parental Lock Default OFF DVD only
Setups
Use the Number buttons to enter the current password
Yes
Disc Audio
Disc Menu Language Default English DVD only
Audio Language Default Original DVD only
Angle Icon Default on DVD only
Subtitle Language Default OFF DVD only
Still Mode Default Auto DVD only
Variable Skip / Replay
Screen Saver Default 10 minutes
Language Default English
Display
Refer to 1 to 6 on pages 109-111 and set the selected item
Use the Number buttons to enter the access password
FL Dimmer Default Bright
Chip
Mpaa Rating
Use the Number Buttons to enter new access password
Change Password Change the current password
Canadian French Rating
To set the rating
Video
When you finish with setting, press Menu to exit
Use K / L to select a desired item
Refer to 1 to 2 on page 113 and set the selected item
TV Aspect Default 43 Letter Box
Progressive Scan Default OFF
Press Menu in stop mode and use
To select General Setting
Format Default RGB
Hdmi Audio Default on
Fun-Link Hdmi CEC Default OFF
RGB Range Default Normal
One Touch Play
System Information Get & Set Menu Language
Repairing process MAY not work
Troubleshooting
Symptom Remedy
Troubleshooting
Symptom
Please check IR signal. Refer to
Disc may be dirty or flawed. Clean the disc
Remote manufacturer if you have any problem with it
Playback does not start from
Error message Cause Solution
Error Message
Language Code
Language Code
Glossary
General
Specifications
Recording
Tuner
Discos Reproducibles
Español
Disco Grabable
Disco no Grabable
Cable RCA de audio Parte trasera de la unidad
Conexión Básica
Español
Configuración Inicial
Presione STANDBY/ON y
Utilice / B para seleccionar un
Grabación Básica
Reproducción Directa
Copiado Básica
Memo
Memo
Memo
E2S05UD / E2S07UD / E2S08UD 1VMN32933
Tel