MDV540VR/17
For Customer Use
Dear Magnavox product owner
Returning the enclosed card
Declaration of Conformity
Safety and General Information
Safety Precautions
Table of Contents
Introduction
Playable Discs and Video Cassettes
Playable Discs
Region Codes
Color Systems
Hookups
Determining the best possible connection
Before you begin
Remember
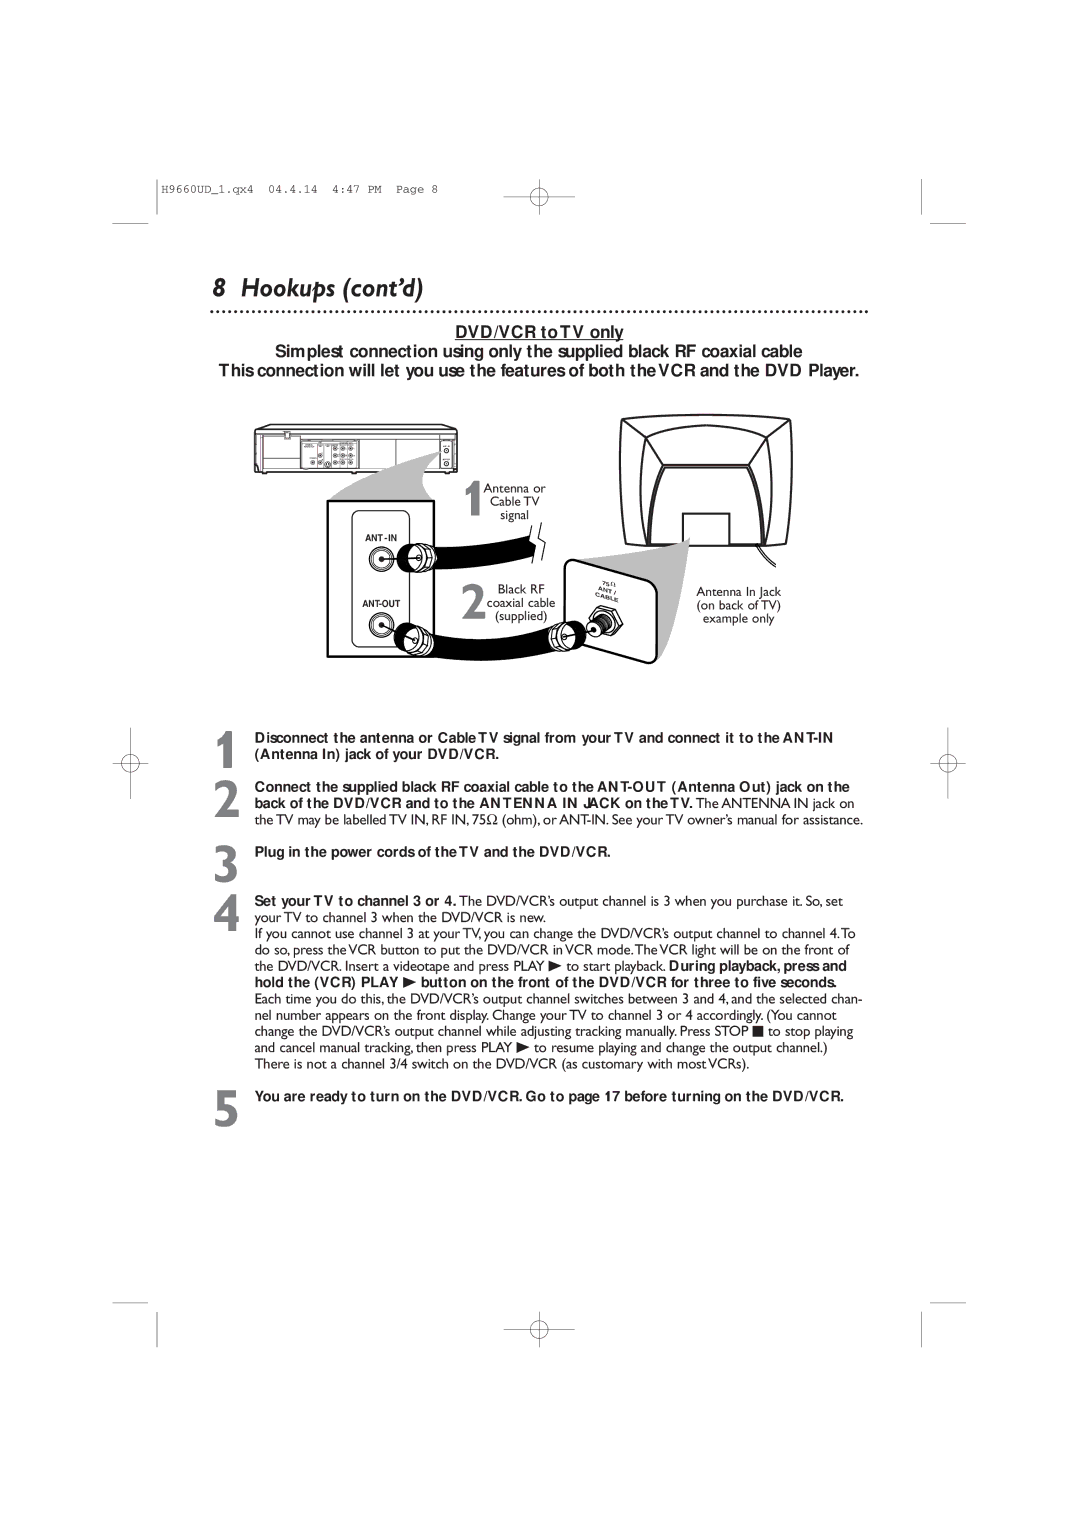
Hookups cont’d
Connections
2DVD/VCR
RF coaxial cable
Video OUTSatellite Signal
Cable TV
Audio Cable Video Cable Video in Jacks On TV
DVD/VCR to a TV that has Component Video In jacks
DVD/VCR to a TV that has an S-Video In jack
Details are on pages seven
1Antenna/Cable TV Signal
DVD/VCR to a TV and a Stereo
1Antenna/Cable TV Signal
Are on pages seven
Remote Control Setup
Putting Batteries in the Remote Control
Using the Remote Control
Recycling Guidelines/Battery Safety
Turn on the TV
First-time DVD/VCR Setup
Repeat this process if the power fails
Details are on pages
Other tape playback features are on pages
Video Cassette Playback
Disc Playback
Press STANDBY-ON to turn on the DVD/VCR
Press OPEN/CLOSE a
On the DVD/VCR
Display Panel DVD
Display Messages
Display
DVD Light
VCR light
Display Panel VCR
Cassette Compartment
Front Panel
DVD/VCR Audio OUT and Video OUT Jacks red, white, yellow
Rear Panel
VCR Audio in and Video in jacks red, white, yellow
Remote Control
Remote Control cont’d
Channel Setup
Press o or p to select Channel SET UP.Then, press B
Press o or p to select Auto SET UP. Press B
Press VCR, then press DISC/MENU so Menu appears
Press B or s so ADD or Delete flashes on the screen
Channel Setup cont’d
Adding/Deleting Channels
Clock VCR
While the DAY space is flashing, press o or p
Until the day appears.Then, press B
While the Year space is flashing, press o or p
Clock VCR cont’d
Language VCR
VCR Status Displays
To prevent recording, break off the tab with a
Videotape Recording
Recording Prevention
Recording One Channel/Watching Another
Reselect channel 03, 04, or Video In at the TV
One-Touch Recording
Stopping an OTR
Make the connections shown above
Rerecording Tape Duplication
Playing unit
Timer Recording
Set the clock. Details are on pages
Press o or p to select an empty program.Then
Press o or p to select ONCE, DAILY, or Weekly
Timer Recording cont’d
Next, press o or p until the day appears.Then
Hour appears. Press B
Press o or p until the minute appears. Press B
Tape speed are on
Cancelling Timer Recordings
Press o or p to select a recording tape speed
DVD to Videotape Duplication
Follow the steps below to copy a DVD to a videotape. This
Will be possible only if the DVD is not copy protected
Before you begin
Press B so on appears next to Auto Repeat
Repeat Play
Press o or p to select Auto Repeat
Tape Counter
Press VCR, then play, fast forward, or rewind a
Tape to the location that you would like to refer
To later. Press Stop C to stop the tape
Time Search, Index Search
Time Search
Special Effects Playback
Forward and Reverse Searching SP/LP/SLP
Super High Speed Searching LP/SLP
Viewing a Still Picture
Automatic Operation Features
Multi-Channel Television Sound
Understanding Displays
Press o or p to select TV Stereo or SAP
Second Audio Program. Press B so on appears
Beside your selection
Press DISC/MENU to remove the menu
Hi-Fi Stereo
Press o or p to select Audio OUT. Then, press B
Press o or p to select HIFI. on will appear
Beside Hifi
Using the Title Menu
DVD Disc Menus
Fast Forward/Reverse Search
Enter the Title or Chapter number using
Title/Chapter Playback
Specific Time Playback
Number of available Titles or Chapters will appear at Right
Using Search Mode
Track Playback
Paused and Step-by-Step Playback, Resume
Paused and Step-by-Step Playback
Resume
Press Play B to resume play
Repeat,A-B Repeat
Repeat
Tion will begin to play repeatedly
Point B must be later on the Disc than Point a
Markers
Opening the disc tray will cancel your subtitle setting
Subtitles, Camera Angles
Subtitles
Camera Angles
Parental Controls Password
Press Setup
Power failure will not erase your password
Press sor B to select CUSTOM, then press OK
Parental Levels
Adult material
Example English audio
Stereo Sound Mode
Audio Language
Slow Motion, Zoom
Slow Motion
Zoom
Press Pause F during DVD or Video CD play
Program can have a maximum of 99 Tracks
Programmed Playback
You cannot alter a Program dur- ing play
DOM screen appears
While play is stopped, press Mode twice so the RAN
Random Playback
62 MP3/JPEG Playback
Press o or p to select a Folder, MP3 Track, or Jpeg File
Or OK
To stop play, press Stop C
MP3/JPEG Displays
You can review MP3 and Jpeg information during play
Press Display again. The current Track number, total
Tracks available, and elapsed playing time of the current
Setting, then press OK
Display
Or B to select display, then press OK
Press o or p to select an item, then press OK
Press Setup to remove the menus
Display cont’d
From previous
If Progressive is ON, this message appears
Language
Language cont’d
Language Codes
Audio
On-Screen Displays
DVD Displays
Audio CD/ Video CD Displays
Press Display repeatedly to see the following dis
Black Level,Virtual Surround
Black Level
Virtual Surround
Icon will disappear after about 10 seconds
Except for Parental to their default settings
Initializing
Glossary
Cable Box/Satellite Receiver Output Channel 03 or
Specifications
DVD/VCR has no power
Remote control will not operate the DVD/VCR
There is no picture in DVD mode
Helpful Hints
Helpful Hints cont’d
Power Failure
VCR will not perform a timer recording
VCR will not record a TV program
Number buttons won’t work for TV channels above
Line Input mode
Cleaning the Video Heads
You cannot insert a video cassette
You cannot remove the tape
Care and Maintenance
English or Spanish Speaking
Limited Warranty
Product sold AS is or Renewed
Information Index
Controls