Manuals
/
Majestic
/
Household Appliance
/
Indoor Fireplace
Majestic
SC42A Continue Installing Pipe to Complete Run, Additional Ceilings, Chimney Supports
Models:
SC36A
SC42A
SR36A
SR42A
1
13
24
24
Download
24 pages
6.77 Kb
10
11
12
13
14
15
16
17
Install
Warranty
Accessories
Chimney Setup
Page 13
Image 13
Page 12
Page 14
Page 13
Image 13
Page 12
Page 14
Contents
SC36A, SR36A SC42A, SR42A
Woodburning Fireplace
DO NOT DISCARD THIS MANUAL Retain for future use
Homeowners Installation and Operating Manual
Table of Contents
Safety Information
Precautions
SR/SC Series A Woodburning Fireplace
SR/SC Series A Woodburning Fireplace
SR36A Series Woodburning Fireplace
7412948
Fig. 1 SR36A Series specifications and framing
SR/SC Series A Woodburning Fireplace
SR42A Series Woodburning Fireplace
7412948
Fig. 3 SR42A Series specifications and framing
SR/SC Series A Woodburning Fireplace
Chase Installation
Insulation methods
for cold climate, not
30˚ Elbow Offsets
Chimney Requirements - Offset Installations
Illustration Key
SR/SC Series A Woodburning Fireplace
Mounting the Fireplace
Planning Information
Planning the Chimney Run
The Ten Foot Rule
Chase Installation
Installation
Chimney Supports
Insulating Fireplace Enclosure for Cold Climates
Install Fan Kit Assembly
Installing Electrical Wire for Circulator Models
Chimney Setup
Framing
Offset Installation
Straight-UpChimney Installation
Ceiling Chimney Hole Possible Obstructions
Cutting the Hole
Installing Outside Air Kit
Positioning, Safety Strips Securing the Fireplace
Installing the Chimney System
SR/SC Series A Woodburning Fireplace
Proper Firestop Spacer Installation
Installing the Firestop Spacer
in the Ceiling Hole
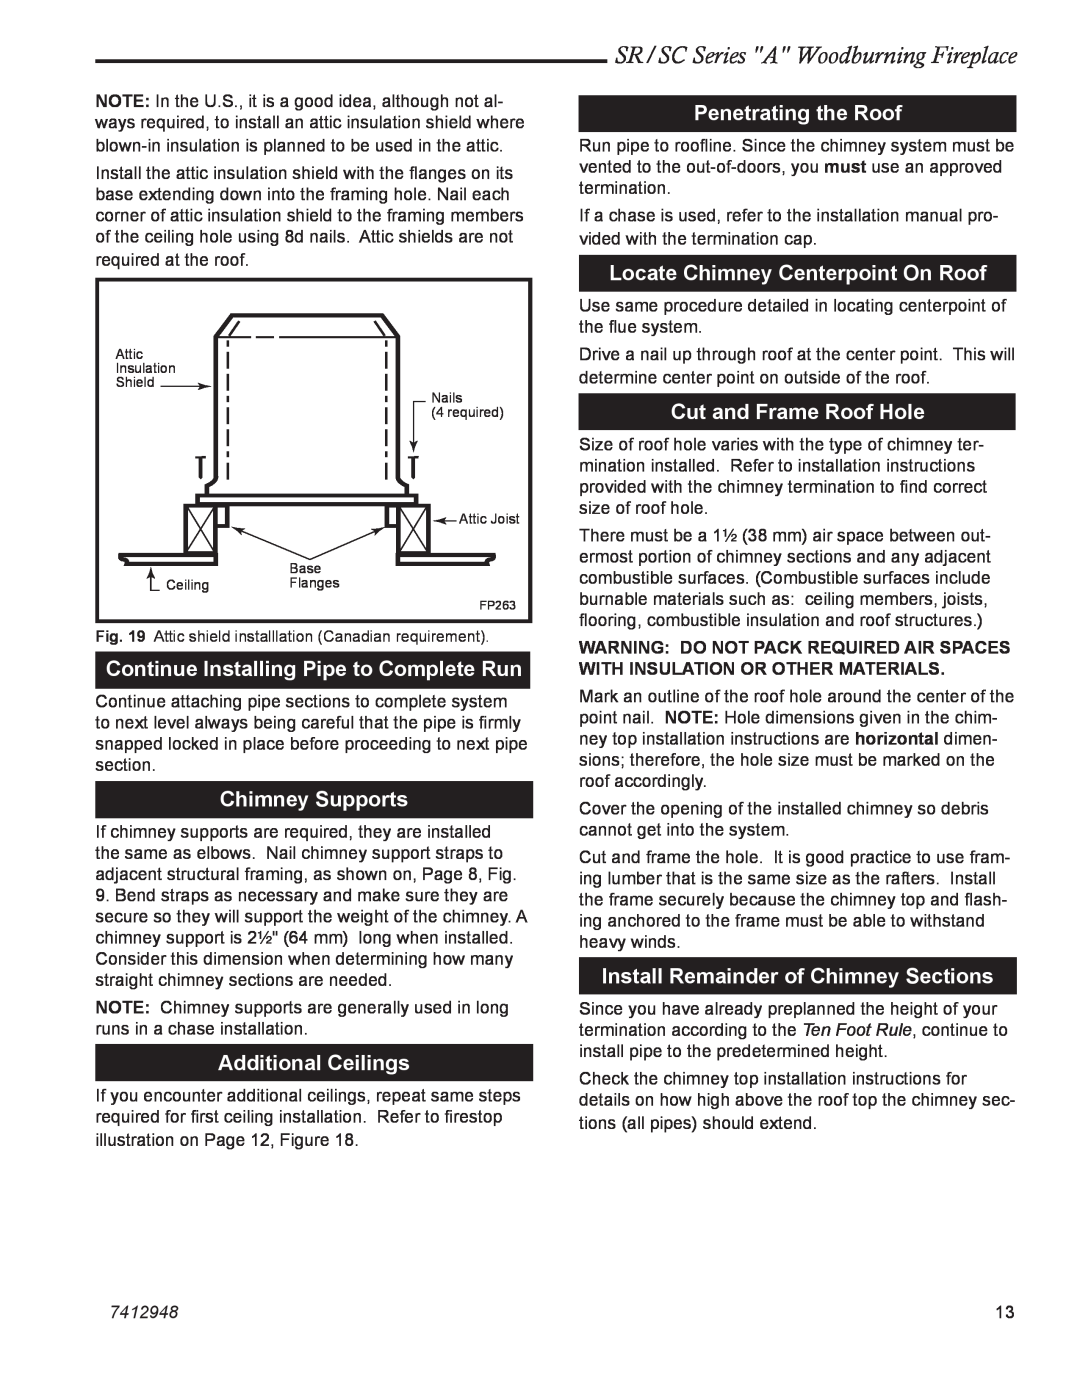
Canadian Requirements for Insulation Shield
Install Remainder of Chimney Sections
Continue Installing Pipe to Complete Run
Additional Ceilings
Penetrating the Roof
Installing Chimney In a Chase
Installing Top Housing or Termination
Finishing
Finish Wall
7412948
SR/SC Series A Woodburning Fireplace
Mantel Clearance - Radiant
Mantel Clearance - Radiant Model
Minimum Hearth Extension Dimensions
Hearth Installation
Side Wall Protection
Minimum Wall Clearances
Example for Common Brick
COMMON MATERIALS AND FACTORS
SR/SC Series A Woodburning Fireplace
7412948
SR/SC Series A Woodburning Fireplace
Installing Line for Gas Logs
SR/SC Series A Woodburning Fireplace
SR36A/42A, SC36A/42A SERIES
Description
SR/SC36A
SR/SC Series A Woodburning Fireplace
Accessories
7412948
SR/SC Series A Woodburning Fireplace
Chimney Components
7412948
SR/SC Series A Woodburning Fireplace
Chimney Components cont Canada
7412948
What is Not Covered
Except Blowers What is Covered and For How Long
Factory-BuildFireplace and Components
Limitations and Exclusions
149 Cleveland Drive Paris, Kentucky
MHSC
Top
Page
Image
Contents