THE BACK PANEL
OUTPUT
CHANNEL 2
PIN 1 GROUND
PIN 2 HOT +
PIN 3 LOW -
N9512423
INPUT | IF IN DOUBT USE +4 BALANCED | |
| & “IRON” IF OPTION IS INSTALLED | |
| INPUT OUTPUT | TRANSFORMER |
| LEVELS | OPTION |
| +4 UNBALANCED | VINTAGE |
| +4 | IRON |
| BAL | |
|
| |
| BYPASS | |
MINI MASSIVE | MANLEY LABS | OUTPUT | CHANNEL 1 | INPUT |
PHONE (909) |
|
|
| |
| 13880 MAGNOLIA AVE., CHINO, CA 91710 |
|
|
|
| www.manleylabs.com |
| BY MANLEY LABS |
|
SERIAL NUMBER | FUSE 1A @ 117V |
|
| |
| FUSE .5A @ 220V |
|
|
|
VOLTAGE | CAUTION - RISK OF ELECTRIC SHOCK |
| TWO CHANNEL EQUALIZER |
|
DO NOT OPEN. REFER SERVICING TO |
| DESIGNED BY HUTCH |
| |
| QUALIFIED PERSONNEL ONLY |
|
| |
|
|
|
|
76 5 8 2 3 1 4 76
First connect all the cables, then turn on the power, wait 30 seconds, then have fun, as if we had to tell you....
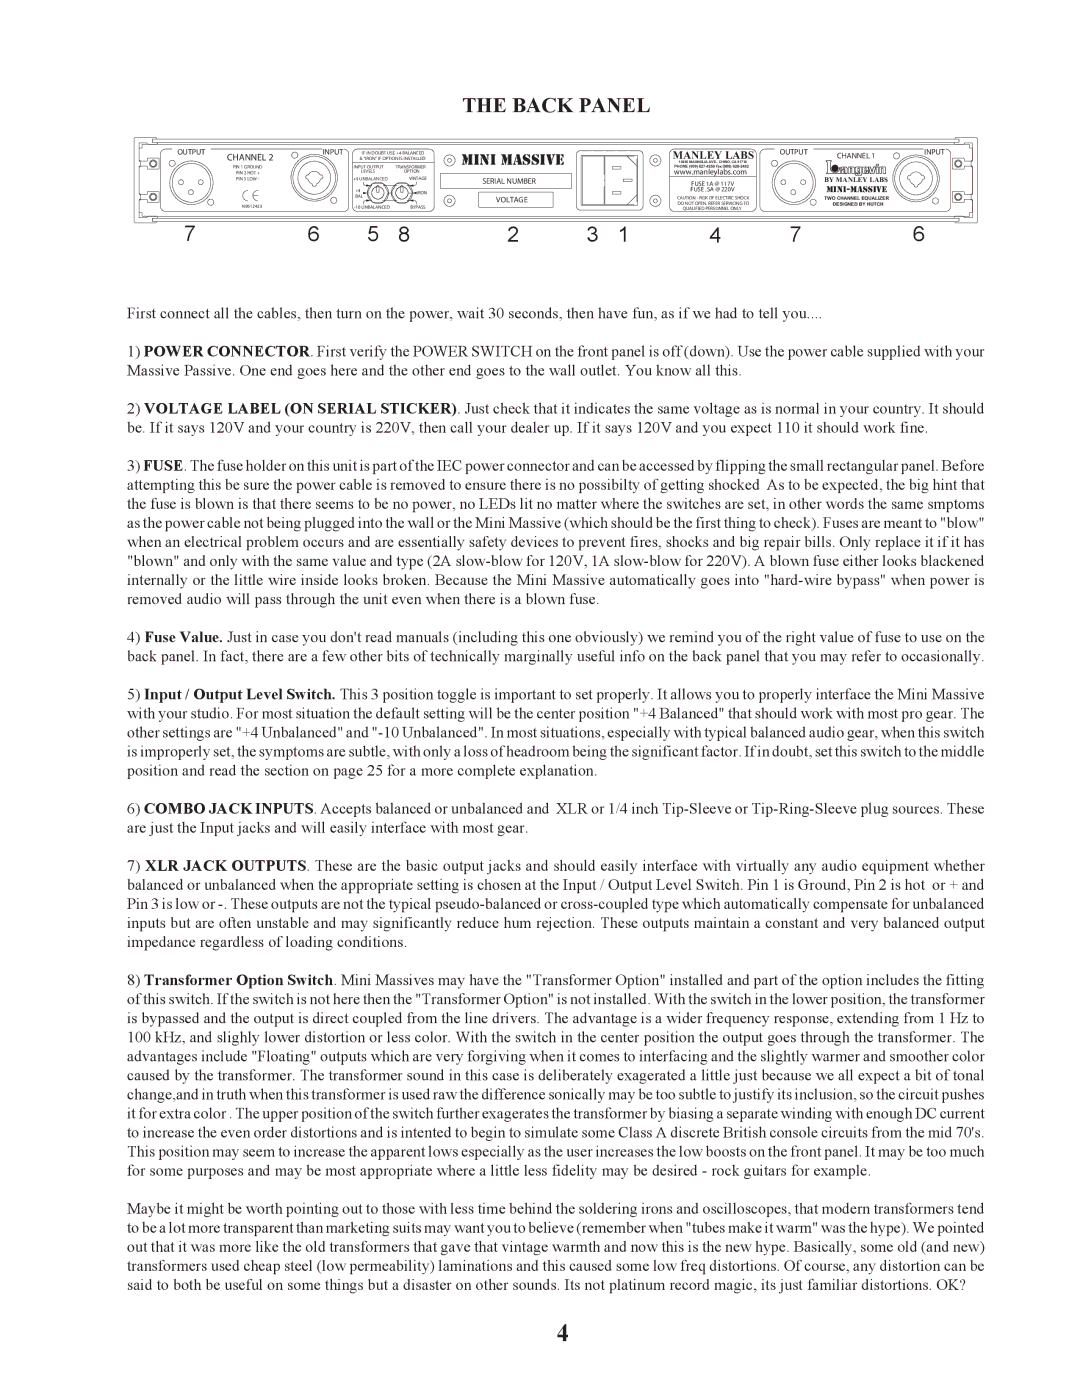
1)POWER CONNECTOR. First verify the POWER SWITCH on the front panel is off (down). Use the power cable supplied with your Massive Passive. One end goes here and the other end goes to the wall outlet. You know all this.
2)VOLTAGE LABEL (ON SERIAL STICKER). Just check that it indicates the same voltage as is normal in your country. It should be. If it says 120V and your country is 220V, then call your dealer up. If it says 120V and you expect 110 it should work fine.
3)FUSE. The fuse holder on this unit is part of the IEC power connector and can be accessed by flipping the small rectangular panel. Before attempting this be sure the power cable is removed to ensure there is no possibilty of getting shocked As to be expected, the big hint that the fuse is blown is that there seems to be no power, no LEDs lit no matter where the switches are set, in other words the same smptoms as the power cable not being plugged into the wall or the Mini Massive (which should be the first thing to check). Fuses are meant to "blow" when an electrical problem occurs and are essentially safety devices to prevent fires, shocks and big repair bills. Only replace it if it has "blown" and only with the same value and type (2A
4)Fuse Value. Just in case you don't read manuals (including this one obviously) we remind you of the right value of fuse to use on the back panel. In fact, there are a few other bits of technically marginally useful info on the back panel that you may refer to occasionally.
5)Input / Output Level Switch. This 3 position toggle is important to set properly. It allows you to properly interface the Mini Massive with your studio. For most situation the default setting will be the center position "+4 Balanced" that should work with most pro gear. The other settings are "+4 Unbalanced" and
6)COMBO JACK INPUTS. Accepts balanced or unbalanced and XLR or 1/4 inch
7)XLR JACK OUTPUTS. These are the basic output jacks and should easily interface with virtually any audio equipment whether balanced or unbalanced when the appropriate setting is chosen at the Input / Output Level Switch. Pin 1 is Ground, Pin 2 is hot or + and Pin 3 is low or
8)Transformer Option Switch. Mini Massives may have the "Transformer Option" installed and part of the option includes the fitting of this switch. If the switch is not here then the "Transformer Option" is not installed. With the switch in the lower position, the transformer is bypassed and the output is direct coupled from the line drivers. The advantage is a wider frequency response, extending from 1 Hz to 100 kHz, and slighly lower distortion or less color. With the switch in the center position the output goes through the transformer. The advantages include "Floating" outputs which are very forgiving when it comes to interfacing and the slightly warmer and smoother color caused by the transformer. The transformer sound in this case is deliberately exagerated a little just because we all expect a bit of tonal change,and in truth when this transformer is used raw the difference sonically may be too subtle to justify its inclusion, so the circuit pushes it for extra color . The upper position of the switch further exagerates the transformer by biasing a separate winding with enough DC current to increase the even order distortions and is intented to begin to simulate some Class A discrete British console circuits from the mid 70's. This position may seem to increase the apparent lows especially as the user increases the low boosts on the front panel. It may be too much for some purposes and may be most appropriate where a little less fidelity may be desired - rock guitars for example.
Maybe it might be worth pointing out to those with less time behind the soldering irons and oscilloscopes, that modern transformers tend to be a lot more transparent than marketing suits may want you to believe (remember when "tubes make it warm" was the hype). We pointed out that it was more like the old transformers that gave that vintage warmth and now this is the new hype. Basically, some old (and new) transformers used cheap steel (low permeability) laminations and this caused some low freq distortions. Of course, any distortion can be said to both be useful on some things but a disaster on other sounds. Its not platinum record magic, its just familiar distortions. OK?
4
