ENGLISH

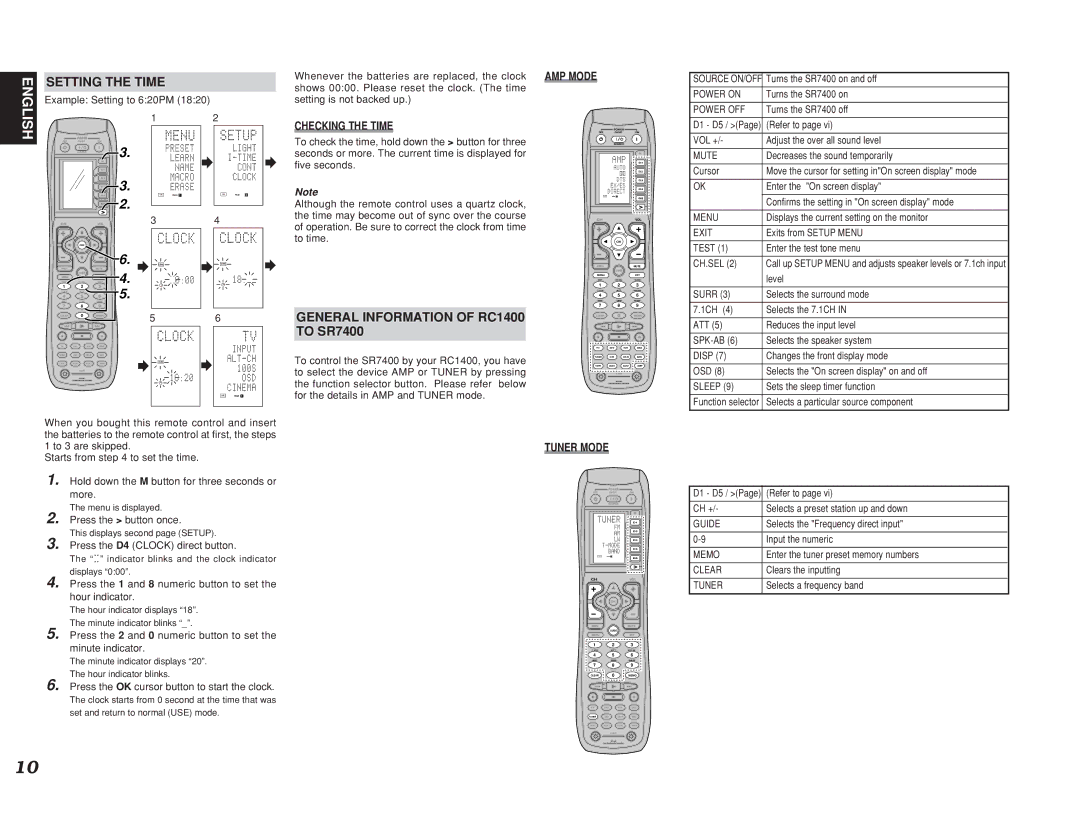
SETTING THE TIME

Example: Setting to 6:20PM (18:20)

12

Whenever the batteries are replaced, the clock shows 00:00. Please reset the clock. (The time setting is not backed up.)

CHECKING THE TIME

AMP MODE

POWER

OFFON/OFF

ON

SOURCE ON/OFF Turns the SR7400 on and off

POWER ON

Turns the SR7400 on


POWER OFF

Turns the SR7400 off


D1 - D5 / >(Page)

(Refer to page vi)

POWER

OFF

ON/OFF

ON


SOURCE


M


D1


D2


D3


D4


D5

CH


VOL

3.

3.

USE

PAGE 1

2.

3

USE

PAGE 1 2

4

To check the time, hold down the > button for three seconds or more. The current time is displayed for five seconds.

Note

Although the remote control uses a quartz clock, the time may become out of sync over the course of operation. Be sure to correct the clock from time to time.

SOURCE

1 2 3 4

CH

M

D11

D2

D3

D4

D5

VOL

VOL +/-

Adjust the over all sound level

MUTE

Decreases the sound temporarily


Cursor

Move the cursor for setting in"On screen display" mode


OK

Enter the "On screen display"


Confirms the setting in "On screen display" mode


MENU

Displays the current setting on the monitor


EXIT

Exits from SETUP MENU


OK


PREV


MUTE


GUIDE


MENU


EXIT

TEST


CH.SEL

SURR

1


2

3

7.1CH


ATT

SPK-AB

4


5

6

DISP


OSD

SLEEP

7


8

9

CLEAR


0

MEMO

TV

DVD

VCR

DSS

TUNER

CD

CD-R

MD

TAPE

AUX1

AUX2

AMP

LIGHT

12

RC1400

Learning Remote Controller

6.

LEARN

4.

5.

5

LEARN

LEARN

6

GENERAL INFORMATION OF RC1400

TO SR7400

To control the SR7400 by your RC1400, you have to select the device AMP or TUNER by pressing the function selector button. Please refer below

OK

PREV


MUTE


GUIDE


MENU


EXIT

TEST


CH.SEL

SURR

1


2

3

7.1CH


ATT

SPK-AB

4


5

6

DISP


OSD

SLEEP

7


8

9

CLEAR


0

MEMO

TV

DVD

VCR

DSS

TUNER

CD

CD-R

MD

TAPE

AUX1

AUX2

AMP


LIGHT


1


2


RC1400


Learning Remote Controller


TEST (1)

Enter the test tone menu

CH.SEL (2)

Call up SETUP MENU and adjusts speaker levels or 7.1ch input


level


SURR (3)

Selects the surround mode


7.1CH (4)

Selects the 7.1CH IN


ATT (5)

Reduces the input level


SPK-AB (6)

Selects the speaker system


DISP (7)

Changes the front display mode


OSD (8)

Selects the "On screen display" on and off


SLEEP (9)

Sets the sleep timer function

USE

PAGE 1 2

When you bought this remote control and insert the batteries to the remote control at first, the steps 1 to 3 are skipped.

Starts from step 4 to set the time.

1. Hold down the M button for three seconds or

for the details in AMP and TUNER mode.

TUNER MODE

Function selector Selects a particular source component

more.

The menu is displayed.

2. Press the > button once.

This displays second page (SETUP).

3. Press the D4 (CLOCK) direct button.

The “ ” indicator blinks and the clock indicator displays “0:00”.

4. Press the 1 and 8 numeric button to set the

POWER

OFFON/OFF

SOURCE

1

CH

ON

M

D11

D2

D3

D4

D5

VOL

D1 - D5 / >(Page) (Refer to page vi)

CH +/-

Selects a preset station up and down

GUIDE

Selects the "Frequency direct input"


0-9

Input the numeric


MEMO

Enter the tuner preset memory numbers


CLEAR

Clears the inputting


TUNER

Selects a frequency band

hour indicator.

The hour indicator displays “18”.

The minute indicator blinks “_”.

5. Press the 2 and 0 numeric button to set the minute indicator.

The minute indicator displays “20”.

The hour indicator blinks.

6. Press the OK cursor button to start the clock.

The clock starts from 0 second at the time that was set and return to normal (USE) mode.

OK

PREV


MUTE


GUIDE


MENU


EXIT

TEST


CH.SEL

SURR

1


2

3

7.1CH


ATT

SPK-AB

4


5

6

DISP


OSD

SLEEP

7


8

9

CLEAR


0

MEMO

TV

DVD

VCR

DSS

TUNER

CD

CD-R

MD

TAPE

AUX1

AUX2

AMP

LIGHT

12

RC1400

Learning Remote Controller

10

Page 13
Image 13
Marantz SR7400 manual Setting the Time, General Information of RC1400

SR7400 specifications

The Marantz SR7400 is a distinguished audio receiver designed to provide an excellent home theater experience. Launched in the early 2000s, the SR7400 has maintained its reputation as a premium choice for audiophiles and home cinema enthusiasts due to its robust build and extensive feature set.

One of the main highlights of the SR7400 is its 7.1-channel amplification, capable of delivering a powerful and engaging sound experience. Rated at 90 watts per channel, it ensures ample output for most home environments, making it suitable for both movies and music alike. The receiver supports a variety of surround sound formats, including Dolby Digital, DTS, and Pro Logic II, enabling users to enjoy dynamic audio from their favorite media.

The SR7400 is equipped with advanced circuitry, including Marantz's proprietary HDAM (Hyper Dynamic Amplification Module) technology. This innovation enhances audio performance by minimizing distortion and improving signal clarity. The design emphasizes a high current capability, providing a lively and detailed sound stage, essential for engrossing home theater experiences.

Another significant feature is the SR7400's multi-room capability, allowing different audio sources to be played in separate zones of the house. This flexibility makes it ideal for larger homes where the desire for sound in multiple rooms is a common preference.

In terms of connectivity, the receiver boasts a comprehensive array of inputs and outputs, including multiple HDMI inputs, digital coaxial and optical connections, as well as traditional analog inputs. This versatility allows for seamless integration with various audio and video components, such as DVD players, gaming consoles, and streaming devices.

Additionally, the SR7400 supports the Audyssey MultEQ, an automatic calibration system that optimizes the audio settings based on the room's acoustics. This feature ensures that listeners experience balanced sound regardless of their positioning within the space.

In conclusion, the Marantz SR7400 combines cutting-edge technology with user-friendly features, making it a remarkable choice for anyone looking to enhance their home audio experience. With its powerful amplification, advanced audio processing capabilities, and versatile connectivity options, it remains a sought-after receiver for a truly immersive sound experience.