JUNCTION BOX

JUNCTION

BOX END

CAP

SCREW

HEATER

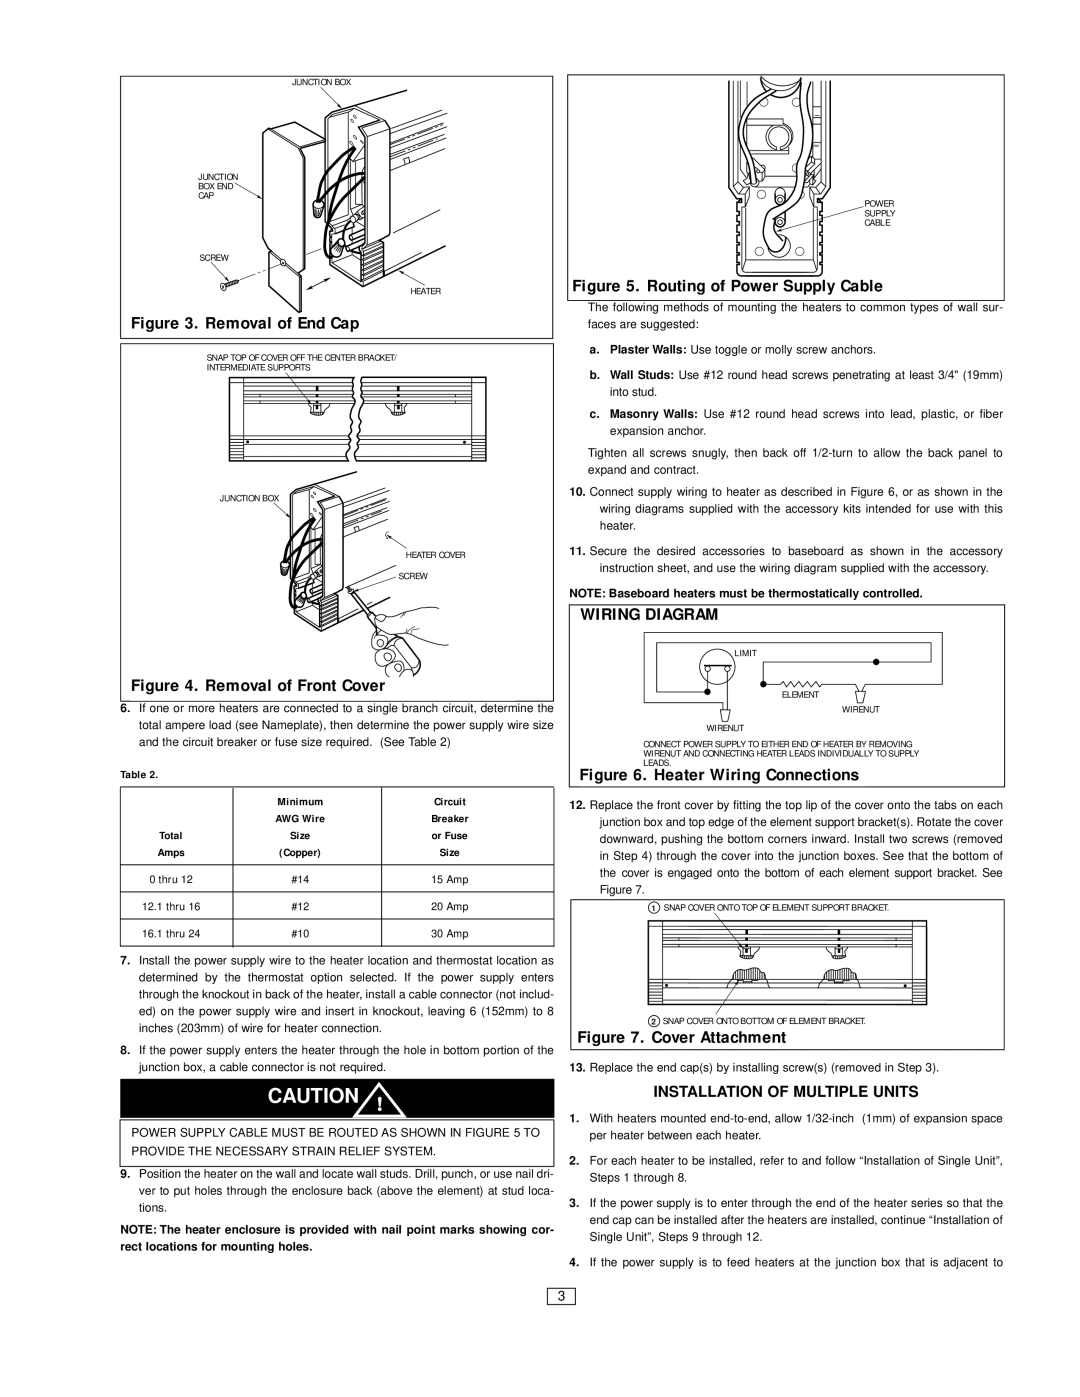
Figure 3. Removal of End Cap

SNAP TOP OF COVER OFF THE CENTER BRACKET/

INTERMEDIATE SUPPORTS

JUNCTION BOX

HEATER COVER

SCREW

Figure 4. Removal of Front Cover

6.If one or more heaters are connected to a single branch circuit, determine the total ampere load (see Nameplate), then determine the power supply wire size and the circuit breaker or fuse size required. (See Table 2)

Table 2.


Minimum

Circuit


AWG Wire

Breaker

Total

Size

or Fuse

Amps

(Copper)

Size


0 thru 12

#14

15 Amp


12.1 thru 16

#12

20 Amp


16.1 thru 24

#10

30 Amp


7.Install the power supply wire to the heater location and thermostat location as determined by the thermostat option selected. If the power supply enters through the knockout in back of the heater, install a cable connector (not includ- ed) on the power supply wire and insert in knockout, leaving 6 (152mm) to 8 inches (203mm) of wire for heater connection.

8.If the power supply enters the heater through the hole in bottom portion of the junction box, a cable connector is not required.

POWER

SUPPLY

CABLE

Figure 5. Routing of Power Supply Cable

The following methods of mounting the heaters to common types of wall sur- faces are suggested:

a.Plaster Walls: Use toggle or molly screw anchors.

b.Wall Studs: Use #12 round head screws penetrating at least 3/4" (19mm) into stud.

c.Masonry Walls: Use #12 round head screws into lead, plastic, or fiber expansion anchor.

Tighten all screws snugly, then back off 1/2-turn to allow the back panel to expand and contract.

10.Connect supply wiring to heater as described in Figure 6, or as shown in the wiring diagrams supplied with the accessory kits intended for use with this heater.

11.Secure the desired accessories to baseboard as shown in the accessory instruction sheet, and use the wiring diagram supplied with the accessory.

NOTE: Baseboard heaters must be thermostatically controlled.

WIRING DIAGRAM

LIMIT

ELEMENT

WIRENUT

WIRENUT

CONNECT POWER SUPPLY TO EITHER END OF HEATER BY REMOVING WIRENUT AND CONNECTING HEATER LEADS INDIVIDUALLY TO SUPPLY LEADS.

Figure 6. Heater Wiring Connections

12.Replace the front cover by fitting the top lip of the cover onto the tabs on each junction box and top edge of the element support bracket(s). Rotate the cover downward, pushing the bottom corners inward. Install two screws (removed

in Step 4) through the cover into the junction boxes. See that the bottom of

the cover is engaged onto the bottom of each element support bracket. See Figure 7.

1SNAP COVER ONTO TOP OF ELEMENT SUPPORT BRACKET.

2SNAP COVER ONTO BOTTOM OF ELEMENT BRACKET.

Figure 7. Cover Attachment

13.Replace the end cap(s) by installing screw(s) (removed in Step 3).

CAUTION !

POWER SUPPLY CABLE MUST BE ROUTED AS SHOWN IN FIGURE 5 TO

PROVIDE THE NECESSARY STRAIN RELIEF SYSTEM.

9.Position the heater on the wall and locate wall studs. Drill, punch, or use nail dri- ver to put holes through the enclosure back (above the element) at stud loca- tions.

NOTE: The heater enclosure is provided with nail point marks showing cor- rect locations for mounting holes.

INSTALLATION OF MULTIPLE UNITS

1.With heaters mounted end-to-end, allow 1/32-inch (1mm) of expansion space per heater between each heater.

2.For each heater to be installed, refer to and follow “Installation of Single Unit”, Steps 1 through 8.

3.If the power supply is to enter through the end of the heater series so that the end cap can be installed after the heaters are installed, continue “Installation of Single Unit”, Steps 9 through 12.

4.If the power supply is to feed heaters at the junction box that is adjacent to

3

Page 3
Image 3
Marley Engineered Products D instruction sheet Installation of Multiple Units, Minimum Circuit

D specifications

Marley Engineered Products D is a leading provider of advanced HVAC solutions, offering a range of products designed to improve indoor air quality and enhance energy efficiency. With a focus on innovative technologies and sustainable practices, Marley has established itself as a trusted name in the heating and cooling industry.

One of the standout features of Marley Engineered Products D is its commitment to energy efficiency. The company utilizes state-of-the-art technologies to ensure that its systems operate at optimal levels while minimizing energy consumption. This includes the use of variable speed motors and smart controls that adjust system operation based on real-time conditions. By implementing these technologies, Marley systems not only reduce energy costs for users but also contribute to the overall reduction of greenhouse gas emissions.

Another key characteristic of Marley Engineered Products D is its emphasis on reliability and durability. The products are engineered to withstand the demands of various environments, making them suitable for a wide range of applications, from residential to commercial settings. High-quality materials and rigorous testing processes ensure that the systems can perform effectively under challenging conditions, providing peace of mind to end-users.

Marley also places a strong focus on user-centric design, providing intuitive interfaces that make it easy for users to operate and manage their HVAC systems. This includes smart thermostat compatibility and mobile app integration, allowing users to control their systems remotely and receive real-time alerts for maintenance needs. Such features enhance user experience and promote proactive maintenance, further extending the lifespan of the equipment.

In addition to performance and efficiency, Marley Engineered Products D prioritizes indoor air quality. The company offers advanced filtration options that effectively capture allergens, dust, and other contaminants, ensuring that the air circulated within a space is clean and healthy. This is especially vital in today's climate, where air quality has become a significant concern for homeowners and businesses alike.

Overall, Marley Engineered Products D represents a blend of innovation, efficiency, and reliability. With its commitment to sustainable practices, user-friendly designs, and superior performance, Marley continues to lead the way in the HVAC industry, making it a preferred choice for those looking to enhance their indoor climate while reducing their environmental impact. As the demand for energy-efficient and effective heating and cooling solutions grows, Marley stands ready to meet the challenge with cutting-edge products that address the needs of modern consumers.