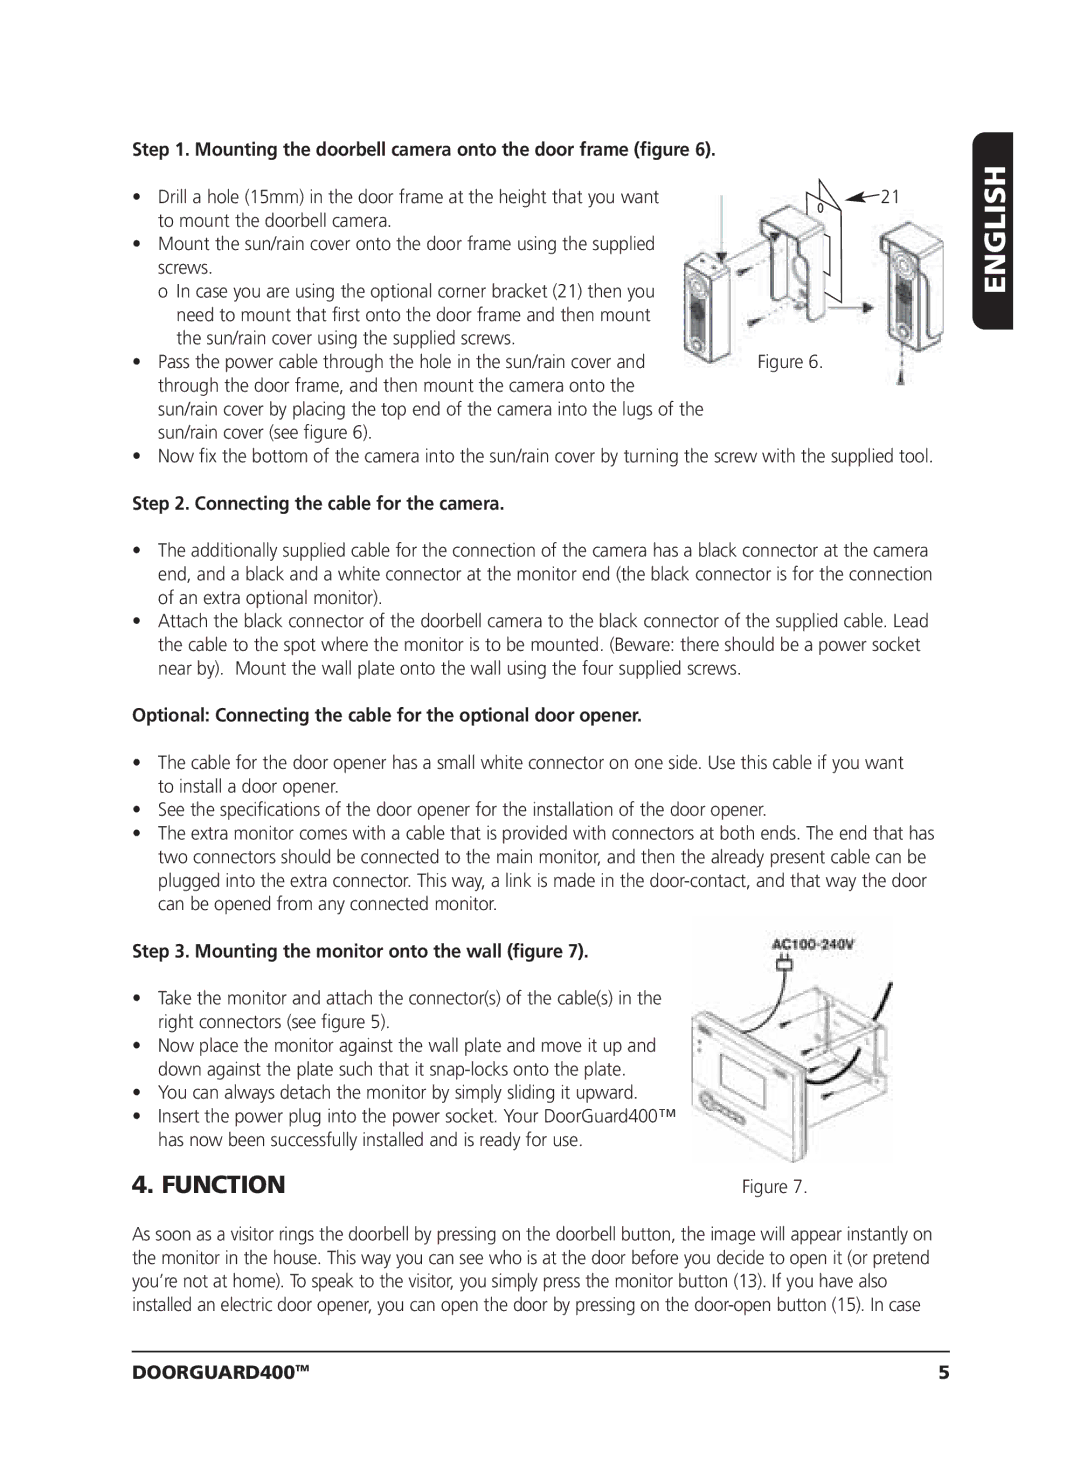
Step 1. Mounting the doorbell camera onto the door frame (figure 6).


• Drill a hole (15mm) in the door frame at the height that you want

21

to mount the doorbell camera.


• Mount the sun/rain cover onto the door frame using the supplied


screws.


o In case you are using the optional corner bracket (21) then you


need to mount that first onto the door frame and then mount


the sun/rain cover using the supplied screws.


• Pass the power cable through the hole in the sun/rain cover and

Figure 6.

through the door frame, and then mount the camera onto the


sun/rain cover by placing the top end of the camera into the lugs of the


sun/rain cover (see figure 6).


• Now fix the bottom of the camera into the sun/rain cover by turning the screw with the supplied tool.

Step 2. Connecting the cable for the camera.

The additionally supplied cable for the connection of the camera has a black connector at the camera end, and a black and a white connector at the monitor end (the black connector is for the connection of an extra optional monitor).

Attach the black connector of the doorbell camera to the black connector of the supplied cable. Lead the cable to the spot where the monitor is to be mounted. (Beware: there should be a power socket near by). Mount the wall plate onto the wall using the four supplied screws.

Optional: Connecting the cable for the optional door opener.

The cable for the door opener has a small white connector on one side. Use this cable if you want to install a door opener.

See the specifications of the door opener for the installation of the door opener.

The extra monitor comes with a cable that is provided with connectors at both ends. The end that has two connectors should be connected to the main monitor, and then the already present cable can be plugged into the extra connector. This way, a link is made in the door-contact, and that way the door can be opened from any connected monitor.

Step 3. Mounting the monitor onto the wall (figure 7).

Take the monitor and attach the connector(s) of the cable(s) in the right connectors (see figure 5).

Now place the monitor against the wall plate and move it up and down against the plate such that it snap-locks onto the plate.

You can always detach the monitor by simply sliding it upward.

Insert the power plug into the power socket. Your DoorGuard400™ has now been successfully installed and is ready for use.

4. FUNCTION

Figure 7.

As soon as a visitor rings the doorbell by pressing on the doorbell button, the image will appear instantly on the monitor in the house. This way you can see who is at the door before you decide to open it (or pretend you’re not at home). To speak to the visitor, you simply press the monitor button (13). If you have also installed an electric door opener, you can open the door by pressing on the door-open button (15). In case

ENGLISH

DOORGUARD400TM

5

Page 5
Image 5
Marmitek VIDEO DOORPHONE Function, Connecting the cable for the camera, Mounting the monitor onto the wall figure

VIDEO DOORPHONE specifications

The Marmitek VIDEO DOORPHONE is an advanced home communication and security solution designed to enhance the convenience and safety of everyday life. This innovative device allows homeowners to see and interact with visitors at their door from the comfort of their home, ensuring peace of mind and improved home management.

One of the standout features of the Marmitek VIDEO DOORPHONE is its high-resolution video display. The crystal-clear screen provides users with a detailed view of who is at the door, allowing for accurate identification of visitors. Additionally, the doorphone is equipped with a wide-angle camera, offering a larger field of vision, which minimizes blind spots and ensures comprehensive coverage of the entry area.

The unit also includes two-way audio communication, enabling real-time conversations between the homeowner and visitors. This feature is essential for verifying the identity of guests or delivery personnel without needing to open the door. The audio quality is optimized to ensure clarity, making conversations seamless and effortless.

Equipped with infrared night vision capabilities, the Marmitek VIDEO DOORPHONE ensures reliable performance in low-light conditions. This feature adds an extra layer of security by enabling homeowners to see visitors clearly, even during the night, thereby maintaining peace of mind around the clock.

Moreover, the device supports advanced connectivity options. It can be easily integrated with home automation systems, offering compatibility with various smart home technologies. This allows users to control and monitor their doorphone remotely from their smartphones or tablets, providing convenience and enhancing security features.

The Marmitek VIDEO DOORPHONE also includes customizable features, such as adjustable ringtones and volume settings, tailoring the experience to individual preferences. The installation process is user-friendly, designed for both DIY enthusiasts and professional installers, which ensures a hassle-free setup.

In terms of durability, the materials used in the construction of the video doorphone are weather-resistant, providing full protection against outdoor elements. This durability makes the device suitable for various climates, ensuring that it remains functional and aesthetically pleasing over time.

Overall, the Marmitek VIDEO DOORPHONE combines cutting-edge technology with essential security features, making it an excellent choice for homeowners looking to enhance their property’s safety and convenience. With its user-friendly interface, high-definition video capabilities, and compatibility with smart home systems, it represents a modern solution for today’s security needs.