4 |
|
|
.reproductivo aparato el en daños otros |
|
|
y congénitos defectos de causante como California de estado el por reconocida química |
| |
sustancia una plomo, contenga producto este en utilizado material el que posible Es |
|
|
ADVERTENCIA |
|
|
.cesta la o calentador elemento el en cerdo de manteca o grasa derrita Nunca | • | |
.tiempo mismo al aceite de tipos diferentes mezcle | No | • |
.olla la de máximo llenado de línea la exceda | No | • |
.funcionamiento en está cuando calienta | Se | • |
.vuelque se que evitar para estable y nivelada superficie una en unidad la Coloque | • | |
.vacía olla la con calienta la se si graves daños | • | |
sufrir puede unidad La .olla la en aceite o agua colocar antes sin electrodoméstico el utilice | No | |
PRECAUCIÓN |
|
|
.pitido el emita | ||
temporizador el cuando APAGARÁ SE NO elemento El .calentador elemento al conectado está NO TEMPORIZADOR EL | ||
.indicada temperatura la mantener para apagará se y encenderá | ||
se indicadora luz La .deseada temperatura la alcance unidad la cuando (verde) ENCENDERÁ se INDICADORA LUZ LA | ||
.tomacorriente | ||
el en enchufado está alimentación de cable el que indicar para iluminará se (naranja) ENCENDIDO DE LUZ LA | ||
.temperatura la constante mantendrá y calentamiento de tiempo el reducirá | ||
Esto .cocina y unidad la precalienta mientras CERRADA tapa la Mantenga .alimentos hervir o freír de antes cocción | ||
de temperatura la a completa unidad la precaliente óptimo, rendimiento un obtener Para .cocinar desea que alimentos | ||
los preparar para tiempo este Aproveche .minutos 35 aproximadamente tardará aceite el o agua el PRECALENTAR | ||
.casa su de eléctrico sistema el ni unidad la dañará se NO circuito de interruptor el dispara se Si .distinto circuito | ||
un en electrodoméstico otro cualquier opere suceda, esto que de riesgo el reducir Para .circuito de interruptor del disparo el | ||
provocar puede y potente muy elemento un es calentador elemento El .ensamblaje) de instrucciones las (consulte montaje | ||
de abrazadera la en ensamblado correctamente está cuando calienta sólo calentador elemento el SEGURIDAD, SU PARA | ||
.com.masterbuilt.www en freidora" Butterball "Conocer: Ver Nota: | ||
.gas de unidad una de la a distintas características presenta que y ELÉCTRICA es unidad esta que Recuerde .producto | ||
este utilizar de antes principiantes para consejos siguientes los LEA RESULTADOS, MEJORES LOS OBTENER PARA | ||
PRINCIPIANTES PARA CONSEJOS |
|
|
.6) .pág la en C .Fig la (consulte escurrir para gancho | ||
del montaje de orificio el en cesta la de escurrir para gancho el enganchando aceite de exceso el escurra se que Permita | ||
.tomacorriente del alimentación de cable | ||
el desenchufe y .MÍN posición la a perilla la gire lista, esté comida la y finalizado haya cocción de tiempo el que vez Una | ||
6 Paso | ||
.restablecerlo para presionarlo a vuelva y botón el Suelte .parpadean números |
|
|
los mientras temporizador del botón el presionado mantenga 0, en temporizador |
|
|
el restablecer Para .pitido un emitirá temporizador el tiempo, el finalizado |
|
|
vez Una .parpadearán números los regresiva, cuenta la Durante .minuto 1 de menos |
|
|
quede que hasta minutos, por únicamente regresivo conteo el realiza temporizador |
|
|
El .funcionar a comience temporizador el que para botón el suelte establecido, |
|
|
vez Una .deseado tiempo el establecer para temporizador del botón el Presione |
|
|
5 Paso |
|
|
.usar |
|
|
para lista está ya que indicará le y deseada temperatura la alcanzado haya unidad |
|
|
la cuando iluminará se indicadora luz La .temperatura la ajustar para perilla la Gire |
|
|
4 Paso |
|
|
.montaje de abrazadera la en correctamente |
|
|
montado está elemento el que y enchufada está unidad la que indicar para iluminará |
|
|
se encendido de luz La .importantes") seguridad de medidas y "Advertencias manual |
|
|
del sección la (consulte tomacorriente un en alimentación de cable el Enchufe .3) |
|
|
.pág la en 6 Paso la (consulte control de panel al alimentación de cable el Conecte |
|
|
3 Paso |
|
|
MAX llenado de línea la de inferior parte la hasta aceite de llene Siempre |
|
|
.aceite de l 7,57 aproximadamente requiere unidad la pavo, un freír para Nota: |
|
|
.7) .pág la (consulte l) 7,57 (aproximadamente |
|
|
.MÁX o l) (3,79 .MÍN llenado de línea la hasta agua o aceite Agregue |
|
|
2 Paso |
|
|
.3) .pág la en 3 Paso la (consulte exterior |
|
|
carcasa la de abrazadera la sobre elemento el y control de panel el Coloque |
|
|
1 Paso |
|
|
FUNCIONAMIENTO DE INSTRUCCIONES |
|
|
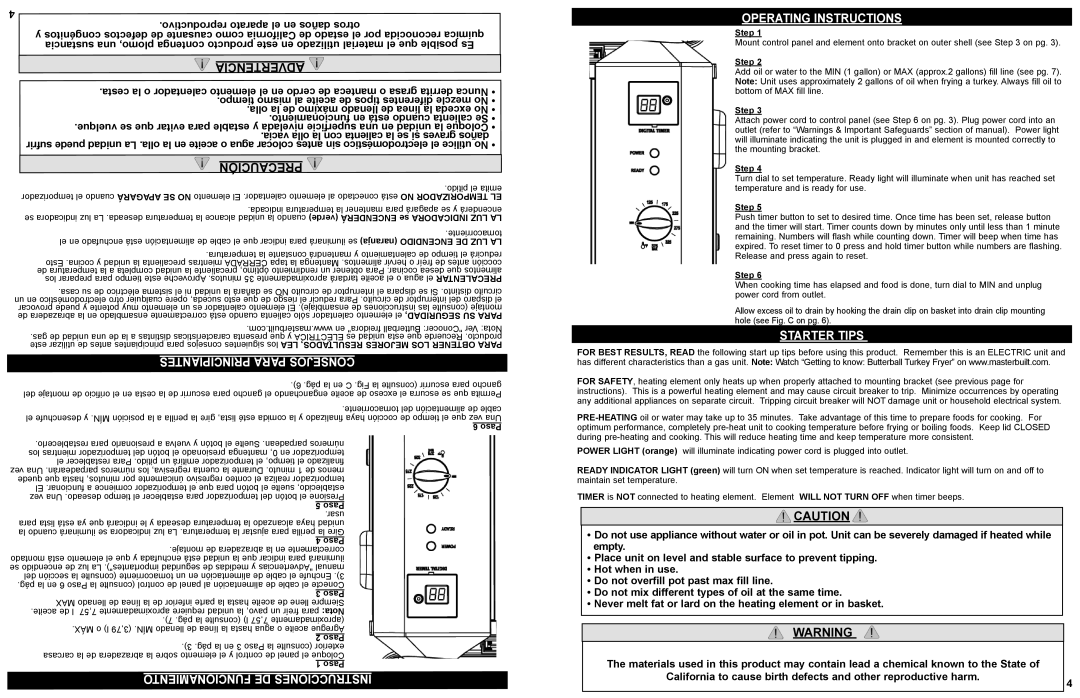
OPERATING INSTRUCTIONS
Step 1
Mount control panel and element onto bracket on outer shell (see Step 3 on pg. 3).
Step 2
Add oil or water to the MIN (1 gallon) or MAX (approx.2 gallons) fill line (see pg. 7). Note: Unit uses approximately 2 gallons of oil when frying a turkey. Always fill oil to bottom of MAX fill line.
Step 3
Attach power cord to control panel (see Step 6 on pg. 3). Plug power cord into an outlet (refer to “Warnings & Important Safeguards” section of manual). Power light will illuminate indicating the unit is plugged in and element is mounted correctly to the mounting bracket.
Step 4
Turn dial to set temperature. Ready light will illuminate when unit has reached set temperature and is ready for use.
Step 5
Push timer button to set to desired time. Once time has been set, release button and the timer will start. Timer counts down by minutes only until less than 1 minute remaining. Numbers will flash while counting down. Timer will beep when time has expired. To reset timer to 0 press and hold timer button while numbers are flashing. Release and press again to reset.
Step 6
When cooking time has elapsed and food is done, turn dial to MIN and unplug power cord from outlet.
Allow excess oil to drain by hooking the drain clip on basket into drain clip mounting hole (see Fig. C on pg. 6).
STARTER TIPS
FOR BEST RESULTS, READ the following start up tips before using this product. Remember this is an ELECTRIC unit and has different characteristics than a gas unit. Note: Watch “Getting to know: Butterball Turkey Fryer” on www.masterbuilt.com.
FOR SAFETY, heating element only heats up when properly attached to mounting bracket (see previous page for instructions). This is a powerful heating element and may cause circuit breaker to trip. Minimize occurrences by operating any additional appliances on separate circuit. Tripping circuit breaker will NOT damage unit or household electrical system.
POWER LIGHT (orange) will illuminate indicating power cord is plugged into outlet.
READY INDICATOR LIGHT (green) will turn ON when set temperature is reached. Indicator light will turn on and off to maintain set temperature.
TIMER is NOT connected to heating element. Element WILL NOT TURN OFF when timer beeps.
![]() CAUTION
CAUTION ![]()
•Do not use appliance without water or oil in pot. Unit can be severely damaged if heated while empty.
•Place unit on level and stable surface to prevent tipping.
•Hot when in use.
•Do not overfill pot past max fill line.
•Do not mix different types of oil at the same time.
•Never melt fat or lard on the heating element or in basket.
WARNING
The materials used in this product may contain lead a chemical known to the State of |
|
California to cause birth defects and other reproductive harm. | 4 |
|