Adjusting the Oven Temperature

3.After four seconds, the oven will start. , BROIL will remain lit.

4.For optimum browning, preheat broil element for 3-4 minutes before adding food.

5.Place food in the oven. Leave oven door open about four inches (the first stop).

6.Turn meat once about halfway through cooking.

7.When food is cooked, press the CANCEL /_A,,r._,"_ pad. Remove food and broiler pan from the

oven.

The time of day will reappear in the display.

Notes:

For best results when broiling, use a pan designed for broiling.

Expect broil times to increase and browning to be slightly lighter if appliance is installed on a 208-volt circuit.

HI is used for most broiling. Use LO broil when broiling longer cooking foods. The lower temperature allows food to cook to the well done stage without excessive browning.

To change oven temperature during broiling, press the Broil pad and then the More+ or Less- pad to switch between LO and HI broil.

Broil times may be longer when the lower broiling temperature is selected.

Most foods should be turned halfway through broiling time.

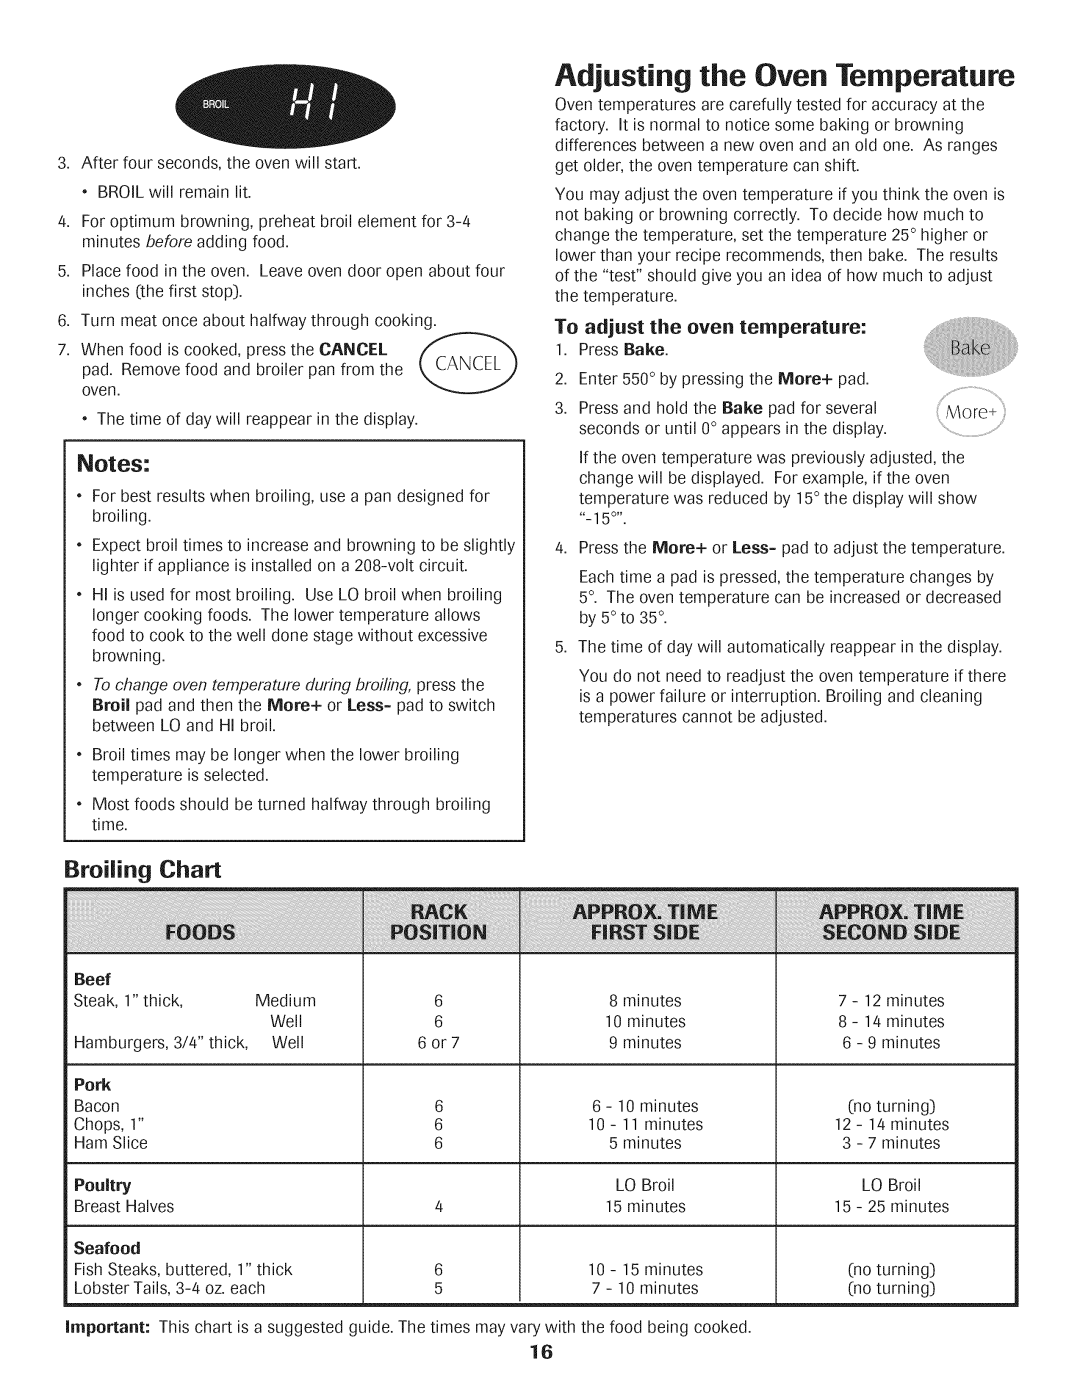
Broiling Chart

Oven temperatures are carefully tested for accuracy at the factory. It is normal to notice some baking or browning differences between a new oven and an old one. As ranges get older, the oven temperature can shift.

You may adjust the oven temperature if you think the oven is not baking or browning correctly. To decide how much to change the temperature, set the temperature 25° higher or lower than your recipe recommends, then bake. The results of the "test" should give you an idea of how much to adjust the temperature.

To adjust the oven temperature:

1.

Press Bake.


2.

Enter 550° by pressing the More+ pad.


3.

Press and hold the Bake pad for several

More+

seconds or until 0° appears in the display.

If the oven temperature was previously adjusted, the change will be displayed. For example, if the oven temperature was reduced by 15° the display will show ,,15 °''"

4.Press the More+ or Less= pad to adjust the temperature.

Each time a pad is pressed, the temperature changes by 5°. The oven temperature can be increased or decreased by 5°to 35°.

5.The time of day will automatically reappear in the display.

You do not need to readjust the oven temperature if there is a power failure or interruption. Broiling and cleaning temperatures cannot be adjusted.

Beef


Steak, 1" thick,

Medium

6

8 minutes

7-

12 minutes


Well

6

10 minutes

8-

14 minutes

Hamburgers, 3/4" thick,

Well

6or7

9 minutes

6 -

9 minutes

Pork


Bacon


6

6- 10 minutes

(no turning)

Chops, 1"


6

10 - 11 minutes

12 -

14 minutes

Ham Slice


6

5 minutes

3 -

7 minutes

Poultry


LO Broil


LO Broil

Breast Halves


15 minutes

15-

25 minutes

Seafood

Fish Steaks, buttered, 1" thick

6

10 - 15 minutes

Lobster Tails, 3-4 oz. each

5

7 - 10 minutes

Important: This chart is a suggested guide. The times may vary with the food being cooked. 16

(no turning) (no turning)

Page 17
Image 17
Maytag AGS1740BDQ, AGS1740BDW, 8113P592-60 Adjusting the Oven Temperature, Broiling Chart, To adjust the oven temperature

AGS1740BDQ, AGS1740BDW, 8113P592-60 specifications

The Maytag AGS1740BDQ and AGS1740BDW are two robust models in the Maytag line of gas ranges, known for their durability, performance, and user-friendly features. These ranges cater to both home chefs and casual cooks alike, offering an efficient cooking experience without compromising on style. A standout feature of these ranges is their powerful high-efficiency burners that provide precise temperature control. The range includes a high-heat burner for boiling and searing, along with lower heat options for simmering delicate sauces and dishes.

One of the key technologies integrated into these models is the precise digital controls, which allow users to easily set their desired cooking temperature. This ensures consistent results, whether baking a pizza or roasting vegetables. Additionally, the oven features a self-cleaning function that saves time and effort, utilizing high-heat to burn away food residues and spills, leaving the interior spotless and ready for your next cooking venture.

Both models come equipped with a spacious oven cavity, offering ample cooking space for large meals and special occasions. With innovative racks that can be adjusted to multiple positions, users can maximize their cooking capacity, fitting in heavy casseroles or tall roasts with ease.

The Maytag AGS1740BDQ and AGS1740BDW also prioritize safety and convenience. The delayed start feature allows users to set the oven to begin cooking at a predetermined time, perfect for busy households. A flame failure safety device ensures the gas supply is cut off should the flame go out, providing peace of mind during use.

Durability is a hallmark of Maytag appliances, and these gas ranges are no exception. Constructed with heavy-duty materials and equipped with sturdy, stainless steel control knobs, they are designed to withstand the rigors of everyday cooking.

The Maytag 8113P592-60 is a popular replacement part associated with these models, specifically designed to ensure seamless operation and compatibility. This igniter helps in reliably lighting the burners, maintaining consistent performance over time.

In summary, the Maytag AGS1740BDQ and AGS1740BDW gas ranges shine with their combination of powerful cooking options, advanced technology, and user-centric features, making them a reliable addition to any kitchen. With the trusted quality of Maytag and essential features that enhance the cooking experience, these ranges are an excellent investment for anyone looking to elevate their culinary endeavors.