Leak Testing
·Always perform a leak test before each use.
·Leak test must be performed in a well ventilated area.
·Never perform a leak test on a grill while in use or hot.
·If you detect a gas leak that cannot be corrected by using the leak test procedures below, do not use the LP gas grill.
·Never smoke or have an open flame near the grill during a leak test.
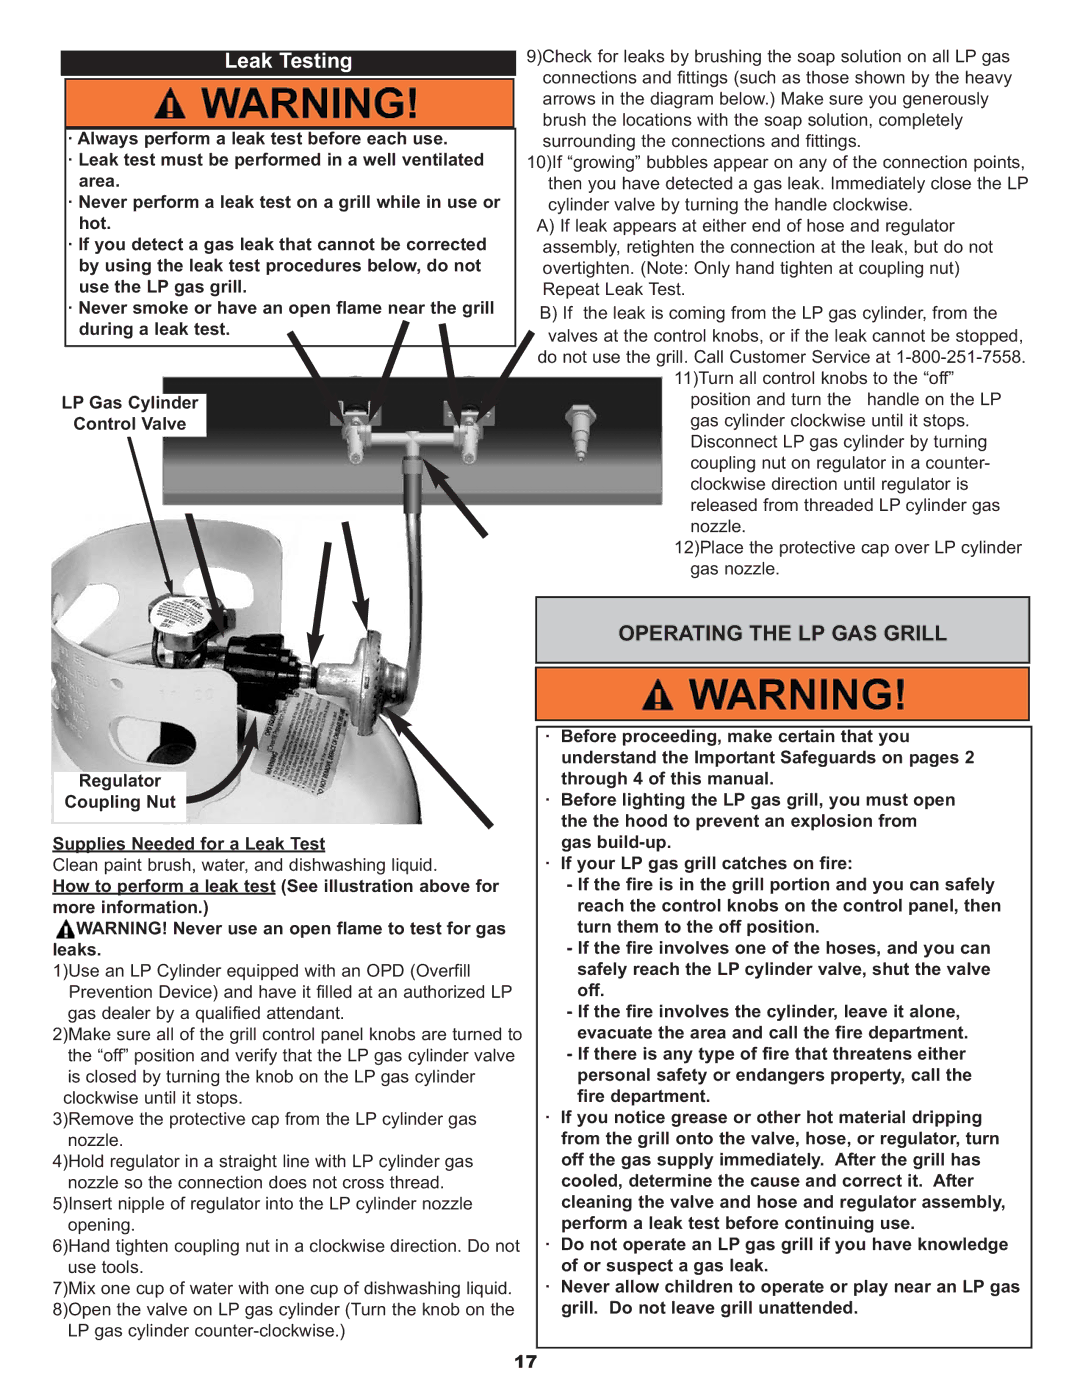
LP Gas Cylinder
Control Valve
9)Check for leaks by brushing the soap solution on all LP gas connections and fittings (such as those shown by the heavy arrows in the diagram below.) Make sure you generously brush the locations with the soap solution, completely surrounding the connections and fittings.
10)If “growing” bubbles appear on any of the connection points, then you have detected a gas leak. Immediately close the LP cylinder valve by turning the handle clockwise.
A)If leak appears at either end of hose and regulator assembly, retighten the connection at the leak, but do not overtighten. (Note: Only hand tighten at coupling nut) Repeat Leak Test.
B)If the leak is coming from the LP gas cylinder, from the valves at the control knobs, or if the leak cannot be stopped,
do not use the grill. Call Customer Service at
position and turn the handle on the LP gas cylinder clockwise until it stops. Disconnect LP gas cylinder by turning coupling nut on regulator in a counter- clockwise direction until regulator is released from threaded LP cylinder gas nozzle.
12)Place the protective cap over LP cylinder gas nozzle.
OPERATING THE LP GAS GRILL
Regulator
Coupling Nut
Supplies Needed for a Leak Test
Clean paint brush, water, and dishwashing liquid.
How to perform a leak test (See illustration above for more information.)
![]() WARNING! Never use an open flame to test for gas leaks.
WARNING! Never use an open flame to test for gas leaks.
1)Use an LP Cylinder equipped with an OPD (Overfill Prevention Device) and have it filled at an authorized LP gas dealer by a qualified attendant.
2)Make sure all of the grill control panel knobs are turned to the “off” position and verify that the LP gas cylinder valve is closed by turning the knob on the LP gas cylinder clockwise until it stops.
3)Remove the protective cap from the LP cylinder gas nozzle.
4)Hold regulator in a straight line with LP cylinder gas nozzle so the connection does not cross thread.
5)Insert nipple of regulator into the LP cylinder nozzle opening.
6)Hand tighten coupling nut in a clockwise direction. Do not use tools.
7)Mix one cup of water with one cup of dishwashing liquid. 8)Open the valve on LP gas cylinder (Turn the knob on the
LP gas cylinder
·Before proceeding, make certain that you understand the Important Safeguards on pages 2 through 4 of this manual.
·Before lighting the LP gas grill, you must open the the hood to prevent an explosion from gas
·If your LP gas grill catches on fire:
-If the fire is in the grill portion and you can safely reach the control knobs on the control panel, then turn them to the off position.
-If the fire involves one of the hoses, and you can safely reach the LP cylinder valve, shut the valve off.
-If the fire involves the cylinder, leave it alone, evacuate the area and call the fire department.
-If there is any type of fire that threatens either personal safety or endangers property, call the fire department.
·If you notice grease or other hot material dripping from the grill onto the valve, hose, or regulator, turn off the gas supply immediately. After the grill has cooled, determine the cause and correct it. After cleaning the valve and hose and regulator assembly, perform a leak test before continuing use.
·Do not operate an LP gas grill if you have knowledge of or suspect a gas leak.
·Never allow children to operate or play near an LP gas grill. Do not leave grill unattended.
17
