Page
Companion Guide
Page
Table of Contents
Picture It! Basics
Opening Photos in Picture It
Basic Touchup
Using Special Effects
Batch Editing and File Management
Adding Edges, Mats, and Frames
Sharing Photos
Creating Projects
Printing Photos
Index
Welcome to Microsoft Picture It
What’s New?
Other Helpful Resources
Welcome to Microsoft Picture It
Starting Setup
Installation
To begin automatic setup
To begin setup manually
Completing the Installation Wizard
Installation Folder Dialog Box
Installation Options Dialog Box
Special Circumstances
Reinstalling or Removing Picture It
Upgrading from a Different Picture It! Product
Other Picture It
Click Add or remove programs
To remove or reinstall Picture It! on Windows XP
Click Add/Remove Programs
Click Add/Remove
Opening photos from your digital camera
Making the Most of Your Camera
Photo Quality
About Digital Cameras
Resolution
Megapixel rating
Compression
File size and photo quality
File formats compatible with Picture It
File Formats
Memory Cards, Disks, and Sticks
Using Zoom Features
Best recharge- able batteries
Battery Life
Using the Flash
Upgrading your flash
Range of your flash
No Flash
Red-Eye Reduction Flash
Fixing red eye with Picture It
Fill Flash
Using Your Camera’s Manual Settings
Exposure
Understanding automatic exposure
Water glass analogy
Exposure Compensation
Aperture
Increasing your chances with bracketing
Shutterless cameras
Program modes
Shutter Speed
ASA versus ISO
ISO Setting or Equivalent
Avoid sharpening a photo with noise
Setting the White Balance
Using Automatic Modes on Your Camera
Setting the white balance manually
Correcting tint in Picture It
Macro Mode
When the lag is a drag
Action Mode
Microsoft Picture It! Companion Guide
Burst Mode
Relaxing your subject
Portrait Mode
Panoramic Mode
Getting Yourself into a Photo
Using the Self-Timer
Taking Long Exposure Shots
Creating a makeshift tripod
Know Your Gear
Ten Tips for Great Pictures
Nail the Exposure
Capture a Moment in the Story
Planning for the imperfect
Look for the Light
Microsoft Picture It! Companion Guide
Recomposing a photo with Picture It
Follow the Rule of Thirds
Find a Unique Perspective
Quick check with the LCD
Bracket
Analyze and Shoot Again
Show Your Photos to Other People
Shoot Every Single Day
Microsoft Picture It! Companion Guide
Using the File Browser
Opening Photos in Picture It
Opening photos from other cameras
Opening Photos in Picture It
About Twain
Opening Photos From a Digital Camera or Card Reader
WIA
To open the file browser
To open photos from a TWAIN- or WIA-compliant camera
Using your camera’s software
Click Download
Click Automatic Download Click Download
Scanning a Photo
Opening a Photo From Your Computer
To scan a photo with a flatbed scanner
Finding the correct drive letter
Opening a Photo From a Photo CD or Other Disk
To open a photo stored on your computer’s hard disk
To open a photo from a photo CD or other disk
Opening a Photo from a Web Page in Picture It
Opening a Photo Sent Through E-mail
To open a photo sent through e-mail in Picture It
Can this photo be printed?
Saving images from a Web site
Opening a Photo from MSN Photos
Signing up with Microsoft .NET Passport
To open a photo from a Web page in Picture It
To open a photo from MSN Photos
Using MSN Photos
Microsoft Picture It! Companion Guide
Startup Window
Picture It! Basics
Getting Help
Examining the Work Area
To expand or collapse the Common Tasks list
Common Tasks list
Workspace
Canvas
Menu bar
Toolbar
Pan control
Basic Image Formatting
Choosing a resolution
Changing picture size
To resize a picture
Manipulating Objects by Using Object Handles
Centering an object on the canvas
Selecting objects
To show or hide object handles
Resizing to fit
To move an object on the canvas
Moving an object on the canvas
To resize an object
To stretch an object
Stretching an object
To rotate an object
Setting snap rotation
To select multiple objects
Rotating an object
Grouping shortcut
To group objects
Grouping objects
Adding text to your project
Adding Text
To ungroup objects
To add text
Help Resources
Online Help
Getting Help from the keyboard
On the Help menu, click Microsoft Picture It! Help
To access online Help
Picture It! Tour
To use the table of contents
To use the index
To use the search function
Technical Support
Instructional Videos
To take the product tour
To watch an Instructional Video
Basic Touchup
Adjusting Brightness and Contrast
To correct brightness and contrast
Making a copy to touch up
Setting the white balance on a digital camera
Adjusting Tint
To adjust tint
Fixing Red Eye
Using the Airbrush
To fix red eye
Click Red-eye auto fix
To use the airbrush tool
Cropping
To crop a photo to a specific proportion
Sharpening Your Photos
On the Touchup menu, click Sharpen or Blur
To sharpen a photo
Using Special Effects
Creating Cutouts
Cutting a hole in a photo
Getting more Help with cutouts
To create a cutout
On the Format menu, click Create a Cutout
Filters
Waiting for filters to be applied
To apply a filter
Paint Effects
Color Effects
To turn a color photo to black and white or antique
Antique Black and white
To paint with stamps
To use the freehand paint brush
Microsoft Picture It! Companion Guide
Batch Editing with Mini Lab
Batch Editing and File Management
On the Touchup menu, click Multi-photo edit in Mini Lab
To open Mini Lab
File Management with the File Browser
Using the file browser
Batch rename
Batch move
To manage files with the file browser
Duplicate
Edge Effects
Adding Edges, Mats, and Frames
To add an edge effect
Shrinking a photo to show the edge effect
Choosing the right mat
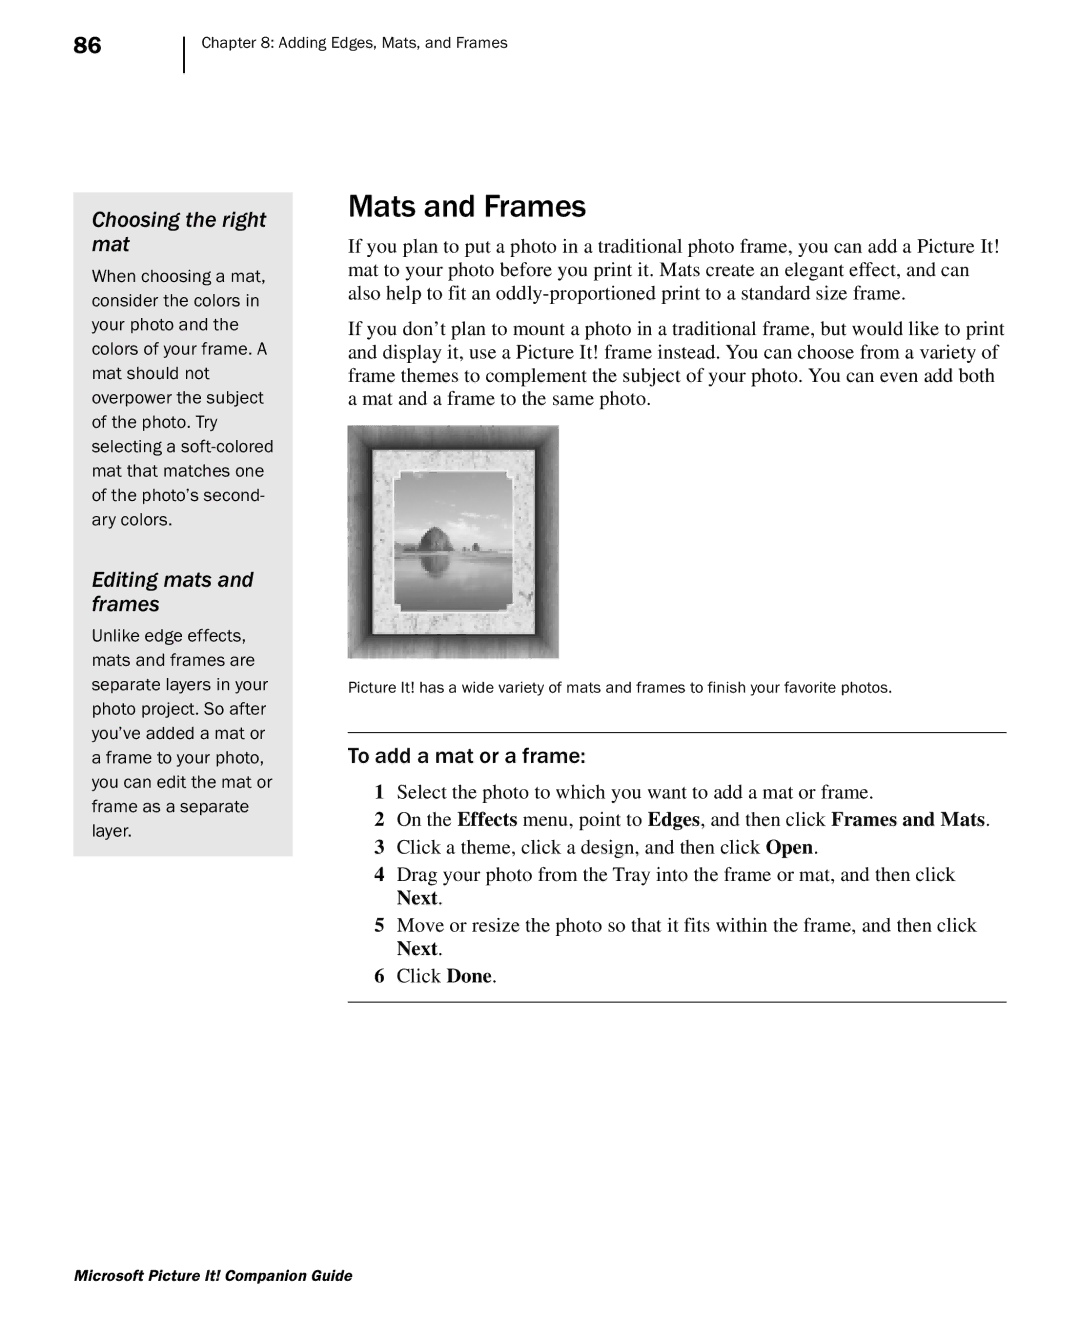
Mats and Frames
Editing mats and frames
To add a mat or a frame
Saving Multiple Versions
Saving Photos
To make a copy of a photo
Creating a folder for edited photos
Choosing a File Format
Saving for E-mail and the Web
To save a photo in a specific file format
Copying Photos to a Zip Disk
Long-term Storage on CD, Zip Disk, or DVD
To save a photo for e-mail or the Web
Avoid sending large photos in e-mail
Copying Photos to a CD
To copy photos to a Zip disk
Copying photos to a CD in Windows XP
Copying to a DVD burner
To copy photos to a CD in Windows XP
Saving To MSN Photos
Signing up with Microsoft .NET Passport Using MSN Photos
To save a photo to MSN Photos
Click Make New Folder
To add photos to the Gallery
Archiving Photos in the Gallery
To find and open a photo from the Gallery
Creating Photo Cards
Creating Projects
To open a photo card design
On the File menu, click Create a Project
Creating Calendars
To change the fold style of a card
On the Format menu, click Change Card Fold
To create a calendar project
To add photos to a 12-month calendar
On the File menu, click Create a Project Click Calendars
Microsoft Picture It! Companion Guide
Sending by E-mail
Sharing Photos
To send a photo by e-mail
Sending multiple copies
Sharing on MSN Photos
100
To share photos to MSN Photos
Printing Photos
Installing printer drivers
Printing a Photo
Printing multiple photos
102
Printing Labels or on Special Paper
Rotating photos for printing
To print multiple photos on the same
Printing Cards
103
To print a half-fold card
Selecting Print Quality
Determining a photo’s pixel dimensions
Selecting a Print Size
104
How large a print can you get?
To check a photo’s pixel dimensions
105
To select a print size and print
Choosing Photo Paper
Creating Long-lasting Prints
106
107
Printing from MSN Photos
To order prints and enlargements
To order photo gifts
108
109
Index
110
111
112
113
Page
Page
Page
Page
Page
Page
Page