Be sure the bit shank and chuck jaws are clean. Dirt particles may prevent the bit from lining up properly.
2.When using drill bits, insert the bit into the chuck. Center the bit in the chuck jaws and lift it about 1/16" off of the bottom. Tighten the chuck jaws by hand to align the bit (Fig. 5).
Fig. 5
When using screwdriver bits, insert the bit far enough for the chuck jaws to grip the bit shank. Tighten the chuck jaws by hand to align the bit.
3.To close the chuck jaws, hold the collar and turn the sleeve clockwise (Fig. 6). Tighten securely.
Fig. 6 | Collar |
To close
Sleeve
4.To remove the bit, hold the chuck collar and turn the sleeve counterclockwise to release the bit from the chuck jaws.
Single Sleeve Keyless Chuck (Fig. 7, 8, & 9)
These tools are equipped with a spindle- lock mechanism and a
1.To open the chuck jaws, turn the chuck sleeve counterclockwise (Fig. 7).
Fig. 7
Tighten
Loosen
Be sure the bit shank and chuck jaws are clean. Dirt particles may prevent the bit from lining up properly.
2.When using drill bits, insert the bit into the chuck. Center the bit in the chuck jaws and lift it about 1/16" off of the bottom. Tighten the chuck jaws by hand to align the bit (Fig. 8).
Fig. 8
When using screwdriver bits, insert the bit far enough for the chuck jaws to grip the bit shank. Tighten the chuck jaws by hand to align the bit.
3.To close the chuck jaws, turn the chuck sleeve clockwise (Fig. 9). Tighten se- curely. Several detents will be felt as the chuck sleeve is turned.
Fig. 9
To close
Sleeve
NOTE: If the spindle rotates when opening or closing the chuck jaws, grasp the chuck and slightly rotate back and forth to engage the
The spindle will remain locked until the tool is turned on. The
4.To remove the bit, turn the chuck sleeve counterclockwise to release the bit from the chuck jaws.
WARNING!
To reduce the risk of injury, always wear eye protection.
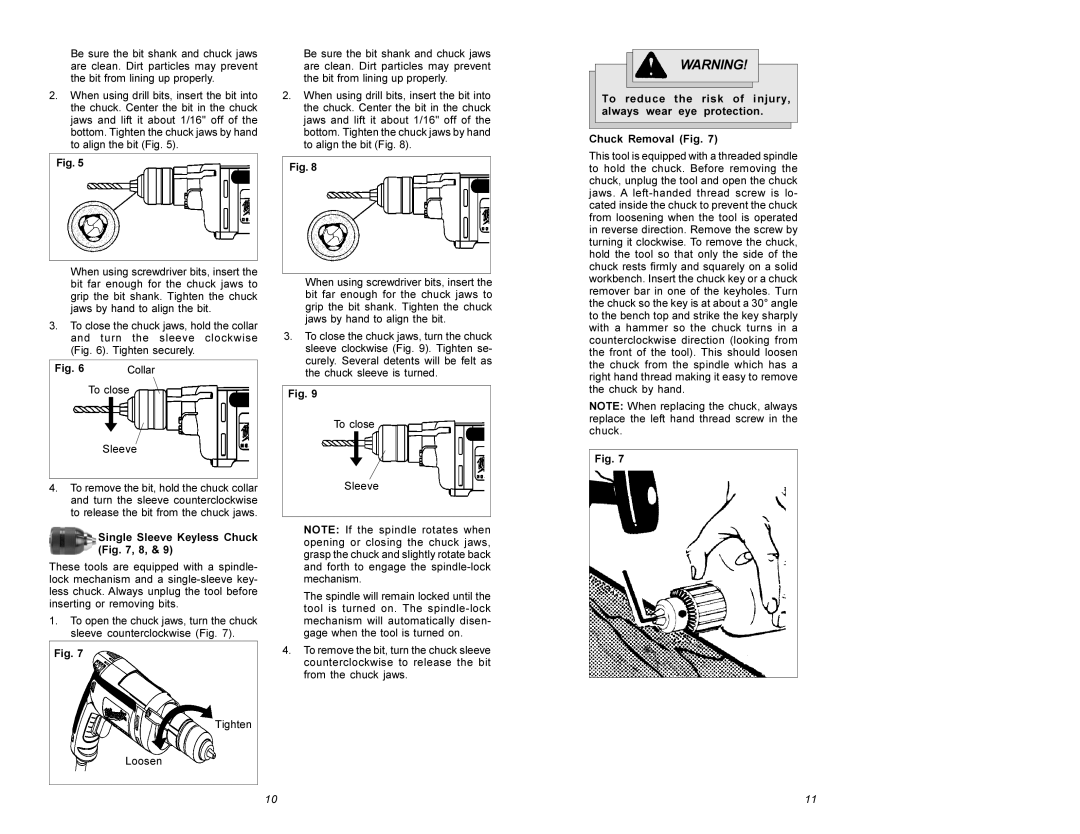
Chuck Removal (Fig. 7)
This tool is equipped with a threaded spindle to hold the chuck. Before removing the chuck, unplug the tool and open the chuck jaws. A
NOTE: When replacing the chuck, always replace the left hand thread screw in the chuck.
Fig. 7
10 | 11 |