OPERATION
APPLICATIONS
![]()
![]()
![]() WARNING!
WARNING!
To reduce the risk of injury, wear safety goggles or glasses with side shields. Unplug the tool before changing accessories or making adjustments.
Using Forward/Reverse Switch (Fig. 10)
Starting, Stopping and Controlling Speed
1.To start the tool, pull the trigger.
2.To stop the tool, release the trigger.
3.To vary the drilling speed, simply in- crease or decrease pressure on the trigger. The further the trigger is pulled, the greater the speed.
Locking Trigger (Fig. 11)
|
|
| Wood |
|
| Wood/Steel | Steel | |
|
|
|
|
|
|
|
|
|
Cat. No Load Flat Boring | Auger | Hole | Self- | Path- |
| Hole | ||
feed | finderTM | Twist | ||||||
No. | RPM | Bits | Bits | Saws | Bits | Bits | Bits | Saws |
|
|
|
|
|
|
|
| |
NR | NR | NR | NR | 1/4" | NR | |||
NR | NR | NR | NR | 1/4" | NR | |||
1" | NR | 1/2" | ||||||
- 2500 | 7/8" | NR | 1/2" | NR | ||||
- 1200 | 1" | NR | 1/2" | |||||
- 850 | 3/4" | 2" | ||||||
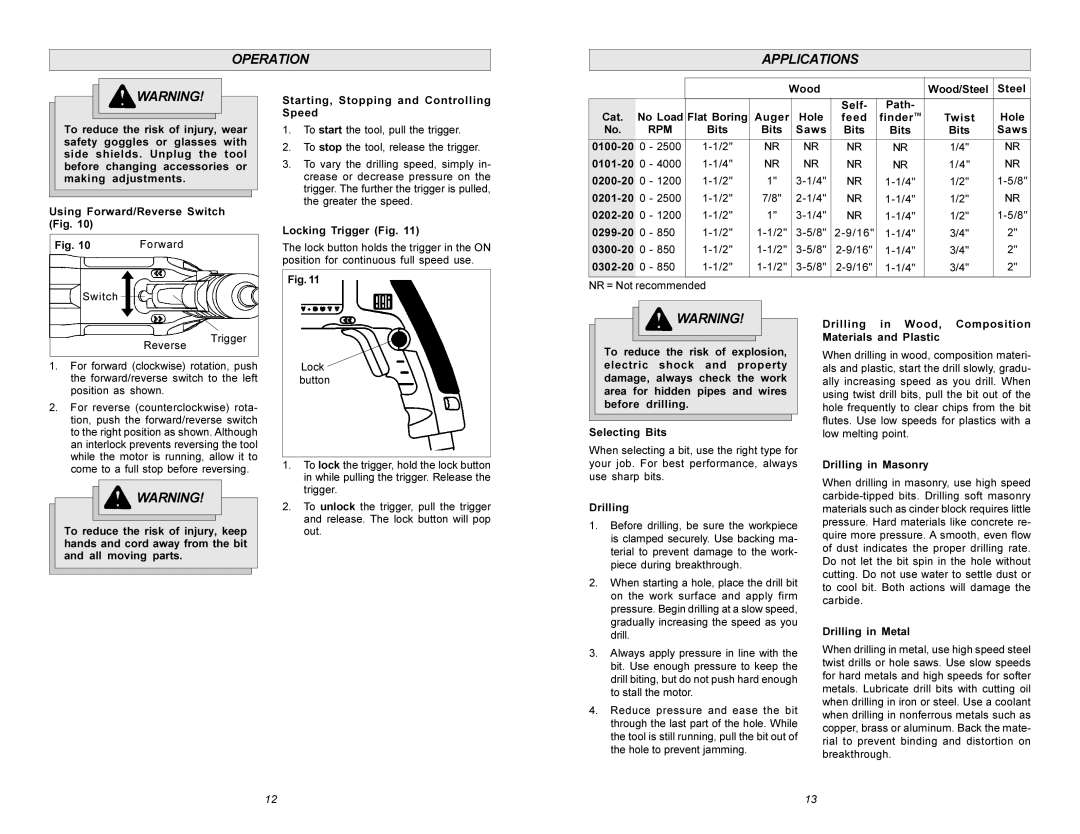
Fig. 10 | Forward |
Switch
The lock button holds the trigger in the ON position for continuous full speed use.
Fig. 11
- 850 | 3/4" | 2" | ||||||
- 850 | 3/4" | 2" |
NR = Not recommended
Reverse Trigger
1.For forward (clockwise) rotation, push the forward/reverse switch to the left position as shown.
2.For reverse (counterclockwise) rota- tion, push the forward/reverse switch to the right position as shown. Although an interlock prevents reversing the tool while the motor is running, allow it to come to a full stop before reversing.
![]()
![]()
![]() WARNING!
WARNING!
To reduce the risk of injury, keep hands and cord away from the bit and all moving parts.
Lock ![]() button
button
1.To lock the trigger, hold the lock button in while pulling the trigger. Release the trigger.
2.To unlock the trigger, pull the trigger and release. The lock button will pop out.
![]()
![]()
![]() WARNING!
WARNING!
To reduce the risk of explosion, electric shock and property damage, always check the work area for hidden pipes and wires before drilling.
Selecting Bits
When selecting a bit, use the right type for your job. For best performance, always use sharp bits.
Drilling
1.Before drilling, be sure the workpiece is clamped securely. Use backing ma- terial to prevent damage to the work- piece during breakthrough.
2.When starting a hole, place the drill bit on the work surface and apply firm pressure. Begin drilling at a slow speed, gradually increasing the speed as you drill.
3.Always apply pressure in line with the bit. Use enough pressure to keep the drill biting, but do not push hard enough to stall the motor.
4.Reduce pressure and ease the bit through the last part of the hole. While the tool is still running, pull the bit out of the hole to prevent jamming.
Drilling in Wood, Composition Materials and Plastic
When drilling in wood, composition materi- als and plastic, start the drill slowly, gradu- ally increasing speed as you drill. When using twist drill bits, pull the bit out of the hole frequently to clear chips from the bit flutes. Use low speeds for plastics with a low melting point.
Drilling in Masonry
When drilling in masonry, use high speed
Drilling in Metal
When drilling in metal, use high speed steel twist drills or hole saws. Use slow speeds for hard metals and high speeds for softer metals. Lubricate drill bits with cutting oil when drilling in iron or steel. Use a coolant when drilling in nonferrous metals such as copper, brass or aluminum. Back the mate- rial to prevent binding and distortion on breakthrough.
12
13