INSTALLING THE BATTERY
Your camera uses one
•If film is in the camera when the battery is replaced, install a new battery immediately after removing the old battery. If the battery is not replaced immediately, your camera may advance one frame and display - - in the frame counter for the remaining exposures. The frame counter will return to normal operation when a new film cassette is loaded.
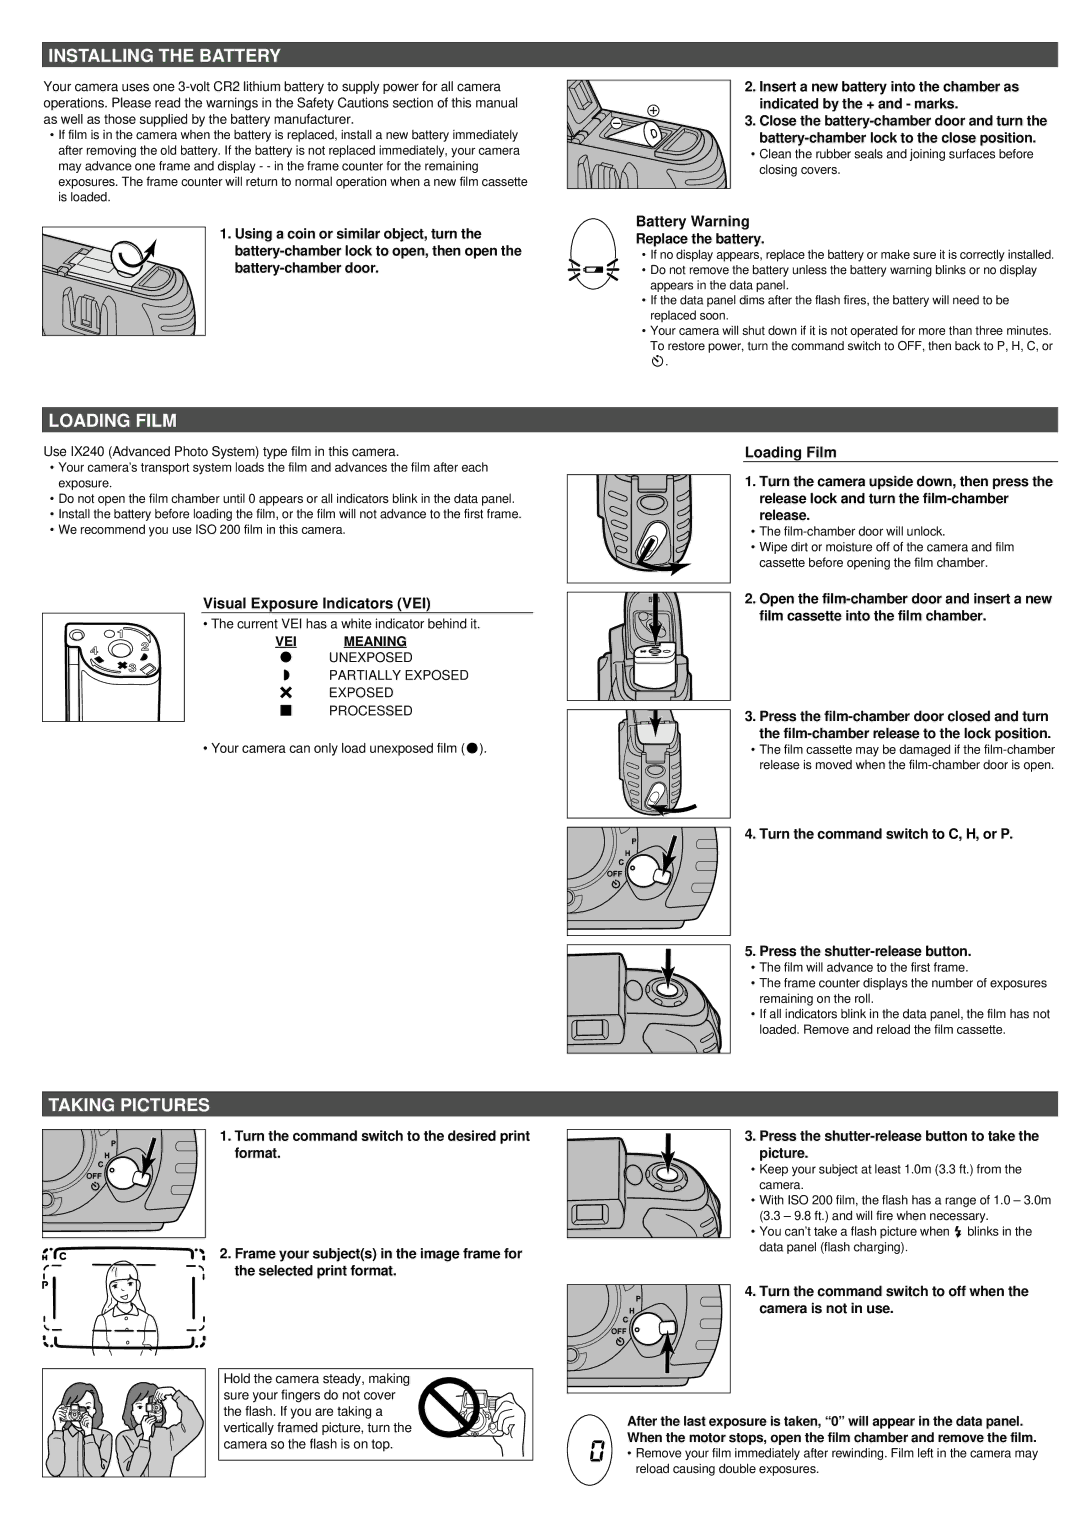
1.Using a coin or similar object, turn the
LOADING FILM
Use IX240 (Advanced Photo System) type film in this camera.
•Your camera’s transport system loads the film and advances the film after each exposure.
•Do not open the film chamber until 0 appears or all indicators blink in the data panel.
•Install the battery before loading the film, or the film will not advance to the first frame.
•We recommend you use ISO 200 film in this camera.
Visual Exposure Indicators (VEI)
• The current VEI has a white indicator behind it.
VEI | MEANING | ||
|
|
| UNEXPOSED |
|
|
| PARTIALLY EXPOSED |
|
|
| EXPOSED |
|
|
| PROCESSED |
|
|
| |
• Your camera can only load unexposed film ( ).
TAKING PICTURES
1. Turn the command switch to the desired print format.
2. Frame your subject(s) in the image frame for the selected print format.
Hold the camera steady, making sure your fingers do not cover the flash. If you are taking a vertically framed picture, turn the camera so the flash is on top.
2.Insert a new battery into the chamber as indicated by the + and - marks.
3. Close the
•Clean the rubber seals and joining surfaces before closing covers.
Battery Warning
Replace the battery.
• If no display appears, replace the battery or make sure it is correctly installed.
• Do not remove the battery unless the battery warning blinks or no display appears in the data panel.
•If the data panel dims after the flash fires, the battery will need to be replaced soon.
•Your camera will shut down if it is not operated for more than three minutes. To restore power, turn the command switch to OFF, then back to P, H, C, or
![]() .
.
Loading Film
1. Turn the camera upside down, then press the release lock and turn the
• The
• Wipe dirt or moisture off of the camera and film cassette before opening the film chamber.
2.Open the
3. Press the
•The film cassette may be damaged if the
4. Turn the command switch to C, H, or P.
5.Press the
• The film will advance to the first frame.
• The frame counter displays the number of exposures remaining on the roll.
• If all indicators blink in the data panel, the film has not
loaded. Remove and reload the film cassette.
3. Press the shutter-release button to take the picture.
•Keep your subject at least 1.0m (3.3 ft.) from the camera.
•With ISO 200 film, the flash has a range of 1.0 – 3.0m
(3.3 – 9.8 ft.) and will fire when necessary.
•You can’t take a flash picture when![]() blinks in the data panel (flash charging).
blinks in the data panel (flash charging).
4. Turn the command switch to off when the camera is not in use.
After the last exposure is taken, “0” will appear in the data panel. When the motor stops, open the film chamber and remove the film.
• Remove your film immediately after rewinding. Film left in the camera may reload causing double exposures.