Preparating your projector (continued)
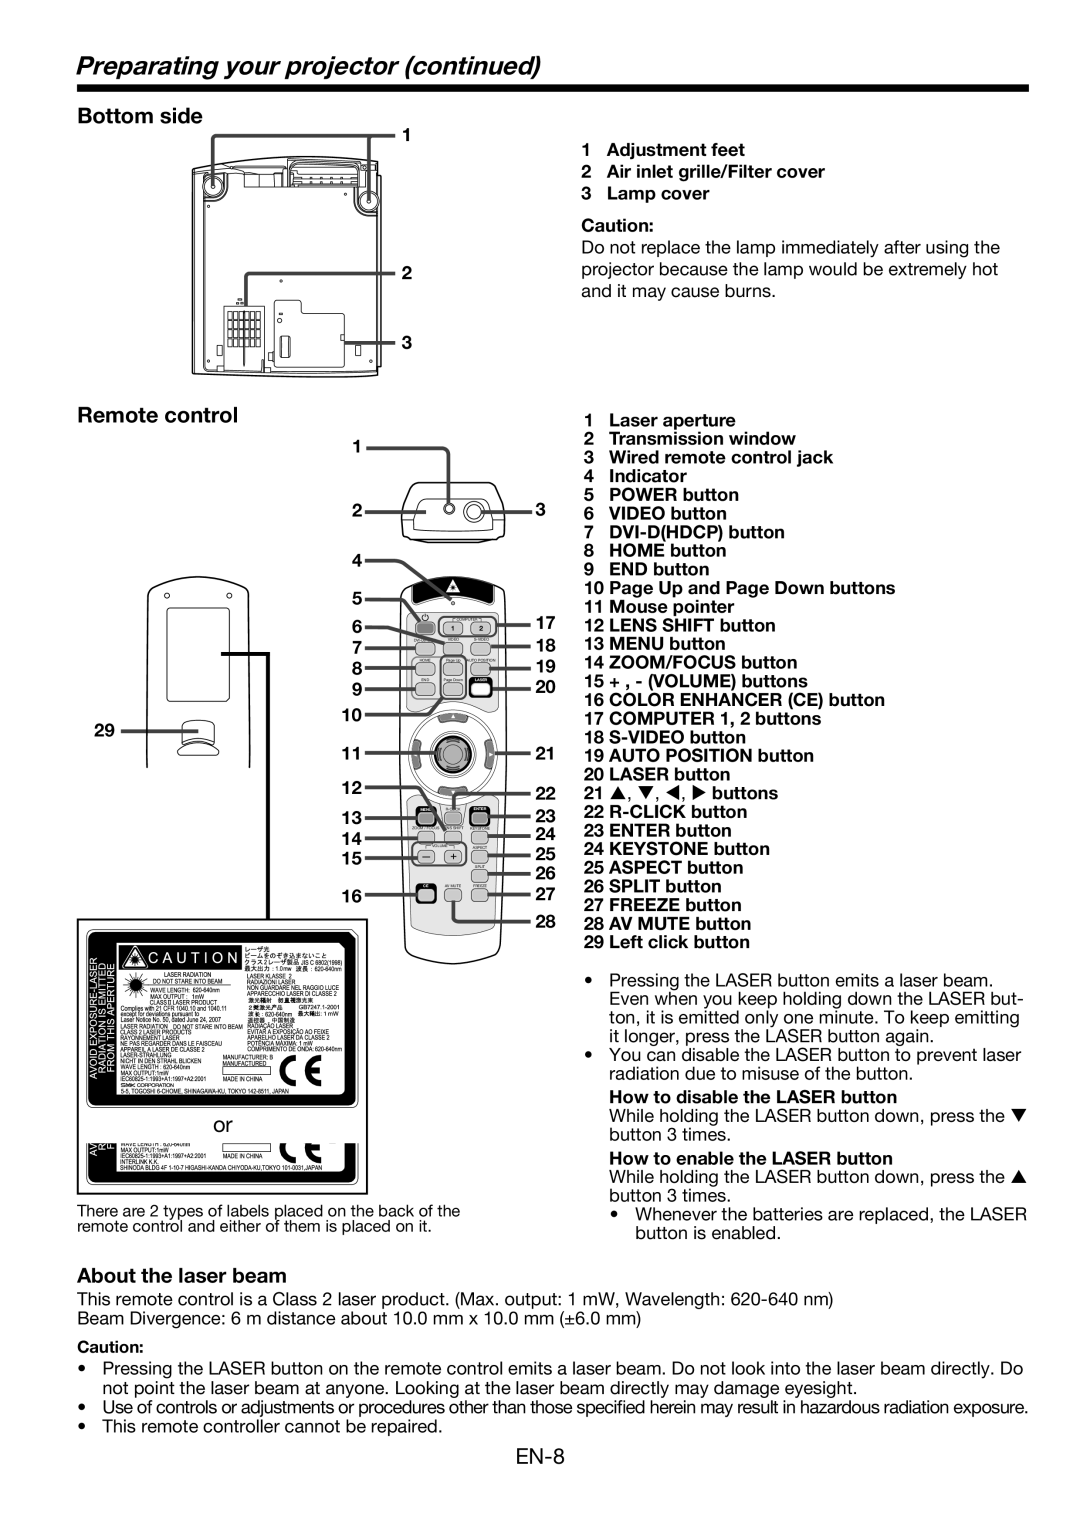
Bottom side
1
2
3
1Adjustment feet
2Air inlet grille/Filter cover
3Lamp cover
Caution:
Do not replace the lamp immediately after using the projector because the lamp would be extremely hot and it may cause burns.
Remote control |
|
|
|
| 1 | Laser aperture |
1 |
|
|
|
| 2 | Transmission window |
|
|
|
| 3 | Wired remote control jack | |
|
|
|
|
| ||
|
|
|
|
| 4 | Indicator |
2 |
|
|
| 3 | 5 | POWER button |
|
|
| 6 | VIDEO button | ||
|
|
|
|
| 7 | |
4 |
|
|
|
| 8 | HOME button |
|
|
|
| 9 | END button | |
|
|
|
|
| ||
5 |
|
|
|
| 10 Page Up and Page Down buttons | |
|
|
|
| 11 | Mouse pointer | |
|
|
|
| 17 | ||
6 |
| COMPUTER | 12 | LENS SHIFT button | ||
| 1 | 2 | ||||
7 | VIDEO | 18 | 13 MENU button | |||
8 | HOME | Page Up | AUTO POSITION | 19 | 14 ZOOM/FOCUS button | |
9 | END | Page Down | LASER | 20 | 15 | + , - (VOLUME) buttons |
|
|
| 16 COLOR ENHANCER (CE) button | |||
10 |
|
|
|
| ||
|
|
|
| 17 COMPUTER 1, 2 buttons | ||
29 |
|
|
|
| 18 | |
11 |
|
|
| 21 | ||
|
|
| 19 AUTO POSITION button | |||
12 |
|
|
|
| 20 LASER button | |
|
|
| 22 | 21 | S, T, W, X buttons | |
13 | MENU | ENTER | 23 | 22 | ||
14 | VOLUME | ASPECT | 24 | 23 ENTER button | ||
| ZOOM / FOCUS LENS SHIFT KEYSTONE |
|
|
| ||
15 |
|
| SPLIT | 25 | 24 KEYSTONE button | |
|
|
|
| 26 | 25 ASPECT button | |
|
|
|
| 26 | SPLIT button | |
16 | CE | AV MUTE | FREEZE | 27 | ||
|
|
| 27 FREEZE button | |||
|
|
|
| 28 | ||
|
|
|
| 28 AV MUTE button | ||
|
|
|
|
| 29 | Left click button |
|
|
|
|
| • | Pressing the LASER button emits a laser beam. |
|
|
|
|
|
| Even when you keep holding down the LASER but- |
|
|
|
|
|
| ton, it is emitted only one minute. To keep emitting |
|
|
|
|
|
| it longer, press the LASER button again. |
|
|
|
|
| • | You can disable the LASER button to prevent laser |
|
|
|
|
|
| radiation due to misuse of the button. |
|
|
|
|
|
| How to disable the LASER button |
or |
|
|
|
|
| While holding the LASER button down, press the T |
|
|
|
|
| button 3 times. | |
|
|
|
|
|
| |
|
|
|
|
|
| How to enable the LASER button |
|
|
|
|
|
| While holding the LASER button down, press the S |
There are 2 types of labels placed on the back of the |
|
|
| button 3 times. | ||
|
|
| • Whenever the batteries are replaced, the LASER | |||
remote control and either of them is placed on it. |
|
|
|
| button is enabled. | |
|
|
|
|
|
| |
About the laser beam
This remote control is a Class 2 laser product. (Max. output: 1 mW, Wavelength:
Beam Divergence: 6 m distance about 10.0 mm x 10.0 mm (±6.0 mm)
Caution:
•Pressing the LASER button on the remote control emits a laser beam. Do not look into the laser beam directly. Do not point the laser beam at anyone. Looking at the laser beam directly may damage eyesight.
•Use of controls or adjustments or procedures other than those specified herein may result in hazardous radiation exposure.
•This remote controller cannot be repaired.
