Mitsubishi Electronics HC3000 user manual Projecting images, EN-21

Models: HC3000

1 40
Download 40 pages 5.41 Kb
Page 21
Image 21

C. Projecting images

Preparation:

Remove the lens cap.

Turn on the power of the connected computer.

FOCUS ring

ZOOM ring

POWER button

POWER STATUS

COMPUTER button

ON ( I ) button HDMI button

COMPUTER button

ENGLISH

1.Confirm the POWER indicator lights-up red.

If the projector was turned off before the lamp had cooled down sufficiently, the fan may start rotating and the POWER button may not work after the power cord is plugged. (The STATUS indicator blinks green.) After the fan stops rotating, press the power button to turn back on the POWER indicator.

2.Press the POWER button on the projector or ON ( I ) button on the remote control.

It may take about one minute for the lamp to light up.

The lamp fails to light up on rare occasions. In such a case, wait for a few minutes and then try again.

Do not cover the lens with the lens cap while the lamp is on. Do not strip off the aluminium sheet inside the lens cap.

After the POWER button is pressed, the image may flicker before the lamp becomes stable. This is not a prod- uct malfunction.

The STANDARD lamp mode is activated by default whenever the projector is turned on. When the LOW LAMP MODE has been chosen, the default STANDARD lamp mode is switched to the LOW lamp mode in 1 minute.

The projector starts warming up when the POWER button is pressed. During the warm-up process, images may appear dark and no commands are accepted.

By blinking red, the STATUS indicator indicates that the lamp should be replaced soon. Replace the lamp when the STATUS indicator blinks red. (See pages 34 and 37.)

3.Select an input source.

Press the COMPUTER button on the projector or the COMPUTER or HDMI button on the remote control that is corresponding to the terminal in use.

The input source is switched between COMPUTER and HDMI every time you press the COMPUTER button on the projector.

Though it may take some time before an image is displayed on the screen depending on the type of the input signal, such symptom is not a malfunction.

Images may not be projected in the correct position, depending on the type of the input signal. In such a case, press the AUTO POSITION button. (See page 22.)

The projector automatically selects the appropriate signal format. The selected signal format is displayed on the screen.

The COMPUTER and HDMI buttons don't function while the menu is being displayed.

• When COMPUTER is chosen as the source, images supplied from the computer may flicker. Press the or button on the remote control to reduce flicker, if it occurs.

4.Adjust the position of the projector to keep an appropriate projection distance with which images are projected in their specified sizes.

5.Adjust the position of the projector so that the projector and the screen are perpendicular to each other. (See page 10.)

• When the projector cannot be positioned perpendicularly to the screen, adjust the projection angle. (See page 10.)

6.Adjust the size of the projected image by turning the ZOOM ring.

7.Adjust the focus by turning the FOCUS ring.

Repeat steps 4 to 7, if necessary.

EN-21

Page 21
Image 21
Mitsubishi Electronics HC3000 user manual Projecting images, EN-21

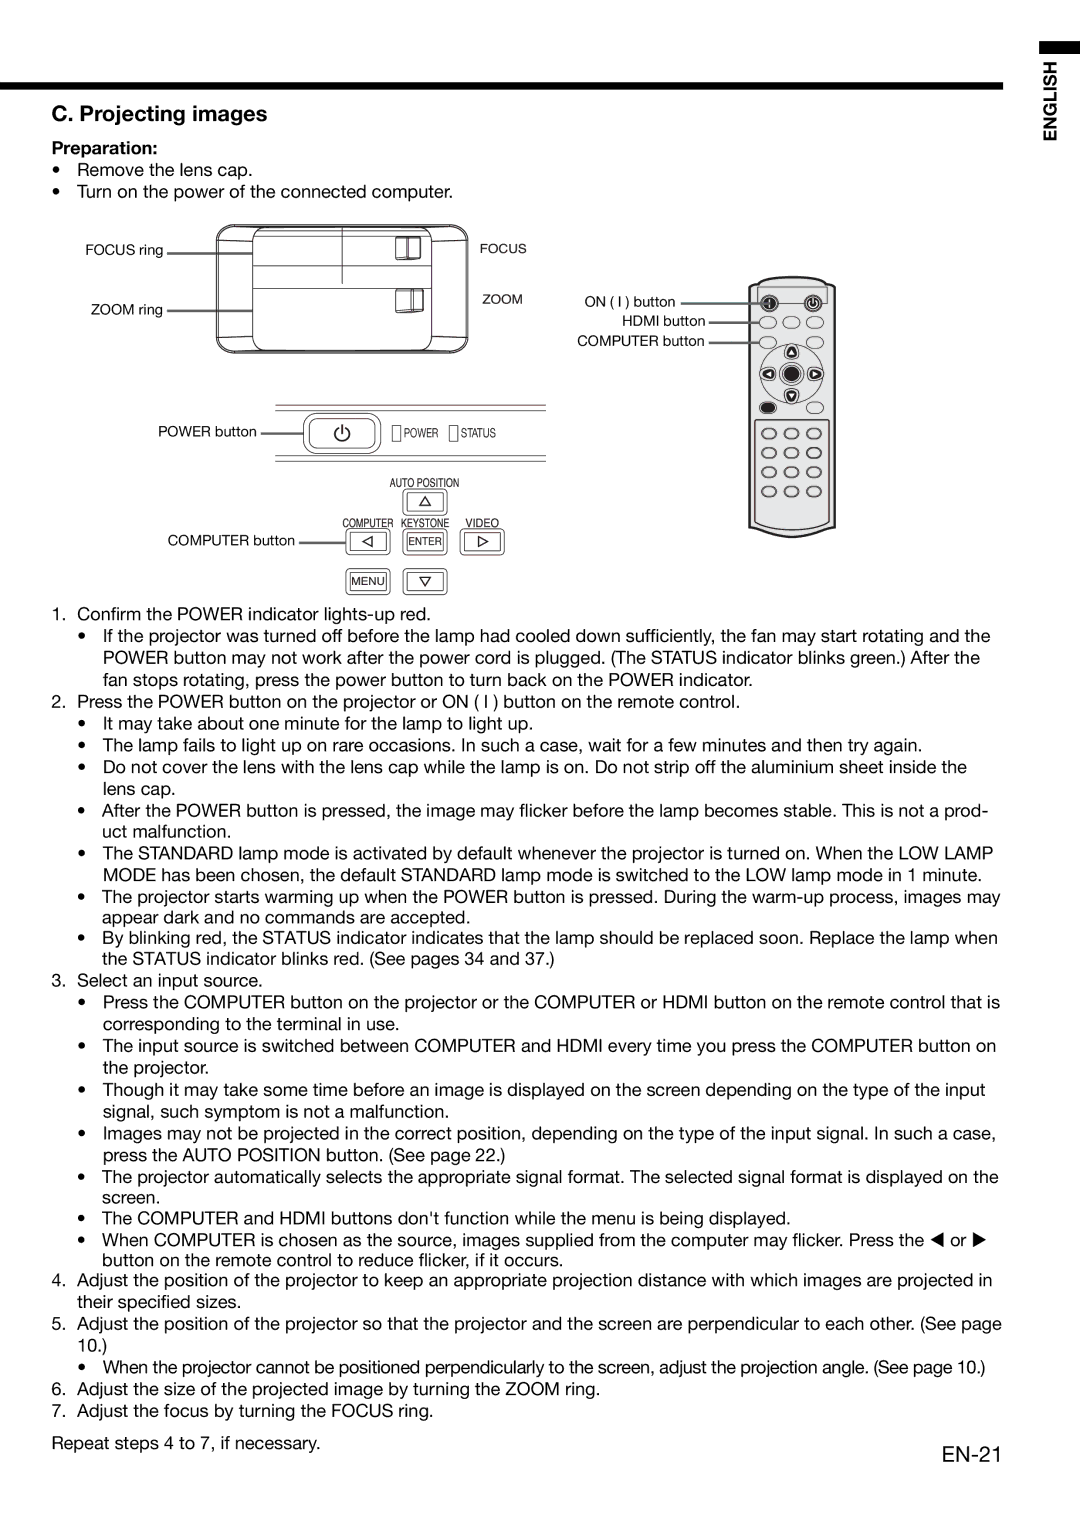
HC3000 specifications

The Mitsubishi Electronics HC3000 is a cutting-edge projector designed to deliver high-quality visuals for both home theater enthusiasts and professional presentations. Known for its exceptional image clarity and versatility, the HC3000 stands out in the crowded market of digital projection.

One of the key features of the HC3000 is its superior resolution capability. With support for Full HD (1920 x 1080), it ensures that images are sharp and vibrant, making it ideal for cinematic experiences and detailed presentations. The high brightness level, which reaches up to 3000 ANSI lumens, allows for clear visibility in various lighting conditions, whether in a dimly lit home theater or a well-lit conference room.

The HC3000 employs advanced DLP (Digital Light Processing) technology, which enhances color accuracy and reduces the possibilities of rainbow effects that can occur in some projection technologies. This DLP technology is complemented by Mitsubishi's proprietary color wheel, which enhances color reproduction, providing deep blacks and rich colors that make images pop.

Another standout characteristic is its flexible connectivity options. The HC3000 includes multiple input terminals, including HDMI, VGA, and composite inputs, making it compatible with a range of devices such as Blu-ray players, gaming consoles, and laptops. This multitude of options ensures that users can easily integrate the projector into their existing systems and switch between different sources without hassle.

Portability is another strength of the HC3000. Weighing in at a manageable size, it can be transported easily, making it a great option for business professionals who need to present on the go. Its compact design does not sacrifice performance for size, maintaining high-quality output even in a portable format.

Additionally, the HC3000 incorporates a robust cooling system designed to extend the life of the projector's lamp. This feature not only enhances durability but also minimizes operational noise, allowing for an immersive viewing experience without distracting sounds.

In summary, the Mitsubishi Electronics HC3000 is a versatile and high-performing projector, offering Full HD resolution, advanced DLP technology, excellent connectivity options, and portability. Whether for home entertainment or professional use, it delivers outstanding image quality, making it a popular choice among consumers seeking reliability and performance.