Setting up your projector

Setting up the screen

Install the screen perpendicularly to the projector. If the screen can not be installed in such a way, adjust the projection angle of the projector. (See page 12.)

Install the screen and projector so that the projector’s lens is placed at the same height and horizontal position of the screen center.

Do not install the screen where it is exposed to direct sunlight or lighting. Light directly reflecting on the screen makes the projected images washed-out and hard to view.

SCREEN SIZE

You can keep the image display area within the screen by setting SCREEN SIZE in the ADVANCED MENU of IMAGE menu according to the aspect ratio of the actual screen. Select 16:9 when the aspect ratio of the screen is 16:9 or 4:3, and select CINEMA SCOPE (2.35:1) when the aspect ratio is 2.35:1 (CinemaScope).

When setting SCREEN SIZE to CINEMA SCOPE (2.35:1):

CinemaScope size movies are projected in the full screen.

Set ASPECT in the FEATURE menu to 16:9 when displaying Vista-size images. In this case, they are squeezed horizontally.

When ASPECT in the FEATURE menu is set to AUTO and 480i/p, 576i/p, 720p, or 1080i/p signal is input, the part for displaying subtitles is not projected. To display subtitles, reset SCREEN SIZE to 16:9 and adjust the image position using VERTICAL LOCATION in the ADVANCED MENU of the IMAGE menu. (To display the menu on the screen, adjust SHUTTER(U) in the SIGNAL - USER menu to position the menu.)

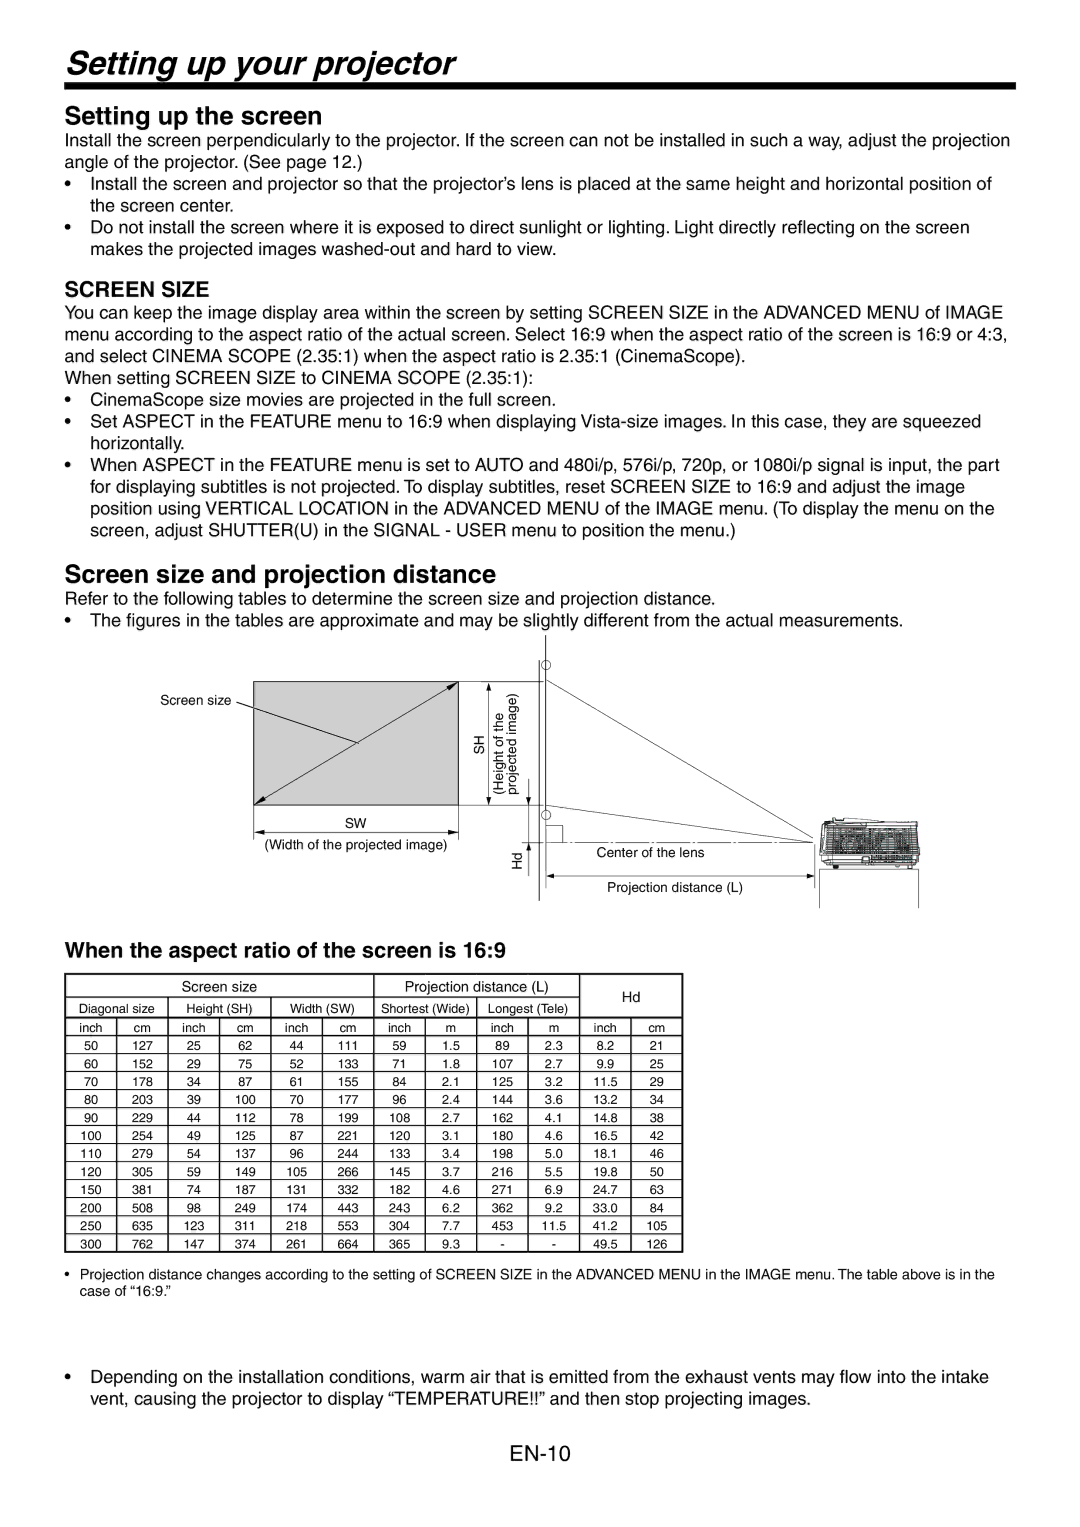
Screen size and projection distance

Refer to the following tables to determine the screen size and projection distance.

The figures in the tables are approximate and may be slightly different from the actual measurements.

Screen size

(Heightprojected SHof theimage)

SW

(Width of the projected image) Hd

Center of the lens

Projection distance (L)

When the aspect ratio of the screen is 16:9


Screen size


Projection distance (L)


Hd

Diagonal size

Height (SH)

Width (SW)

Shortest (Wide)

Longest (Tele)


inch

cm

inch

cm

inch

cm

inch

m

inch

m

inch


cm

50

127

25

62

44

111

59

1.5

89

2.3

8.2


21

60

152

29

75

52

133

71

1.8

107

2.7

9.9


25

70

178

34

87

61

155

84

2.1

125

3.2

11.5


29

80

203

39

100

70

177

96

2.4

144

3.6

13.2


34

90

229

44

112

78

199

108

2.7

162

4.1

14.8


38

100

254

49

125

87

221

120

3.1

180

4.6

16.5


42

110

279

54

137

96

244

133

3.4

198

5.0

18.1


46

120

305

59

149

105

266

145

3.7

216

5.5

19.8


50

150

381

74

187

131

332

182

4.6

271

6.9

24.7


63

200

508

98

249

174

443

243

6.2

362

9.2

33.0


84

250

635

123

311

218

553

304

7.7

453

11.5

41.2


105

300

762

147

374

261

664

365

9.3

-

-

49.5


126

Projection distance changes according to the setting of SCREEN SIZE in the ADVANCED MENU in the IMAGE menu. The table above is in the case of “16:9.”

Depending on the installation conditions, warm air that is emitted from the exhaust vents may flow into the intake

vent, causing the projector to display “TEMPERATURE!!” and then stop projecting images.

EN-10

Page 10
Image 10
Mitsubishi Electronics HC3800 Setting up your projector, Setting up the screen, Screen size and projection distance

HC3800, HC3800 specifications

The Mitsumi Electronic HC3800 is a versatile and innovative device that plays a crucial role in enhancing connectivity and signal transmission in various electronic applications. Designed to meet the demands of modern technology, the HC3800 stands out due to its robust features, cutting-edge technology, and reliable performance.

One of the main features of the HC3800 is its high-speed data transmission capabilities. It supports advanced protocols that allow for quick and efficient communication between devices. This is particularly important in applications such as telecommunications, automotive systems, and industrial automation where speed and reliability are paramount. The HC3800 ensures minimal latency, enabling real-time data processing and response.

Another highlight of the HC3800 is its compact and efficient design. With a small footprint, it can easily be integrated into a wide range of devices, from handheld gadgets to larger industrial equipment. This versatility makes it a preferred choice for manufacturers looking to optimize space without compromising on performance.

The HC3800 employs advanced modulation techniques, which enhance signal integrity and reduce interference. This is critical in environments where electromagnetic interference (EMI) can disrupt communications. By utilizing robust error detection and correction algorithms, the HC3800 maintains high levels of data integrity, ensuring that information is transmitted accurately even in challenging conditions.

Moreover, the Mitsumi HC3800 boasts an impressive power efficiency profile. It is engineered to operate effectively at lower power levels, making it suitable for battery-operated devices. This not only extends the longevity of devices using the HC3800 but also complies with green technology initiatives aimed at reducing energy consumption.

The technology within the HC3800 is continually evolving, ensuring compatibility with future advancements. Mitsumi's commitment to research and development means that users can expect regular updates and improvements in performance features. Additionally, the HC3800 provides extensive support for a wide array of interfaces, making it adaptable to various system architectures.

In conclusion, the Mitsumi Electronic HC3800 is a state-of-the-art component that combines high-speed data transmission, compact design, superior signal integrity, and energy efficiency. Its features make it an ideal choice for a multitude of applications across different industries, ensuring that users benefit from enhanced connectivity and reliable performance in their electronic systems. Whether it's for personal or industrial use, the HC3800 continues to meet and exceed market demands while shaping the future of electronic connectivity.