To operate projector power ON
| INPUT SELECT COMPUTER 1 IN |
| USB |
|
|
|
| |
|
|
|
|
|
|
| ||
| AUDIO 1 IN |
|
|
|
|
|
| |
REMOTE | VIDEO 1 | VIDEO 2 |
|
|
|
| ||
| DIGITAL |
| IN | IN | 3,9,10 |
|
|
|
MAIN |
| VIDEO |
|
|
|
| ||
| ANALOG |
|
|
|
|
|
|
|
| COMPUTER 2 IN | AUDIO 2 IN |
|
|
|
| ||
|
|
|
|
|
| |||
|
|
|
|
|
|
|
| |
O | I |
|
|
| 4 |
|
| KEYSTONE |
| COMPUTER OUT |
|
|
|
|
| ||
|
| R |
|
|
|
| ||
| AC IN | AUDIO OUT | L |
|
|
|
|
|
|
|
| AUDIO |
| COMPUTER | VIDEO | ZOOM/ | |
|
|
|
|
| AUTO POSITION |
| FOCUS | |
|
|
|
|
| POSITION VOLME | |||
|
|
|
|
|
| AUTO |
|
|
2,11 |
|
|
|
| button |
|
|
|
|
|
|
| 6,8 | MENU |
| LASER | |
3,9,10 | FOCUS | TEMP |
|
|
|
|
|
|
| LAMP |
| 5,7 |
|
|
|
| |
| ZOOM/ |
|
|
|
|
|
| |
6,8 |
|
|
|
|
| RIGHT CLICK | ||
VOLUME | VIDEO |
| 4 |
|
|
|
| |
COMPUTER |
|
|
|
|
| |||
4 | MENU |
|
|
|
| ENTER |
| |
|
| ENTER |
|
|
| EXPAND P in P | STILL | |
|
|
|
|
|
| |||
|
|
|
|
|
|
| MUTE |
|
| AUTO | MUTE |
|
|
|
|
|
|
| POSITION |
|
|
|
|
|
| |
|
|
| MUTE button |
|
|
|
| |
AUTO POSITION |
|
|
|
|
|
| ||
button
ENGLISH
5,7
STILL button MUTE button
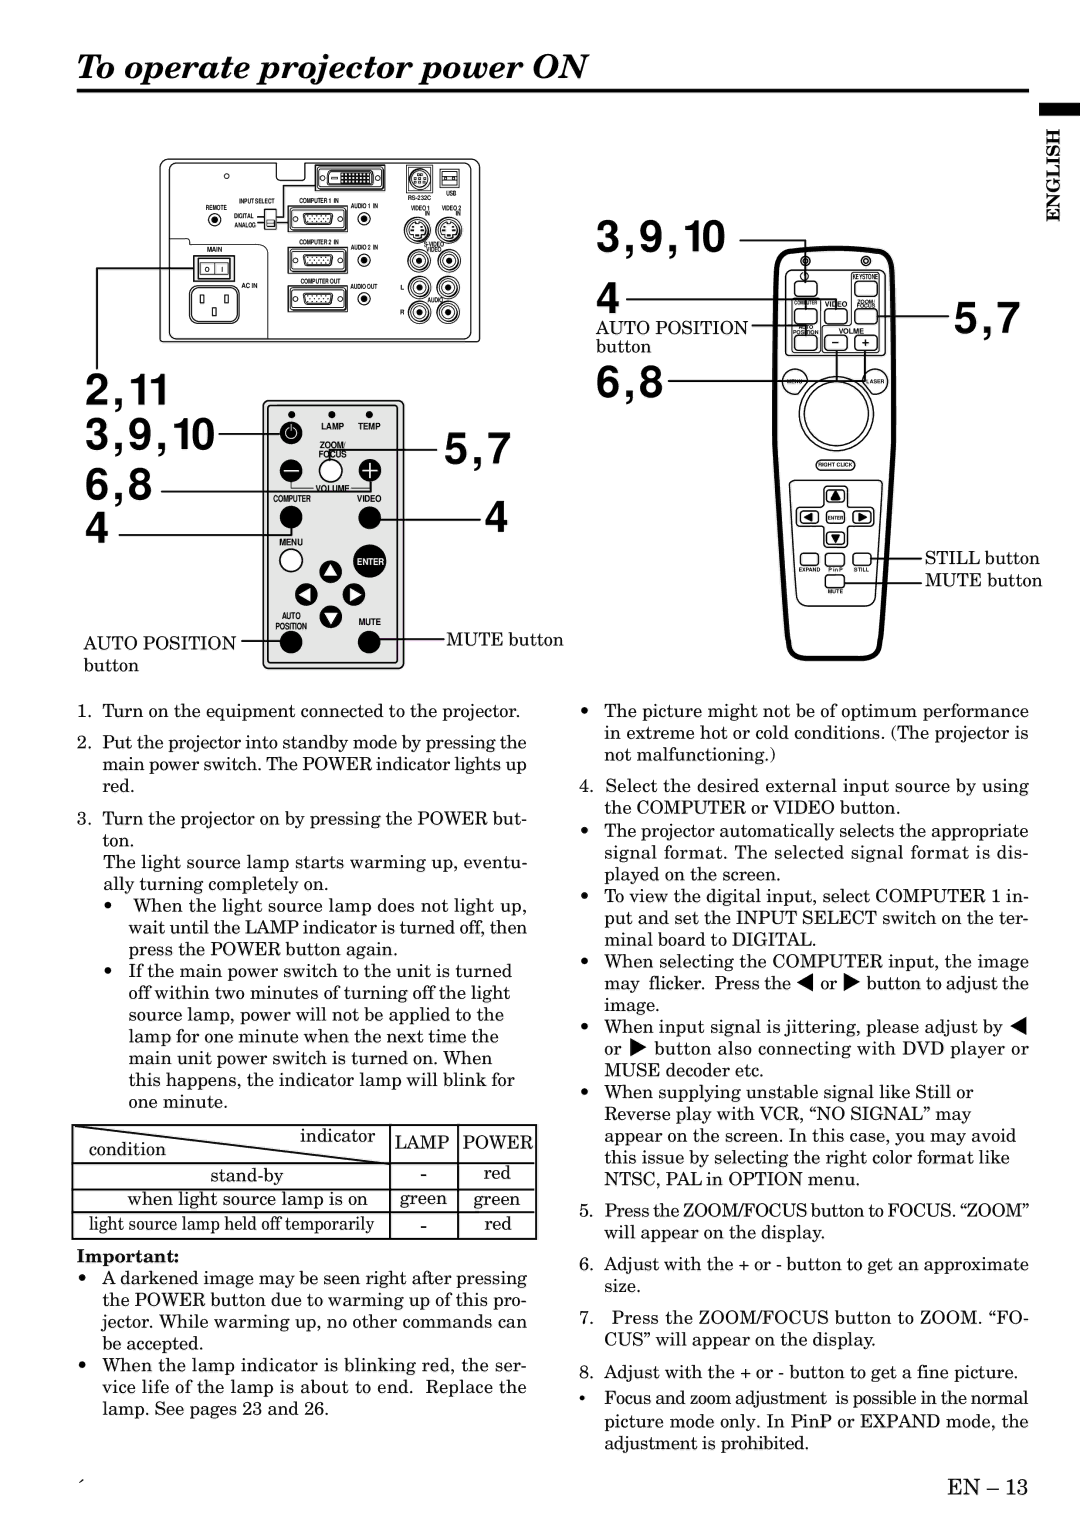
1.Turn on the equipment connected to the projector.
2.Put the projector into standby mode by pressing the main power switch. The POWER indicator lights up red.
3.Turn the projector on by pressing the POWER but- ton.
The light source lamp starts warming up, eventu- ally turning completely on.
•When the light source lamp does not light up, wait until the LAMP indicator is turned off, then press the POWER button again.
•If the main power switch to the unit is turned off within two minutes of turning off the light source lamp, power will not be applied to the lamp for one minute when the next time the main unit power switch is turned on. When this happens, the indicator lamp will blink for one minute.
indicator | LAMP | POWER | |
condition | |||
|
| ||
- | red | ||
when light source lamp is on | green | green | |
light source lamp held off temporarily | - | red |
Important:
•A darkened image may be seen right after pressing the POWER button due to warming up of this pro- jector. While warming up, no other commands can be accepted.
•When the lamp indicator is blinking red, the ser- vice life of the lamp is about to end. Replace the lamp. See pages 23 and 26.
•The picture might not be of optimum performance in extreme hot or cold conditions. (The projector is not malfunctioning.)
4.Select the desired external input source by using the COMPUTER or VIDEO button.
•The projector automatically selects the appropriate signal format. The selected signal format is dis- played on the screen.
•To view the digital input, select COMPUTER 1 in- put and set the INPUT SELECT switch on the ter- minal board to DIGITAL.
•When selecting the COMPUTER input, the image may flicker. Press the $ or % button to adjust the image.
•When input signal is jittering, please adjust by $ or % button also connecting with DVD player or MUSE decoder etc.
•When supplying unstable signal like Still or Reverse play with VCR, “NO SIGNAL” may appear on the screen. In this case, you may avoid this issue by selecting the right color format like NTSC, PAL in OPTION menu.
5.Press the ZOOM/FOCUS button to FOCUS. “ZOOM” will appear on the display.
6.Adjust with the + or - button to get an approximate size.
7.Press the ZOOM/FOCUS button to ZOOM. “FO- CUS” will appear on the display.
8.Adjust with the + or - button to get a fine picture.
• Focus and zoom adjustment is possible in the normal picture mode only. In PinP or EXPAND mode, the adjustment is prohibited.
´ | EN – 13 |