8Initial Setting Procedure

After completing the procedures described in "6 Installation Method" and "7 Wiring Method", set the initial settings in accordance with the procedure described below.

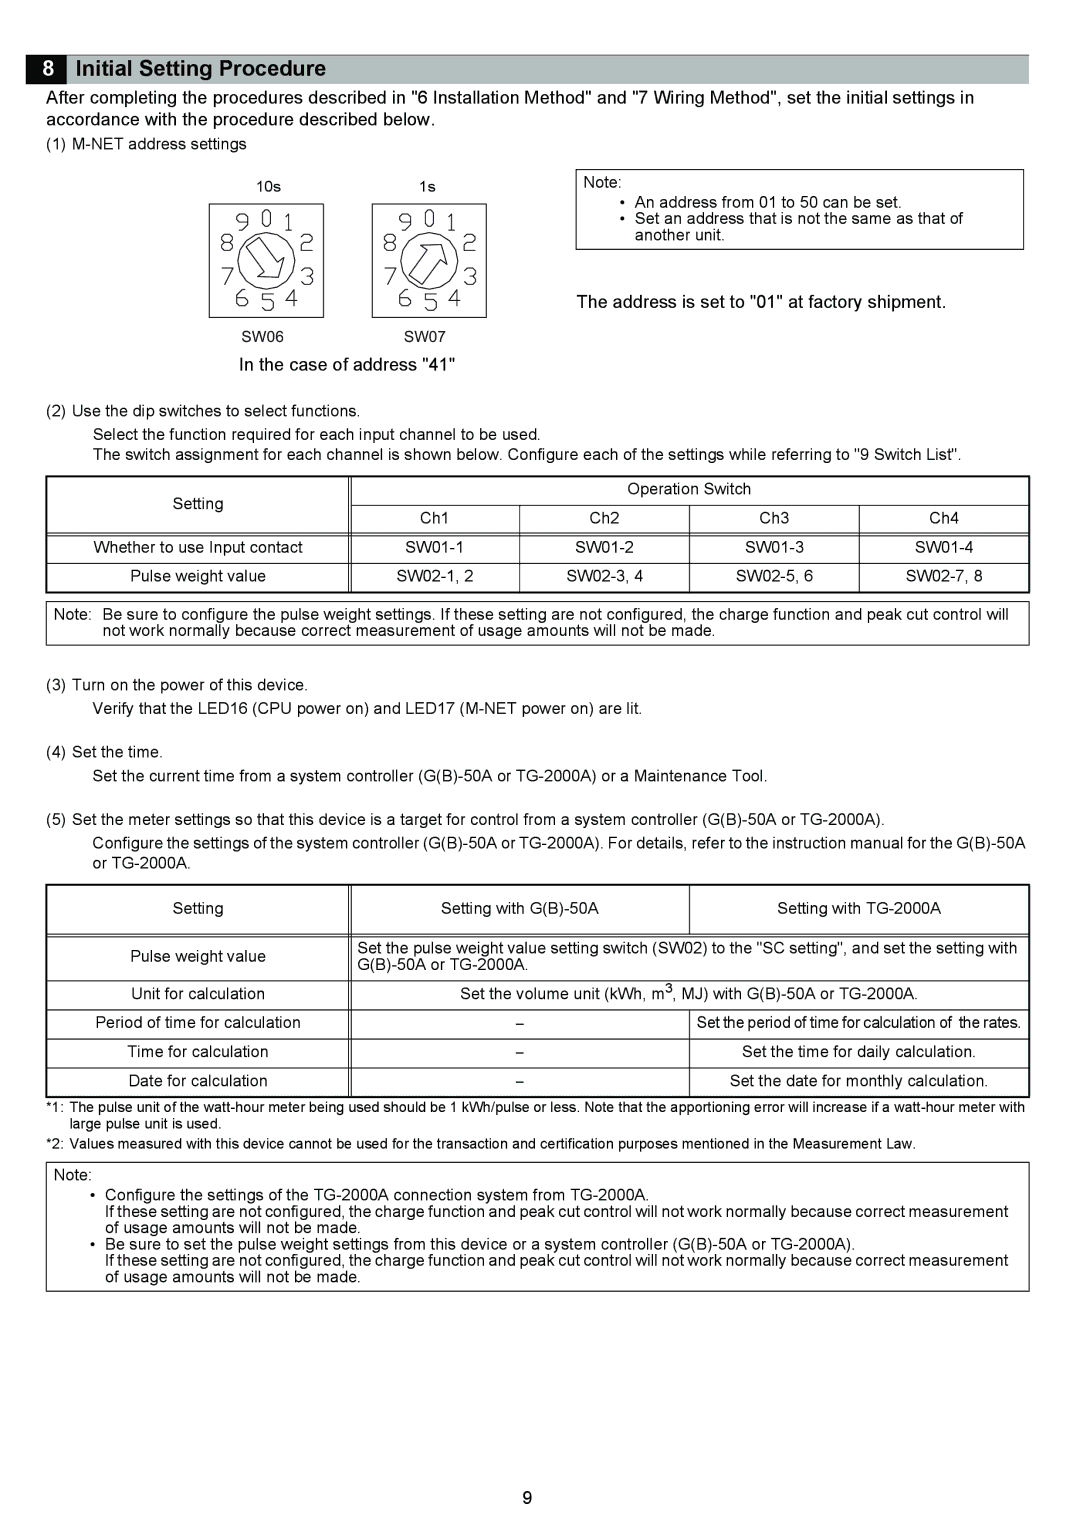
(1) M-NET address settings

10s1s

Note:

An address from 01 to 50 can be set.

Set an address that is not the same as that of another unit.

The address is set to "01" at factory shipment.

SW06SW07

In the case of address "41"

(2) Use the dip switches to select functions.

Select the function required for each input channel to be used.

The switch assignment for each channel is shown below. Configure each of the settings while referring to "9 Switch List".

Setting


Operation Switch


Ch1

Ch2

Ch3

Ch4


Whether to use Input contact

SW01-1

SW01-2

SW01-3

SW01-4


Pulse weight value

SW02-1, 2

SW02-3, 4

SW02-5, 6

SW02-7, 8


Note: Be sure to configure the pulse weight settings. If these setting are not configured, the charge function and peak cut control will not work normally because correct measurement of usage amounts will not be made.

(3) Turn on the power of this device.

Verify that the LED16 (CPU power on) and LED17 (M-NET power on) are lit.

(4) Set the time.

Set the current time from a system controller (G(B)-50A or TG-2000A) or a Maintenance Tool.

(5) Set the meter settings so that this device is a target for control from a system controller (G(B)-50A or TG-2000A).

Configure the settings of the system controller (G(B)-50A or TG-2000A). For details, refer to the instruction manual for the G(B)-50A or TG-2000A.

Setting

Setting with G(B)-50A

Setting with TG-2000A


Pulse weight value

Set the pulse weight value setting switch (SW02) to the "SC setting", and set the setting with

G(B)-50A or TG-2000A.


Unit for calculation

Set the volume unit (kWh, m3, MJ) with G(B)-50A or TG-2000A.

Period of time for calculation

Set the period of time for calculation of the rates.


Time for calculation

Set the time for daily calculation.


Date for calculation

Set the date for monthly calculation.


*1: The pulse unit of the watt-hour meter being used should be 1 kWh/pulse or less. Note that the apportioning error will increase if a watt-hour meter with large pulse unit is used.

*2: Values measured with this device cannot be used for the transaction and certification purposes mentioned in the Measurement Law.

Note:

Configure the settings of the TG-2000A connection system from TG-2000A.

If these setting are not configured, the charge function and peak cut control will not work normally because correct measurement of usage amounts will not be made.

Be sure to set the pulse weight settings from this device or a system controller (G(B)-50A or TG-2000A).

If these setting are not configured, the charge function and peak cut control will not work normally because correct measurement of usage amounts will not be made.

9

Page 10
Image 10
Mitsubishi Electronics PAC-YG60MCA instruction manual Initial Setting Procedure

PAC-YG60MCA specifications

The Mitsubishi Electronics PAC-YG60MCA is an advanced control unit designed for optimizing and managing HVAC systems in commercial and residential settings. Featuring state-of-the-art technology, this model offers seamless integration with Mitsubishi's extensive range of heating and cooling solutions, ensuring enhanced energy efficiency and comfort for users.

One of the standout features of the PAC-YG60MCA is its ability to connect multiple units, allowing for centralized management of up to 60 indoor units simultaneously. This capability simplifies the control process for larger systems, providing users with a comprehensive overview of system performance and enabling easy adjustments to temperature settings, fan speeds, and operation modes based on specific preferences and requirements.

The PAC-YG60MCA utilizes a sophisticated control algorithm that prioritizes energy efficiency without compromising on performance. It incorporates advanced sensor technology, which monitors environmental conditions and adjusts system settings in real time. This not only helps to reduce operational costs but also contributes to environmental sustainability by minimizing energy consumption.

Another significant feature of the PAC-YG60MCA is its user-friendly interface, which includes a clear display and intuitive navigation. Users can easily program schedules, change settings, and monitor system performance through a simple menu structure. Additionally, the unit supports remote access via a smartphone app, allowing users to manage their HVAC systems from virtually anywhere, enhancing convenience and flexibility.

Durability and reliability are also key characteristics of the PAC-YG60MCA. Designed with high-quality materials, it can withstand various environmental conditions, ensuring long-lasting performance. The unit complies with stringent safety standards and undergoes rigorous testing to guarantee its robustness, making it a dependable choice for any HVAC installation.

In summary, the Mitsubishi Electronics PAC-YG60MCA is a cutting-edge control unit that enhances HVAC system management through its extensive features, including the ability to connect multiple units, energy-efficient operation, and user-friendly interface. Its advanced technology and durable design make it a valuable asset for both commercial and residential settings, ensuring optimal comfort while reducing energy costs. This model exemplifies Mitsubishi's commitment to innovation, efficiency, and customer satisfaction in the HVAC industry.