RECORDING

Recording Operation

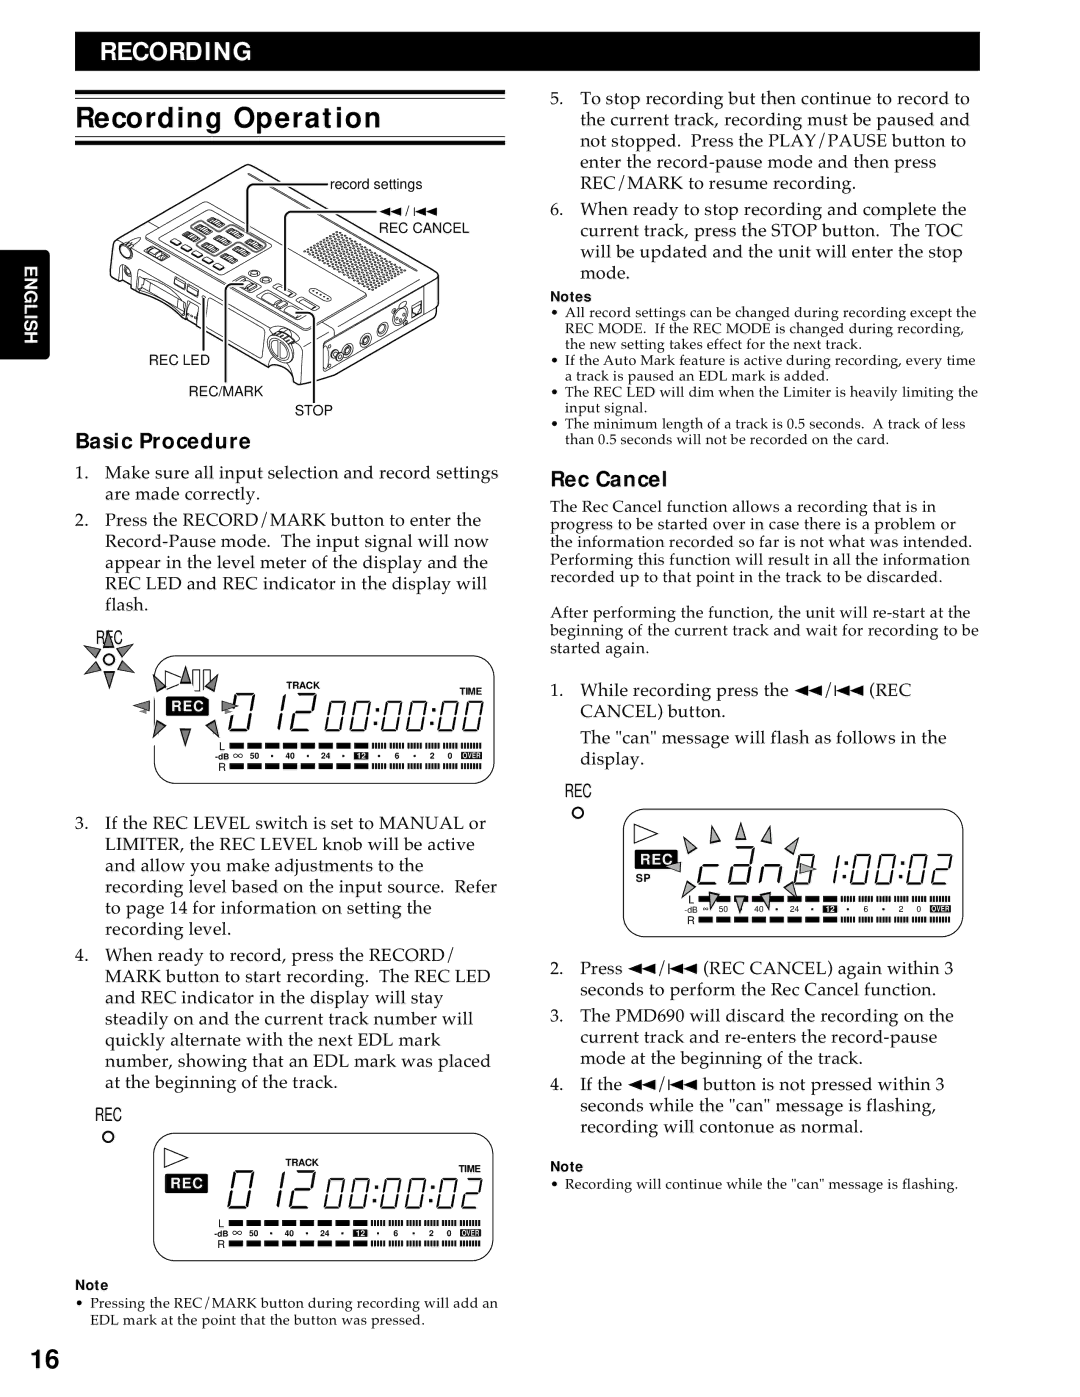
record settings

1 / 4

REC CANCEL

ENGLISH

REC LED

REC/MARK

STOP

Basic Procedure

1.Make sure all input selection and record settings are made correctly.

2.Press the RECORD/MARK button to enter the Record-Pause mode. The input signal will now appear in the level meter of the display and the REC LED and REC indicator in the display will flash.

5

REC5


5


5

5


5

5


5


5


TRACK


TIME


5

REC

55


5


5

5


5


L


-dB 50

40 24


6 2 0


R

3.If the REC LEVEL switch is set to MANUAL or LIMITER, the REC LEVEL knob will be active and allow you make adjustments to the recording level based on the input source. Refer to page 14 for information on setting the recording level.

4.When ready to record, press the RECORD/ MARK button to start recording. The REC LED and REC indicator in the display will stay steadily on and the current track number will quickly alternate with the next EDL mark number, showing that an EDL mark was placed at the beginning of the track.

REC


TRACK


TIME


REC


L


-dB 50 40 24


6 2 0


R

Note

• Pressing the REC/MARK button during recording will add an EDL mark at the point that the button was pressed.

5.To stop recording but then continue to record to the current track, recording must be paused and not stopped. Press the PLAY/PAUSE button to enter the record-pause mode and then press REC/MARK to resume recording.

6.When ready to stop recording and complete the current track, press the STOP button. The TOC will be updated and the unit will enter the stop mode.

Notes

All record settings can be changed during recording except the REC MODE. If the REC MODE is changed during recording, the new setting takes effect for the next track.

If the Auto Mark feature is active during recording, every time a track is paused an EDL mark is added.

The REC LED will dim when the Limiter is heavily limiting the input signal.

The minimum length of a track is 0.5 seconds. A track of less than 0.5 seconds will not be recorded on the card.

Rec Cancel

The Rec Cancel function allows a recording that is in progress to be started over in case there is a problem or the information recorded so far is not what was intended. Performing this function will result in all the information recorded up to that point in the track to be discarded.

After performing the function, the unit will re-start at the beginning of the current track and wait for recording to be started again.

1.While recording press the 1/4 (REC CANCEL) button.

The "can" message will flash as follows in the display.

REC

5

5

5

5

5


REC


5


5


SP


5


5


L


-dB ∞�550

5

405

24


6 2 0


R

2.Press 1/4 (REC CANCEL) again within 3 seconds to perform the Rec Cancel function.

3.The PMD690 will discard the recording on the current track and re-enters the record-pause mode at the beginning of the track.

4.If the 1/4 button is not pressed within 3 seconds while the "can" message is flashing, recording will contonue as normal.

Note

• Recording will continue while the "can" message is flashing.

16

Page 20
Image 20
Marantz PMD690 manual Recording Operation, Basic Procedure, Rec Cancel

PMD690 specifications

The Marantz PMD690 is a versatile and user-friendly digital audio recorder that has gained popularity among audio professionals and enthusiasts alike. This device is designed to deliver high-quality sound recording while ensuring ease of use, making it an ideal choice for a variety of applications, including interviews, live performances, and field recordings.

One of the standout features of the PMD690 is its high-fidelity recording capability. It supports multiple audio formats, including WAV and MP3, allowing users to choose the quality that best suits their needs. The device can record in resolutions of up to 24-bit/96kHz, ensuring that the captured audio retains its clarity and detail. This makes it particularly valuable for music recording, sound design, and broadcasting.

The PMD690 is equipped with dual XLR/TRS combo inputs, allowing for a range of connectivity options. This flexibility enables users to connect various microphones and line-level devices, providing them with the freedom to adapt to different recording scenarios. The included phantom power supports condenser microphones, expanding the range of possible setups for professional recordings.

An intuitive interface is another hallmark of the PMD690. The device features a large, backlit LCD screen that provides clear visibility of recording levels, battery life, and remaining recording time. Navigating through the menu is straightforward, and the inclusion of dedicated control buttons enhances the overall user experience. Many users appreciate the quick access to essential functions, which is crucial in fast-paced recording environments.

In addition to its recording capabilities, the Marantz PMD690 offers robust editing features. Users can perform functions such as dividing and combining tracks, as well as adding simple metadata, making post-production tasks more convenient. This feature is particularly beneficial for podcasters and field recorders who need to manage and organize their recordings efficiently.

Rugged and portable, the PMD690 is designed for durability, making it an excellent choice for outdoor and on-the-go recording. Its compact design means it can easily fit into a camera bag or backpack, and its battery life is sufficiently long to handle extended recording sessions without the need for recharging.

In conclusion, the Marantz PMD690 stands out as a reliable and high-performance digital audio recorder that meets the needs of professionals and hobbyists alike. With its quality recording capabilities, versatile connectivity options, user-friendly interface, and durable construction, it is a valuable tool for anyone looking to capture audio in a variety of settings. Whether for professional use or personal projects, the PMD690 is sure to deliver exceptional performance and recording quality.