Part II: Installation

Connecting a VCR


AUDIO-R

Pb


S-VIDEO


VIDEO


Y/G

H

AUDIO-L


AUDIO-L


AUDIO-L

(MONO)


(MONO)


Pr/R

V


Pb/B

AUDIO-R

AUDIO-R


AUDIO-R


Incoming


DTV

INPUT

OUTPUT


Cable


LOOP


1080i

/ 720p / 480i / 480p

ANT-A

ANT-B


1


OUT


TV back panel


VCR back panel


2


AUDIO IN

VIDEO OUT


AUDIO OUT

IN


L

L

(Y/C)


Antenna

1

2


1


MONITOR

R

R

3


OUT

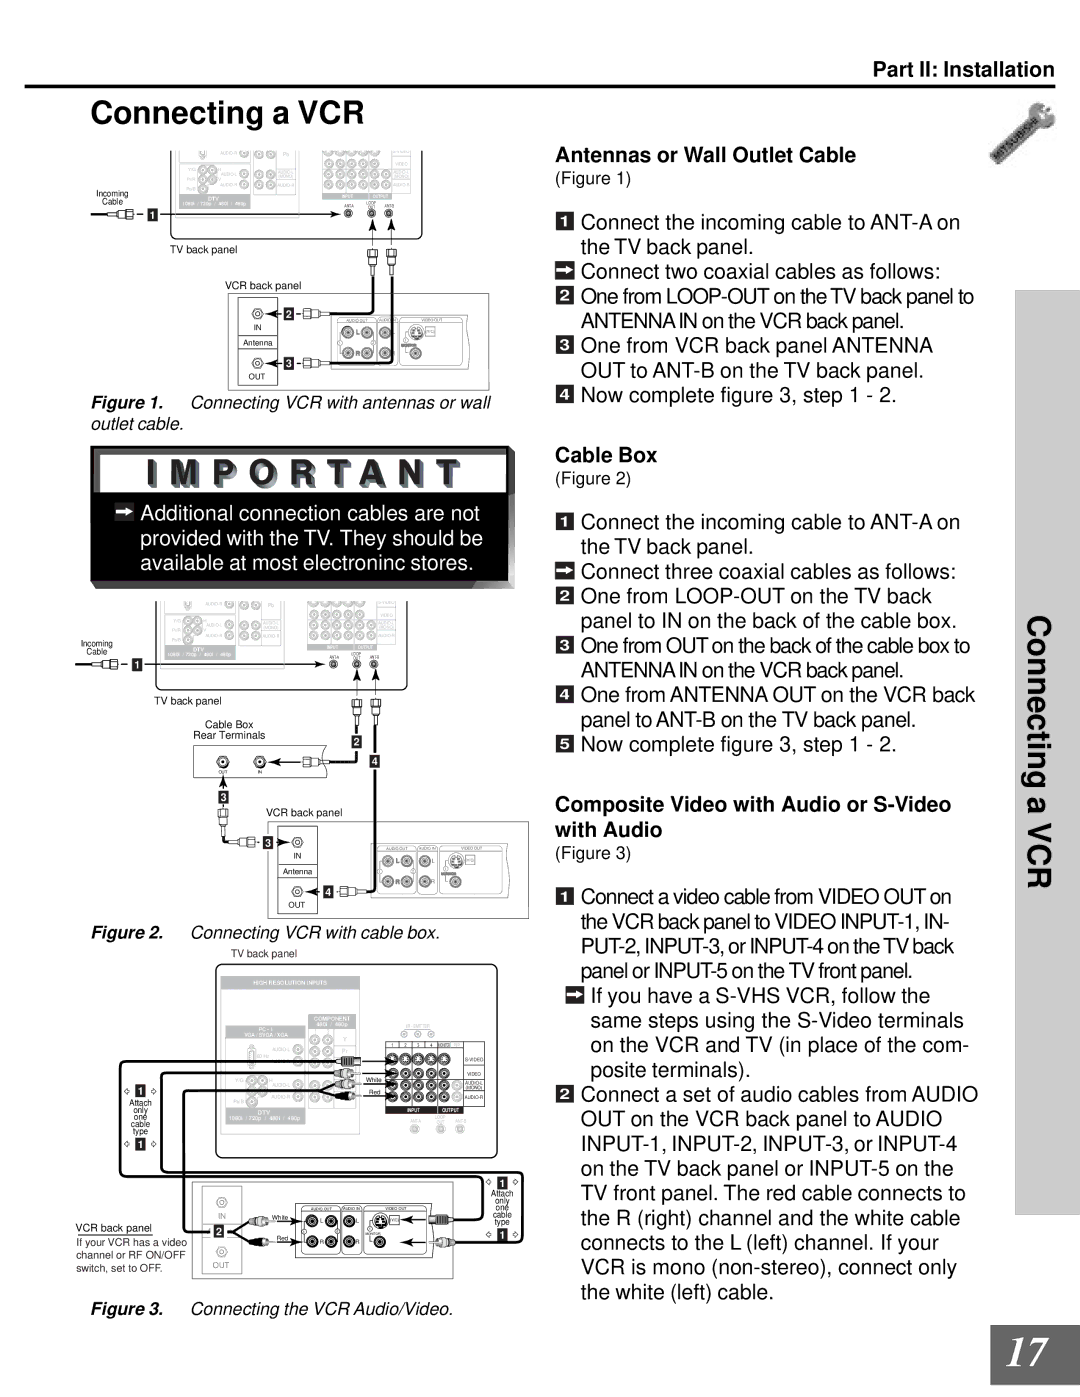
Figure 1. Connecting VCR with antennas or wall outlet cable.

Additional connection cables are not provided with the TV. They should be available at most electroninc stores.


AUDIO-R

Pb


S-VIDEO


VIDEO


Y/G

H

AUDIO-L


AUDIO-L


AUDIO-L

(MONO)


(MONO)


Pr/R

V


Incoming

Pb/B

AUDIO-R

AUDIO-R


AUDIO-R


DTV

INPUT

OUTPUT

Cable


LOOP


1080i

/ 720p / 480i / 480p

ANT-A

ANT-B


1


OUT


Antennas or Wall Outlet Cable

(Figure 1)

1

Connect the incoming cable to ANT-A on


the TV back panel.


Connect two coaxial cables as follows:

2

One from LOOP-OUT on the TV back panel to


ANTENNAIN on the VCR back panel.

3

One from VCR back panel ANTENNA


OUT to ANT-B on the TV back panel.

4

Now complete figure 3, step 1 - 2.

Cable Box

(Figure 2)

1

Connect the incoming cable to ANT-A on


the TV back panel.


Connect three coaxial cables as follows:

2

One from LOOP-OUT on the TV back


panel to IN on the back of the cable box.

3

One from OUT on the back of the cable box to


ANTENNAIN on the VCR back panel.

4

One from ANTENNA OUT on the VCR back

TV back panel

Cable Box

Rear Terminals

OUTIN

3

VCR back panel

3

IN

Antenna

4

OUT

2

4

AUDIO OUT

AUDIO IN

VIDEO OUT

L

L

(Y/C)

1

2

1

MONITOR

R R

panel to ANT-B on the TV back panel.

5 Now complete figure 3, step 1 - 2.

Composite Video with Audio or S-Video with Audio

(Figure 3)

1 Connect a video cable from VIDEO OUT on the VCR back panel to VIDEO INPUT-1, IN-

Connecting a VCR

Figure 2. Connecting VCR with cable box.

TV back panel

PUT-2, INPUT-3, or INPUT-4 on the TV back panel or INPUT-5 on the TV front panel.

1

Attach

only one cable type

1


HIGH RESOLUTION INPUTS


COMPONENT


PC - 1

480i

/

480p


1

2


VGA / SVGA / XGA


Y


AUDIO-L


Pr


60 Hz


AUDIO-R


Pb

Y/G

H


AUDIO-L


AUDIO-L


(MONO)

Pr/R

V


Pb/B

AUDIO-R


AUDIO-R


DTV


1080i

/ 720p / 480i /

480p


IR - EMITTER

1

2

3

4

MONITOR

PIP


S-VIDEO

White


VIDEO


AUDIO-L

Red


(MONO)


AUDIO-R


INPUT


OUTPUT

ANT-A

LOOP

ANT-B

OUT

If you have a S-VHS VCR, follow the same steps using the S-Video terminals on the VCR and TV (in place of the com- posite terminals).

2 Connect a set of audio cables from AUDIO OUT on the VCR back panel to AUDIO INPUT-1, INPUT-2, INPUT-3, or INPUT-4 on the TV back panel or INPUT-5 on the

VCR back panel

If your VCR has a video channel or RF ON/OFF switch, set to OFF.


1


Attach


only


AUDIO OUT

AUDIO IN

VIDEO OUT

one

IN


White

L

L

(Y/C)

cable

Anten2


type

na


1

2

1

1


MONITOR


Red

R

R


OUT


TV front panel. The red cable connects to the R (right) channel and the white cable connects to the L (left) channel. If your VCR is mono (non-stereo), connect only the white (left) cable.

Figure 3. Connecting the VCR Audio/Video.

17

Page 17
Image 17
Mitsubishi Electronics WD-65000 manual Connecting a VCR, Antennas or Wall Outlet Cable

WD-65000 specifications

The Mitsubishi Electronics WD-65000 is a high-quality home theater projector that stands out with its advanced features and technology, making it a popular choice for consumers looking to enhance their viewing experience. This DLP rear-projection television is well-regarded for its ability to deliver stunning visuals and immersive sound, ideal for movie nights, gaming, or sports events.

One of the standout features of the WD-65000 is its impressive 65-inch screen size, which provides a large viewing area without sacrificing home space. The display employs DLP technology, known for its ability to produce vibrant colors and sharp images with high contrast levels. This projector boasts a native resolution of 1920 x 1080 pixels, allowing it to support full HD content, ensuring that users can enjoy their favorite movies and TV shows in crystal-clear quality.

The WD-65000 is equipped with Mitsubishi's proprietary Brilliant Color technology, which enhances color accuracy and brightness across a wide color gamut. This technology significantly improves image quality, making a difference in both bright and dark scenes, resulting in more lifelike visuals. Additionally, the television has a high brightness level measured at around 1000 ANSI lumens, benefiting daylight viewing and making it suitable for various lighting conditions.

Another noteworthy characteristic is its advanced sound system that includes built-in speakers capable of delivering clear audio quality. Combining the visuals with robust audio creates an immersive environment that enhances the overall entertainment experience. Users also have the option to connect external sound systems through multiple audio output options.

Connectivity is made effortless with the WD-65000, which includes multiple HDMI ports, allowing users to connect gaming consoles, Blu-ray players, and streaming devices seamlessly. Other connectivity options include digital optical audio outputs and USB ports, providing versatility for various media devices.

In terms of design, the WD-65000 features a sleek, modern aesthetic that fits well in any living room or home theater setup. Its compact footprint makes it easier to place in various environments, while the user-friendly interface and remote control allow for easy navigation and adjustments.

Overall, the Mitsubishi Electronics WD-65000 is a well-rounded choice for those seeking a home entertainment solution that combines stunning picture quality, advanced technologies, and robust audio performance, making it a worthy investment for avid movie and gaming enthusiasts.