Part II: Installation

Connecting an Audio Receiver

Receiver

Stereo Audio System

(Figure 1)

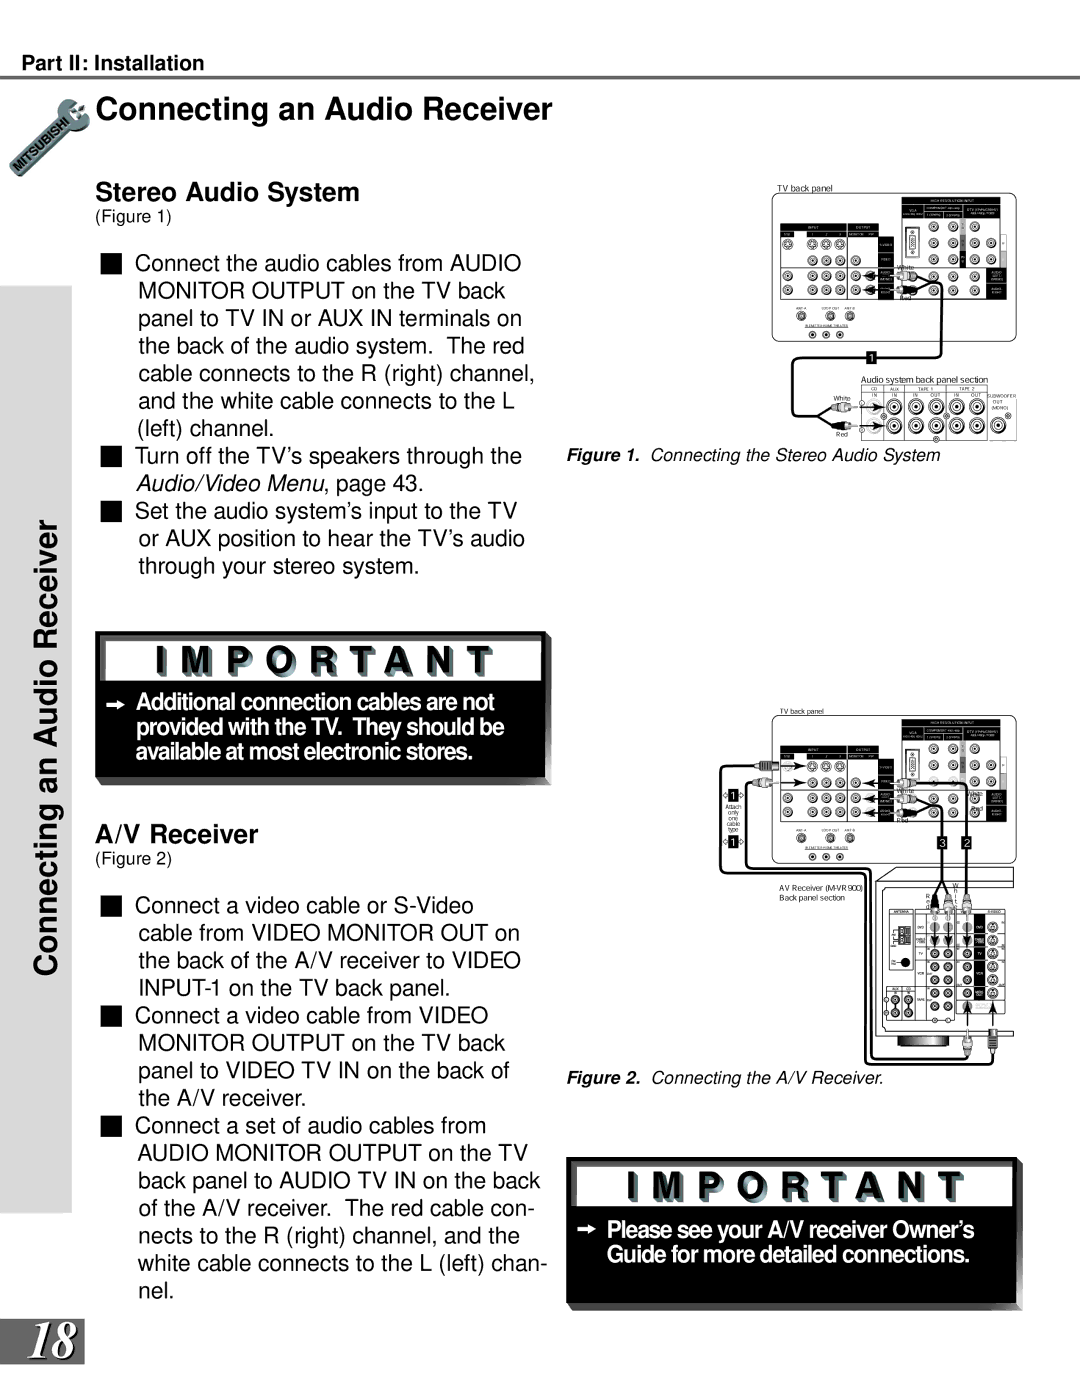
1Connect the audio cables from AUDIO MONITOR OUTPUT on the TV back panel to TV IN or AUX IN terminals on the back of the audio system. The red cable connects to the R (right) channel,

and the white cable connects to the L (left) channel.

2Turn off the TV’s speakers through the Audio/Video Menu, page 43.

3Set the audio system’s input to the TV or AUX position to hear the TV’s audio through your stereo system.

TV back panel


HIGH RESOLUTION INPUT


VGA

COMPONENT 480i /480p

DTV (YPrPb/GRBHV)


640X480, 60HZ

1 (YPrPb)

2 (YPrPb)

480i /480p /1080i


INPUT


OUTPUT


Y


G


STB

1

2

3

MONITOR

PIP


Pr

H


S-VIDEO


R


VIDEO


Pb

V


B


White


AUDIO-


AUDIO-


LEFT/


LEFT/


(MONO)


(MONO)


AUDIO-


AUDIO-


RIGHT


RIGHT


Red


ANT-A

LOOP OUT ANT-B

IR EMITTER HOME THEATER

1

Audio system back panel section


CD

AUX


TAPE 1


TAPE 2

White

IN

IN

IN

OUT

IN

OUT SUBWOOFER

L


OUT


(MONO)

R

Red

Figure 1. Connecting the Stereo Audio System

an Audio

Additional connection cables are not provided with the TV. They should be available at most electronic stores.

A/V Receiver

(Figure 2)

TV back panel


HIGH RESOLUTION INPUT


VGA

COMPONENT 480i /480p

DTV (YPrPb/GRBHV)


640X480, 60HZ

1 (YPrPb)

2 (YPrPb)

480i /480p /1080i


INPUT


OUTPUT


Y


G


STB

1

2

3

MONITOR

PIP


Pr

H


S-VIDEO


R


VIDEO


Pb

V


B

1


White


White


AUDIO-


AUDIO-


LEFT/


LEFT/


(MONO)


(MONO)

Attach


AUDIO-


Red

AUDIO-

only


RIGHT


RIGHT

one


Red


cable


type

ANT-A

LOOP OUT

ANT-B


1

IR EMITTER HOME THEATER

3

2

Connecting

1Connect a video cable or S-Video cable from VIDEO MONITOR OUT on the back of the A/V receiver to VIDEO INPUT-1 on the TV back panel.

2Connect a video cable from VIDEO MONITOR OUTPUT on the TV back

panel to VIDEO TV IN on the back of the A/V receiver.

3Connect a set of audio cables from AUDIO MONITOR OUTPUT on the TV back panel to AUDIO TV IN on the back of the A/V receiver. The red cable con- nects to the R (right) channel, and the white cable connects to the L (left) chan- nel.

AV Receiver (M-VR900)


W


h

Back panel section

R

i


e

t


d

e

Figure 2. Connecting the A/V Receiver.

Please see your A/V receiver Owner’s Guide for more detailed connections.

18

Page 18
Image 18
Mitsubishi Electronics WS-65908, WS-55908 manual Connecting an Audio Receiver, An Audio, Stereo Audio System

WS-65908, WS-55908 specifications

The Mitsubishi Electronics WS-55908 and WS-65908 are two distinguished models from Mitsubishi's acclaimed line of rear projection televisions, introduced in the early 2000s. These models are known for their robust performance and advanced technology, aiming to deliver a superior viewing experience for home theater enthusiasts.

Both models feature a large screen size, with the WS-55908 boasting a 55-inch display and the WS-65908 providing a more expansive 65-inch screen. This significant screen real estate allows for immersive viewing, making them ideal for movies, sports, and gaming. The screens utilize a high-definition resolution, ensuring crisp and clear images, while also supporting 1080p input, which was cutting edge at the time of their release.

One of the standout technologies in these models is Mitsubishi's exclusive Diamond Vision technology. This innovation enhances brightness and color accuracy, resulting in vibrant images with deep blacks and rich colors. The screens employ a DLP (Digital Light Processing) system, which utilizes a digital micromirror device to project high-quality images. This technology minimizes motion blur and contributes to smoother image reproduction, making it an attractive choice for fast-paced action scenes.

In addition to image quality, sound performance is also a crucial feature of these models. Both the WS-55908 and WS-65908 are equipped with integrated audio systems designed to provide robust sound to complement their visual capabilities. The inclusion of multiple audio outputs allows for easy connectivity with external sound systems, enhancing the overall home theater experience.

Another remarkable characteristic of these models is their user-friendly interface. The remote control is intuitive, allowing users to navigate through various settings, inputs, and features seamlessly. Furthermore, connectivity options are plentiful, with multiple HDMI and component inputs available, ensuring compatibility with a wide range of devices, including DVD players, gaming consoles, and streaming devices.

The design of the WS-55908 and WS-65908 is sleek and modern, making them aesthetically pleasing additions to any living room. Their refined cabinetry and minimalist bezels enhance the viewing experience by focusing attention on the screen itself.

In summary, the Mitsubishi Electronics WS-55908 and WS-65908 rear projection TVs are characterized by their large screen sizes, advanced DLP technology, exceptional image quality, and reliable sound performance. With their rich array of features and stylish designs, these models provided consumers with an outstanding home entertainment option during their era, catering to the evolving demands of television viewing.