Preparing the projector for operation

Getting ready for projection

1.Connect the power cord provided to the projector.

2.Connect the power cord to the wall power outlet.

3.Remove the lens cap.

Warning:

Do not look directly into the lens when projector is “ON”.

The lens cap is for protecting the lens. If you leave the power on with the cap on, the cap may be warped. Please remove the lens cap when you turn the power on.

This projector is equipped with the power cords for both U.S. and Europe. Use the appropriate power cord for your country.

A three-pin grounding type power plug is used with the projector. Do not remove the grounding pin on the power plug. If you are unable to insert the plug into the outlet, contact your electrician to replace your A/C outlet.

The supplied power cord for U.S. is used for 120V only. Never connect to any outlet or power supply having a different voltage or frequency. If you connect to the power supply having a different voltage, please use the appropriate power cord.

Use 100-240V AC 50/60Hz correct voltage other- wise it may lead to fire or electric shock.

Do not place any objects on the power cord, and keep the projector away from heat sources to avoid dam- aging the power cord. A damaged power cord can cause fire or electric shock.

Do not modify or alter the power cord otherwise it may cause fire or electric shock.

Contact your dealer if the cord is damaged.

Caution:

Plug in firmly and unplug by holding the plug, not by pulling the cable out.

Do not plug in or out with wet hands. It may cause an electric shock.

Adjusting the angle of projection

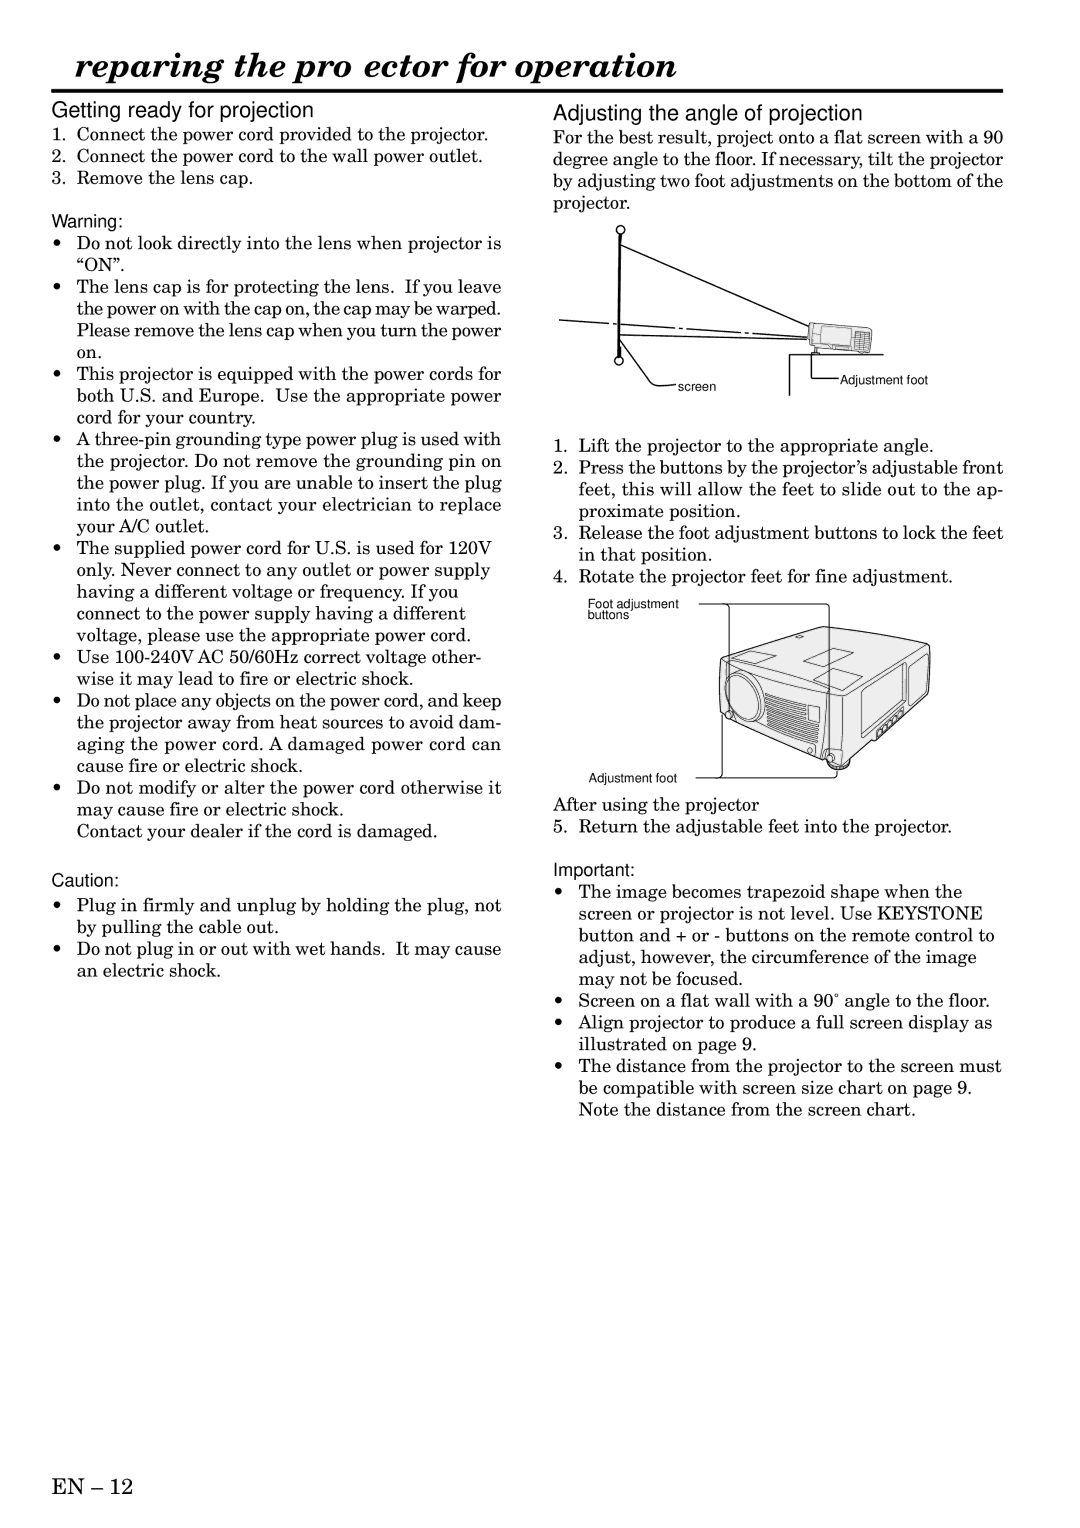
For the best result, project onto a flat screen with a 90 degree angle to the floor. If necessary, tilt the projector by adjusting two foot adjustments on the bottom of the projector.

screen

Adjustment foot


1.Lift the projector to the appropriate angle.

2.Press the buttons by the projector’s adjustable front feet, this will allow the feet to slide out to the ap- proximate position.

3.Release the foot adjustment buttons to lock the feet in that position.

4.Rotate the projector feet for fine adjustment.

Foot adjustment buttons

Adjustment foot

After using the projector

5. Return the adjustable feet into the projector.

Important:

The image becomes trapezoid shape when the screen or projector is not level. Use KEYSTONE button and + or - buttons on the remote control to adjust, however, the circumference of the image may not be focused.

Screen on a flat wall with a 90˚ angle to the floor.

Align projector to produce a full screen display as illustrated on page 9.

The distance from the projector to the screen must be compatible with screen size chart on page 9. Note the distance from the screen chart.

EN – 12

Page 12
Image 12
Mitsubishi Electronics X490, X500, S490 user manual Preparing the projector for operation, Getting ready for projection

S490, X500, X490 specifications

Mitsubishi Electronics has long been known for its commitment to innovation and excellence in the field of electronics, and their latest offerings, the X490, S490, and X500 series, are no exception. These models represent a culmination of advanced technology and user-centric features, making them ideal for various applications across different industries.

The X490 model is designed to impress with its high-resolution LCD display, offering vibrant colors and exceptional clarity. It incorporates advanced image processing technology that ensures sharp visuals, which is essential for detailed presentations or graphical content. Furthermore, the X490 features multiple connectivity options, including HDMI, VGA, and USB, allowing seamless integration with different devices, such as computers, tablets, and smartphones.

Building on the strengths of the X490, the S490 introduces enhancements in audio output, making it a perfect choice for environments where sound quality is paramount. The S490 is equipped with powerful built-in speakers and advanced sound processing algorithms that ensure clear audio reproduction, which is ideal for multimedia presentations. Additionally, it supports wireless connectivity, enabling users to connect devices without the hassle of cables.

The X500 model stands out as a premium option, integrating cutting-edge technologies that cater to the needs of professionals. It features an ultra-high-definition display with outstanding color accuracy, which is crucial for applications in graphic design, video editing, and other creative fields. The X500 also boasts smart features, including ambient light sensors that adjust brightness according to the surrounding environment, optimizing visibility and reducing eye strain.

All three models are built with durability in mind. Mitsubishi Electronics incorporates robust materials and advanced engineering techniques to ensure reliable performance in various settings, from corporate boardrooms to educational institutions. Their energy-efficient designs not only help reduce operational costs but also align with modern sustainability efforts.

User-friendly interfaces and intuitive controls make these models accessible to users of all skill levels. Whether it’s setting up a display for a presentation, adjusting settings for optimal performance, or navigating through different inputs, Mitsubishi Electronics has streamlined the user experience.

In conclusion, the Mitsubishi Electronics X490, S490, and X500 series offer a blend of high-quality visuals, superior sound, connectivity, and durability. These models are equipped with cutting-edge technologies, making them ideal for a wide range of professional environments, from education to corporate settings. With these advancements, Mitsubishi continues to set the standard for excellence in the electronics industry.