Menu operation (continued)

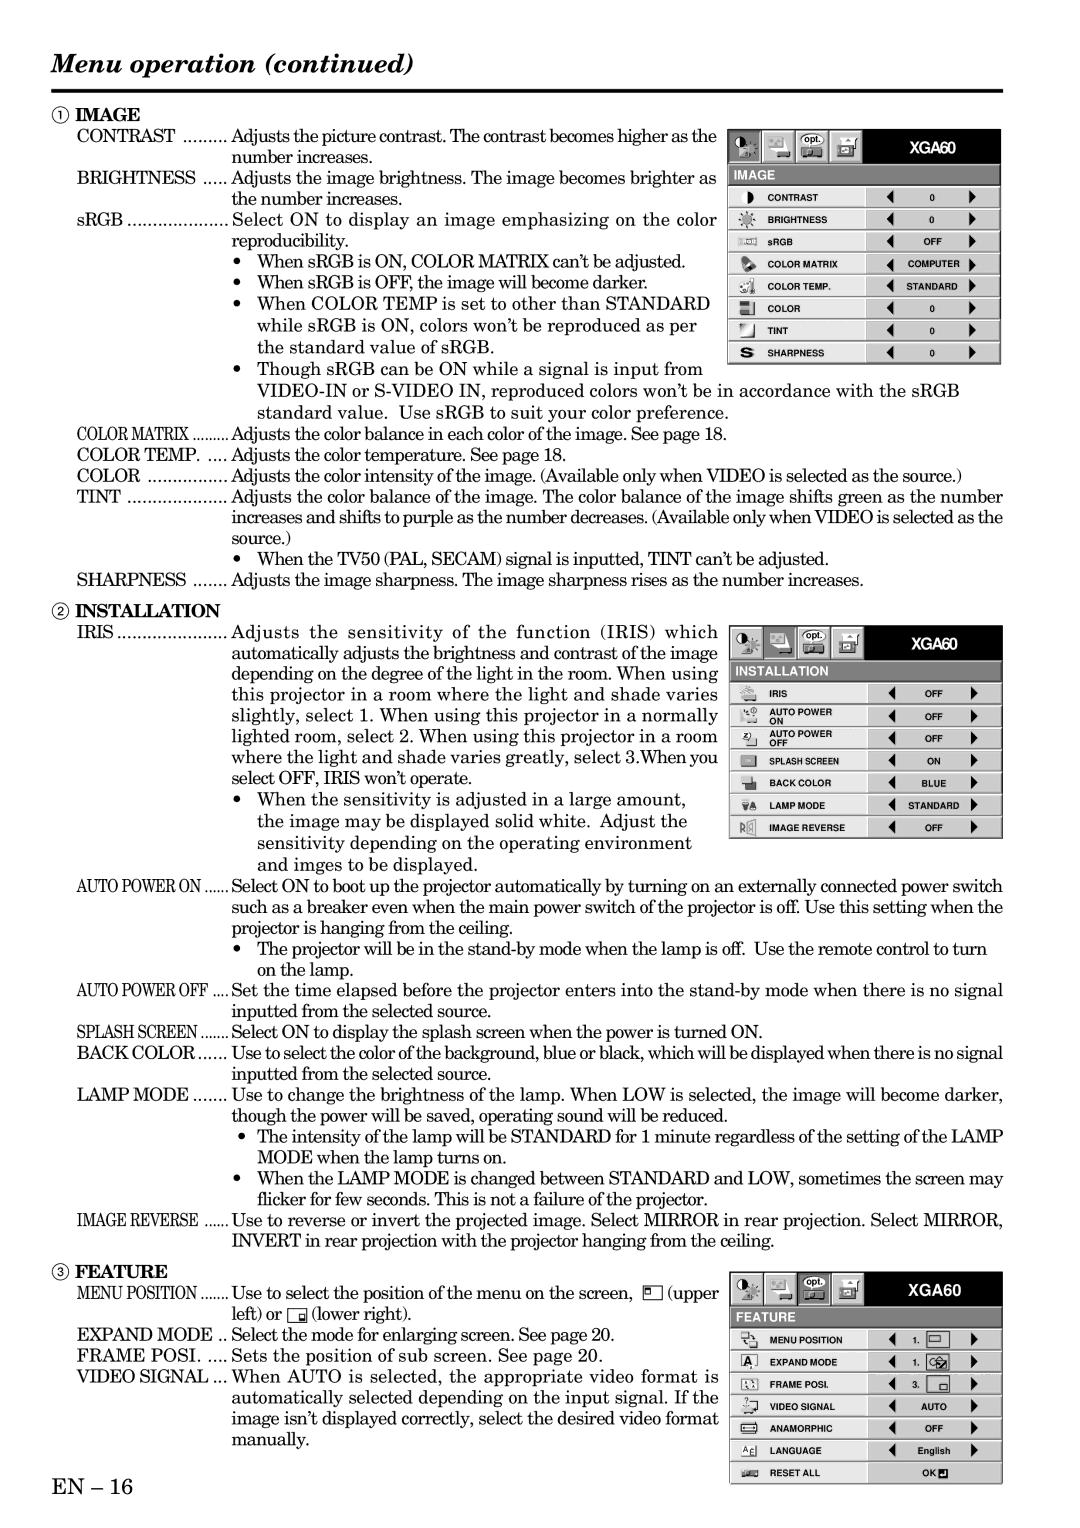
1IMAGE

CONTRAST ......... Adjusts the picture contrast. The contrast becomes higher as the


opt.


XGA60


number increases.


BRIGHTNESS ..... Adjusts the image brightness. The image becomes brighter as

IMAGE


the number increases.


CONTRAST

0


sRGB .................... Select ON to display an image emphasizing on the color


BRIGHTNESS

0


reproducibility.


sRGB

OFF


• When sRGB is ON, COLOR MATRIX can’t be adjusted.


COLOR MATRIX

COMPUTER


• When sRGB is OFF, the image will become darker.


COLOR TEMP.

STANDARD


• When COLOR TEMP is set to other than STANDARD


COLOR

0


while sRGB is ON, colors won’t be reproduced as per


TINT

0


the standard value of sRGB.


SHARPNESS

0


Though sRGB can be ON while a signal is input from

VIDEO-IN or S-VIDEO IN, reproduced colors won’t be in accordance with the sRGB


standard value. Use sRGB to suit your color preference.

COLOR MATRIX

Adjusts the color balance in each color of the image. See page 18.

COLOR TEMP

Adjusts the color temperature. See page 18.

COLOR

Adjusts the color intensity of the image. (Available only when VIDEO is selected as the source.)

TINT

Adjusts the color balance of the image. The color balance of the image shifts green as the number


increases and shifts to purple as the number decreases. (Available only when VIDEO is selected as the


source.)

When the TV50 (PAL, SECAM) signal is inputted, TINT can’t be adjusted. SHARPNESS ....... Adjusts the image sharpness. The image sharpness rises as the number increases.

2INSTALLATION

IRIS ...................... Adjusts the sensitivity of the function (IRIS) which


opt.


XGA60

automatically adjusts the brightness and contrast of the image


depending on the degree of the light in the room. When using

INSTALLATION


this projector in a room where the light and shade varies


IRIS

OFF

slightly, select 1. When using this projector in a normally


AUTO POWER

OFF


ON

lighted room, select 2. When using this projector in a room


AUTO POWER

OFF


OFF

where the light and shade varies greatly, select 3.When you


SPLASH SCREEN

ON


ON

select OFF, IRIS won’t operate.


BACK COLOR

BLUE


• When the sensitivity is adjusted in a large amount,


LAMP MODE

STANDARD

the image may be displayed solid white. Adjust the


IMAGE REVERSE

OFF

sensitivity depending on the operating environment


and imges to be displayed.

AUTO POWER ON ...... Select ON to boot up the projector automatically by turning on an externally connected power switch

such as a breaker even when the main power switch of the projector is off. Use this setting when the projector is hanging from the ceiling.


• The projector will be in the stand-by mode when the lamp is off. Use the remote control to turn


on the lamp.

AUTO POWER OFF ....

Set the time elapsed before the projector enters into the stand-by mode when there is no signal


inputted from the selected source.

SPLASH SCREEN

Select ON to display the splash screen when the power is turned ON.

BACK COLOR

Use to select the color of the background, blue or black, which will be displayed when there is no signal


inputted from the selected source.

LAMP MODE

Use to change the brightness of the lamp. When LOW is selected, the image will become darker,


though the power will be saved, operating sound will be reduced.


• The intensity of the lamp will be STANDARD for 1 minute regardless of the setting of the LAMP


MODE when the lamp turns on.


• When the LAMP MODE is changed between STANDARD and LOW, sometimes the screen may


flicker for few seconds. This is not a failure of the projector.

IMAGE REVERSE ...... Use to reverse or invert the projected image. Select MIRROR in rear projection. Select MIRROR,

INVERT in rear projection with the projector hanging from the ceiling.

3FEATURE

MENU POSITION ....... Use to select the position of the menu on the screen, (upper

left) or (lower right).

EXPAND MODE .. Select the mode for enlarging screen. See page 20. FRAME POSI. .... Sets the position of sub screen. See page 20.

VIDEO SIGNAL ... When AUTO is selected, the appropriate video format is automatically selected depending on the input signal. If the image isn’t displayed correctly, select the desired video format manually.

EN – 16

opt.

FEATURE

MENU POSITION

AEXPAND MODE

A


A

FRAME POSI.

A

?

VIDEO SIGNAL


ANAMORPHIC

A Ë LANGUAGE

RESET ALL

XGA60

1.

1.

3.

AUTO

OFF

English

OK

Page 16
Image 16
Mitsubishi Electronics X500, X490, S490 Number increases, Reproducibility, When sRGB is ON, Color Matrix can’t be adjusted

S490, X500, X490 specifications

Mitsubishi Electronics has long been known for its commitment to innovation and excellence in the field of electronics, and their latest offerings, the X490, S490, and X500 series, are no exception. These models represent a culmination of advanced technology and user-centric features, making them ideal for various applications across different industries.

The X490 model is designed to impress with its high-resolution LCD display, offering vibrant colors and exceptional clarity. It incorporates advanced image processing technology that ensures sharp visuals, which is essential for detailed presentations or graphical content. Furthermore, the X490 features multiple connectivity options, including HDMI, VGA, and USB, allowing seamless integration with different devices, such as computers, tablets, and smartphones.

Building on the strengths of the X490, the S490 introduces enhancements in audio output, making it a perfect choice for environments where sound quality is paramount. The S490 is equipped with powerful built-in speakers and advanced sound processing algorithms that ensure clear audio reproduction, which is ideal for multimedia presentations. Additionally, it supports wireless connectivity, enabling users to connect devices without the hassle of cables.

The X500 model stands out as a premium option, integrating cutting-edge technologies that cater to the needs of professionals. It features an ultra-high-definition display with outstanding color accuracy, which is crucial for applications in graphic design, video editing, and other creative fields. The X500 also boasts smart features, including ambient light sensors that adjust brightness according to the surrounding environment, optimizing visibility and reducing eye strain.

All three models are built with durability in mind. Mitsubishi Electronics incorporates robust materials and advanced engineering techniques to ensure reliable performance in various settings, from corporate boardrooms to educational institutions. Their energy-efficient designs not only help reduce operational costs but also align with modern sustainability efforts.

User-friendly interfaces and intuitive controls make these models accessible to users of all skill levels. Whether it’s setting up a display for a presentation, adjusting settings for optimal performance, or navigating through different inputs, Mitsubishi Electronics has streamlined the user experience.

In conclusion, the Mitsubishi Electronics X490, S490, and X500 series offer a blend of high-quality visuals, superior sound, connectivity, and durability. These models are equipped with cutting-edge technologies, making them ideal for a wide range of professional environments, from education to corporate settings. With these advancements, Mitsubishi continues to set the standard for excellence in the electronics industry.