Replacing the lamp (continued)

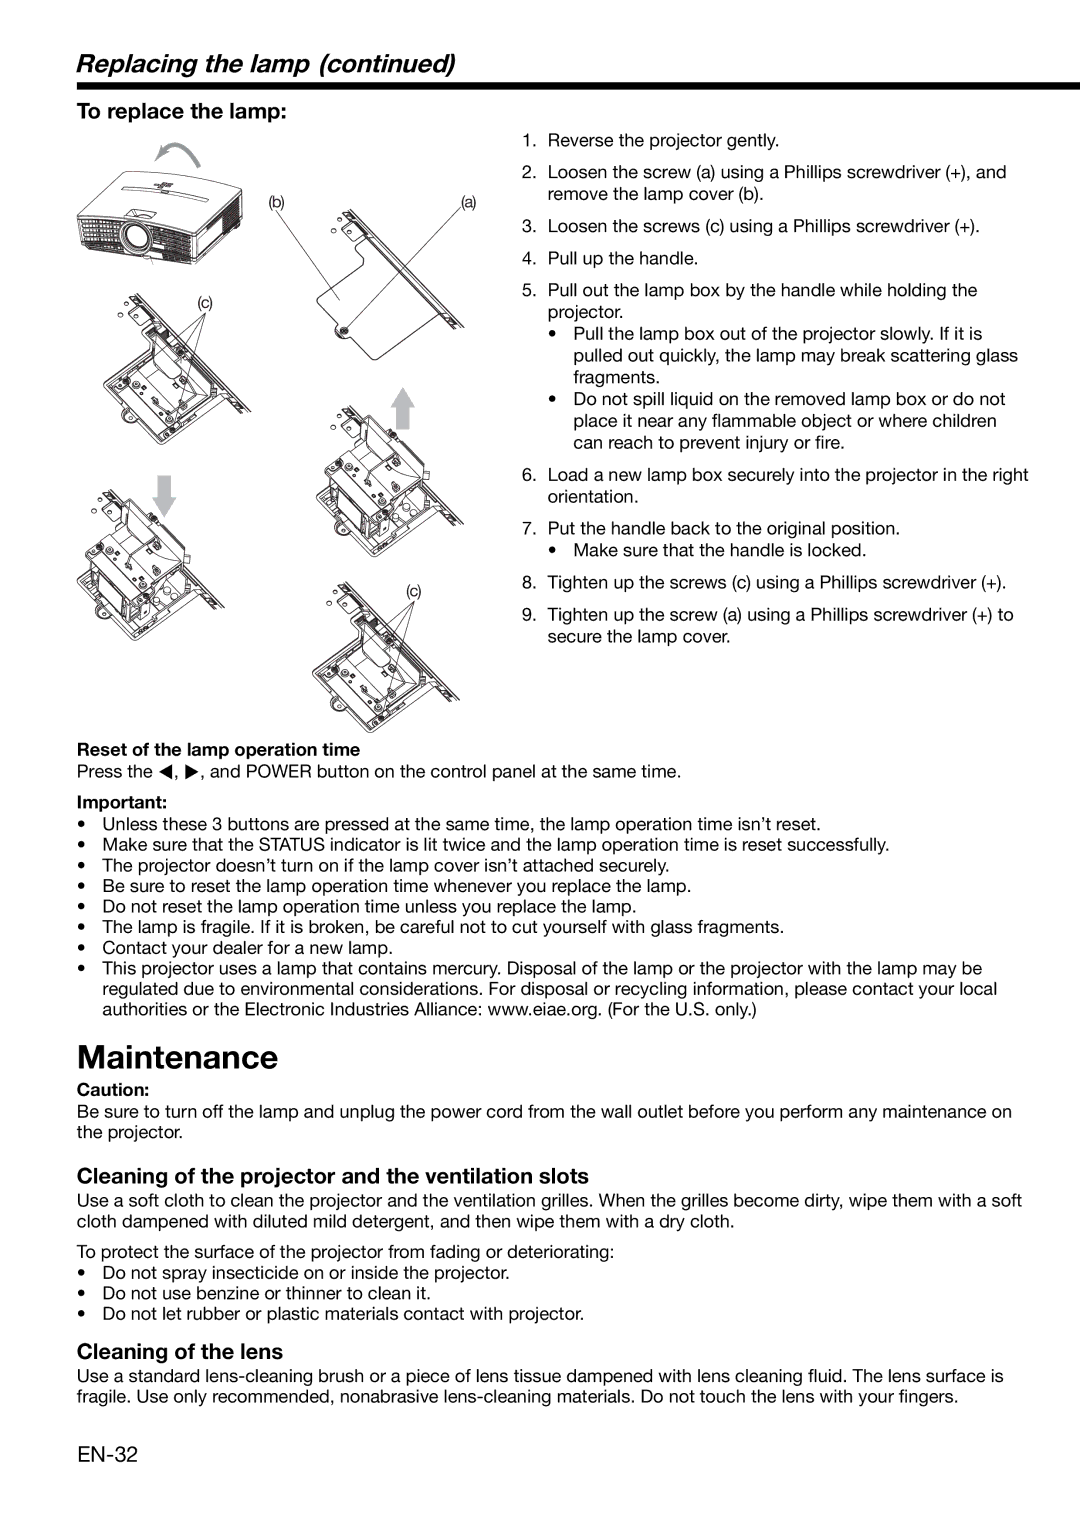
To replace the lamp:


1.

Reverse the projector gently.


2.

Loosen the screw (a) using a Phillips screwdriver (+), and

(b)


(a)

remove the lamp cover (b).


3.

Loosen the screws (c) using a Phillips screwdriver (+).


4.

Pull up the handle.

(c)


5.

Pull out the lamp box by the handle while holding the


projector.


• Pull the lamp box out of the projector slowly. If it is


pulled out quickly, the lamp may break scattering glass


fragments.


• Do not spill liquid on the removed lamp box or do not


place it near any flammable object or where children


can reach to prevent injury or fire.


6.

Load a new lamp box securely into the projector in the right


orientation.


7.

Put the handle back to the original position.


• Make sure that the handle is locked.


(c)

8.

Tighten up the screws (c) using a Phillips screwdriver (+).


9.

Tighten up the screw (a) using a Phillips screwdriver (+) to


secure the lamp cover.

Reset of the lamp operation time

Press the ￿, ￿, and POWER button on the control panel at the same time.

Important:

Unless these 3 buttons are pressed at the same time, the lamp operation time isn’t reset.

Make sure that the STATUS indicator is lit twice and the lamp operation time is reset successfully.

The projector doesn’t turn on if the lamp cover isn’t attached securely.

Be sure to reset the lamp operation time whenever you replace the lamp.

Do not reset the lamp operation time unless you replace the lamp.

The lamp is fragile. If it is broken, be careful not to cut yourself with glass fragments.

Contact your dealer for a new lamp.

This projector uses a lamp that contains mercury. Disposal of the lamp or the projector with the lamp may be regulated due to environmental considerations. For disposal or recycling information, please contact your local authorities or the Electronic Industries Alliance: www.eiae.org. (For the U.S. only.)

Maintenance

Caution:

Be sure to turn off the lamp and unplug the power cord from the wall outlet before you perform any maintenance on the projector.

Cleaning of the projector and the ventilation slots

Use a soft cloth to clean the projector and the ventilation grilles. When the grilles become dirty, wipe them with a soft cloth dampened with diluted mild detergent, and then wipe them with a dry cloth.

To protect the surface of the projector from fading or deteriorating:

Do not spray insecticide on or inside the projector.

Do not use benzine or thinner to clean it.

Do not let rubber or plastic materials contact with projector.

Cleaning of the lens

Use a standard lens-cleaning brush or a piece of lens tissue dampened with lens cleaning fluid. The lens surface is fragile. Use only recommended, nonabrasive lens-cleaning materials. Do not touch the lens with your fingers.

EN-32

Page 32
Image 32
Mitsubishi Electronics XD490U Replacing the lamp, To replace the lamp, Cleaning of the projector and the ventilation slots

XD490U specifications

The Mitsubishi Electronics XD490U is a projector designed to cater to the needs of both professional and educational environments. Its versatility and advanced features make it a popular choice for those looking to deliver impactful presentations and engaging lectures. This model stands out for its blend of performance, convenience, and image quality.

One of the main features of the XD490U is its high brightness, delivering up to 5000 ANSI lumens. This allows for clear and vivid images in well-lit environments, making it suitable for various settings, from classrooms to conference rooms. Coupled with a high contrast ratio, the projector ensures that colors are vibrant and details are sharp, enhancing the overall viewing experience.

The XD490U uses DLP technology, which is well-known for its reliability and excellent color reproduction. DLP projectors like the XD490U are less prone to color decay over time compared to other technologies, ensuring consistent performance throughout its lifespan. The projector supports a native resolution of XGA (1024 x 768), making it ideal for displaying presentations, videos, and images without losing detail.

To enhance usability, the Mitsubishi XD490U features a range of connectivity options. It includes multiple inputs such as HDMI, VGA, and composite video, making it compatible with a variety of devices from laptops to DVD players. This adaptability is essential for environments where multiple devices may be used for presentations.

The XD490U is also equipped with a built-in 10-watt speaker, which provides adequate sound for smaller rooms without the need for additional audio equipment. For larger settings, the projector can easily be connected to external sound systems.

Moreover, the XD490U is designed with user convenience in mind. Its lightweight and portable design make it easy to transport and set up in different locations. The projector also features a quick start-up time, allowing users to begin presentations without lengthy delays.

In terms of energy efficiency, the XD490U incorporates eco-conscious technologies that help reduce power consumption during operation and standby modes. This feature not only minimizes the environmental impact but also contributes to lower operating costs.

Overall, the Mitsubishi Electronics XD490U is a robust projector that combines impressive image quality, versatile connectivity, and user-friendly features, making it an excellent option for anyone seeking a reliable projection solution for various professional and educational applications.