Menu operation (continued)
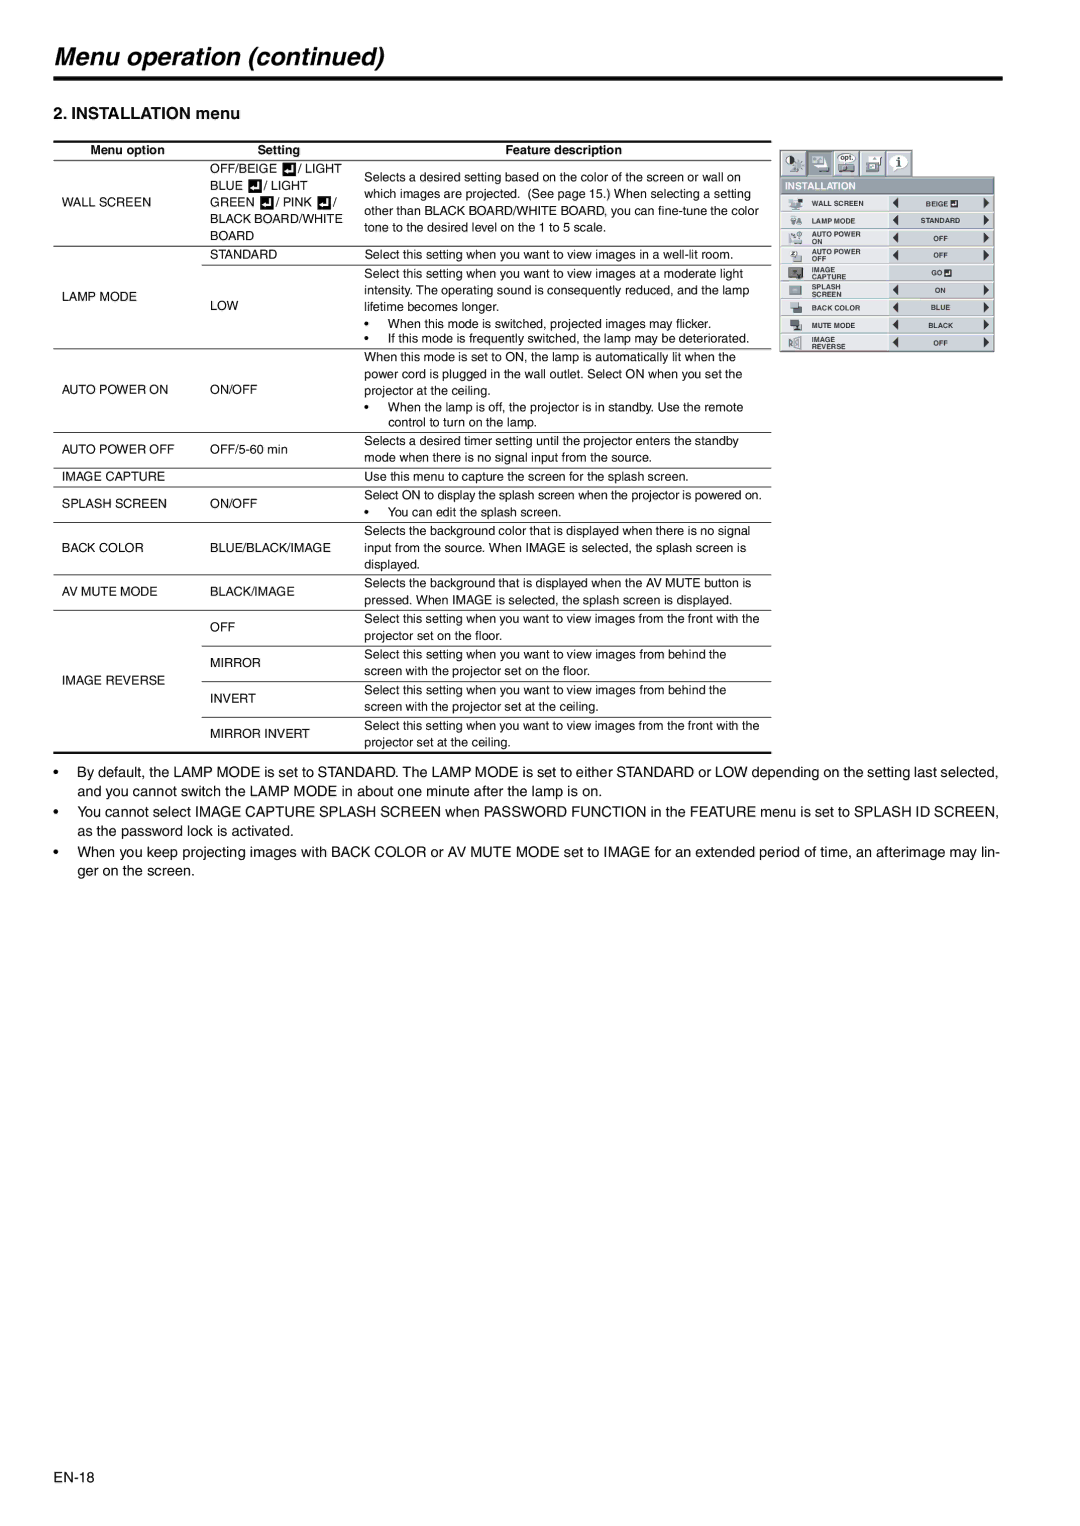
2. INSTALLATION menu
Menu option |
|
| Setting | Feature description | ||||||
| OFF/BEIGE |
| / LIGHT | |||||||
| BLUE |
|
| / LIGHT | Selects a desired setting based on the color of the screen or wall on | |||||
|
|
| ||||||||
|
|
| which images are projected. (See page 15.) When selecting a setting | |||||||
WALL SCREEN | GREEN |
|
| / PINK |
| |||||
|
|
| / | |||||||
|
|
|
|
|
|
|
|
| other than BLACK BOARD/WHITE BOARD, you can | |
| BLACK BOARD/WHITE | |||||||||
| BOARD |
|
|
|
|
|
| tone to the desired level on the 1 to 5 scale. | ||
|
|
|
|
|
|
|
| |||
|
|
|
|
|
|
|
|
| ||
| STANDARD | Select this setting when you want to view images in a | ||||||||
|
|
|
|
|
|
|
|
|
| |
|
|
|
|
|
|
|
|
| Select this setting when you want to view images at a moderate light | |
LAMP MODE |
|
|
|
|
|
|
|
| intensity. The operating sound is consequently reduced, and the lamp | |
LOW |
|
|
|
|
|
| lifetime becomes longer. | |||
|
|
|
|
|
|
| ||||
|
|
|
|
|
|
|
|
| • When this mode is switched, projected images may flicker. | |
|
|
|
|
|
|
|
|
| • If this mode is frequently switched, the lamp may be deteriorated. | |
|
|
|
|
|
|
|
|
|
| |
|
|
|
|
|
|
|
|
| When this mode is set to ON, the lamp is automatically lit when the | |
|
|
|
|
|
|
|
|
| power cord is plugged in the wall outlet. Select ON when you set the | |
AUTO POWER ON | ON/OFF |
|
|
|
|
|
| projector at the ceiling. | ||
|
|
|
|
|
|
|
|
| • When the lamp is off, the projector is in standby. Use the remote | |
|
|
|
|
|
|
|
|
| control to turn on the lamp. | |
|
|
|
|
|
|
|
|
|
| |
AUTO POWER OFF | Selects a desired timer setting until the projector enters the standby | |||||||||
mode when there is no signal input from the source. | ||||||||||
|
|
|
|
|
|
|
|
| ||
|
|
|
|
|
|
|
|
|
| |
IMAGE CAPTURE |
|
|
|
|
|
|
|
| Use this menu to capture the screen for the splash screen. | |
|
|
|
|
|
|
|
|
|
| |
SPLASH SCREEN | ON/OFF |
|
|
|
|
|
| Select ON to display the splash screen when the projector is powered on. | ||
|
|
|
|
|
| • You can edit the splash screen. | ||||
|
|
|
|
|
|
|
|
| ||
|
|
|
|
|
|
|
|
|
| |
|
|
|
|
|
|
|
|
| Selects the background color that is displayed when there is no signal | |
BACK COLOR | BLUE/BLACK/IMAGE | input from the source. When IMAGE is selected, the splash screen is | ||||||||
|
|
|
|
|
|
|
|
| displayed. | |
|
|
|
|
|
|
|
|
|
| |
AV MUTE MODE | BLACK/IMAGE | Selects the background that is displayed when the AV MUTE button is | ||||||||
pressed. When IMAGE is selected, the splash screen is displayed. | ||||||||||
|
|
|
|
|
|
|
|
| ||
| opt. |
|
INSTALLATION |
| |
| WALL SCREEN | BEIGE |
| LAMP MODE | STANDARD |
| AUTO POWER | OFF |
| ON | |
|
| |
| AUTO POWER | OFF |
| OFF | |
|
| |
| IMAGE | GO |
| CAPTURE | |
|
| |
ON | SPLASH | ON |
| SCREEN | |
|
| |
| BACK COLOR | BLUE |
| MUTE MODE | BLACK |
| IMAGE | OFF |
| REVERSE | |
|
| |
OFF
Select this setting when you want to view images from the front with the projector set on the floor.
MIRROR
Select this setting when you want to view images from behind the screen with the projector set on the floor.
IMAGE REVERSE
INVERT
Select this setting when you want to view images from behind the screen with the projector set at the ceiling.
MIRROR INVERT
Select this setting when you want to view images from the front with the projector set at the ceiling.
•By default, the LAMP MODE is set to STANDARD. The LAMP MODE is set to either STANDARD or LOW depending on the setting last selected, and you cannot switch the LAMP MODE in about one minute after the lamp is on.
•You cannot select IMAGE CAPTURE SPLASH SCREEN when PASSWORD FUNCTION in the FEATURE menu is set to SPLASH ID SCREEN, as the password lock is activated.
•When you keep projecting images with BACK COLOR or AV MUTE MODE set to IMAGE for an extended period of time, an afterimage may lin- ger on the screen.
