Manuals
/
Monessen Hearth
/
Household Appliance
/
Stove
Monessen Hearth
C2804VF, C2802VF Log Placement, DO NOT sprinkle volcanic rocks on the logs or
Models:
C2803VF
C2802VF
C2804VF
C2801VF
1
16
28
28
Download
28 pages
24.13 Kb
13
14
15
16
17
18
19
20
Troubleshooting
Specs
Install
Parts list
Wiring Diagram
Connecting The Gas
Warranty
Observed Problem
Accessories
Burner Assembly
Page 16
Image 16
Page 15
Page 17
Page 16
Image 16
Page 15
Page 17
Contents
MODELS C2801VF, C2802VF C2803VF, and C2804VF
Natural Gas or Propane/LPG Milli-VoltControl
WHAT TO DO IF YOU SMELL GAS
Do not try to light any appliance
CONTENTS
INSTALLER
IMPORTANT SAFETY INFORMATION
OWNER
IMPORTANT SAFETY INFORMATION
Continued from page
PRODUCT FEATURES
On/Off Switch Data andOptional
Optional Remote Receiver Off/Pilot/On Knob
Instruction Thermostat Plates Sensor Hi/Lo Knob
GETTING STARTED
WHAT YOU WILL NEED FOR INSTALLATION
MAKE SURE YOU HAVE RECEIVED ALL PARTS
PRODUCT SPECIFICATIONS
NATURAL GAS
PROPANE / LPG
IGNITION CONTROLS
GENERAL INSTALLATION INFORMATION
Do not install the heater …
•In high traffic areas •In windy or drafty areas
CODES
GENERAL INSTALLATION INFORMATION
BTU/Hr = L1
Corner Installation
Wall Installation
CLEARANCES / HEIGHT REQUIRMENTS
Front View
CONNECTING THE GAS
Figure 4 - Gas Connection
Connecting directly to an unregulated
CONNECTING REMOTE RECEIVER
propane/L.P.G. tank can cause an
explosion
ELECTRICAL WIRING MILLI-VOLT
Figure 7 - Wiring Diagram
CONNECTING OPTIONAL WALL SWITCH OR THERMOSTAT
Millivolt
Figure 8 - Removing Face Plate from Stove
ELECTRICAL WIRING MILLI-VOLT
Screws
OPERATION OF THERMOSTAT SENSOR
ELECTRICAL WIRING MILLI-VOLT
Figure 10 - Clipping Thermo Bulb into
Plastic Clip
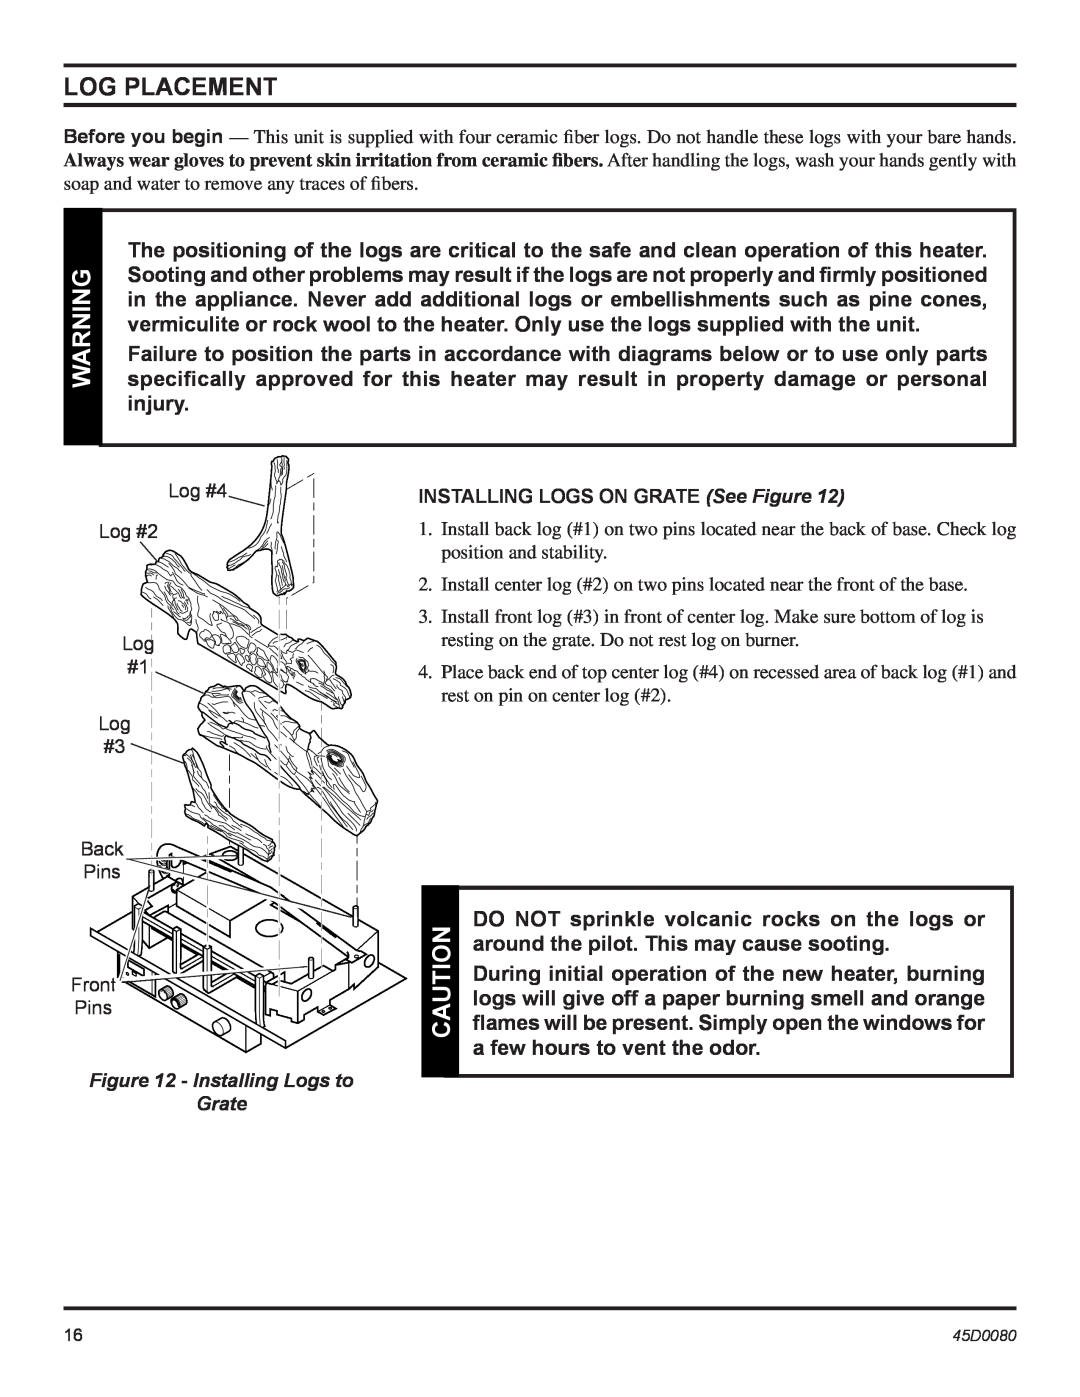
LOG PLACEMENT
DO NOT sprinkle volcanic rocks on the logs or
around the pilot. This may cause sooting
a few hours to vent the odor
FLAME APPEARANCE
CHECKING BURNER FLAME
OPERATING INSTRUCTIONS
CHECKING PILOT FLAME
OPERATING INSTRUCTIONS
FOR YOUR SAFETY READ BEFORE LIGHTING
WHAT TO DO IF YOU SMELL GAS
TO TURN OFF GAS TO HEATER
MILLI-VOLTCONTROL LIGHTING INSTRUCTIONS
OPERATING INSTRUCTIONS
CLEANING AND SERVICING
OPERATING INSTRUCTIONS AND CLEANING AND SERVICING
MATCH LIGHTING INSTRUCTIONS
LOGS
REPLACEMENT PARTS LIST
Description
BURNER ASSEMBLY
REPLACEMENT PARTS
45D0080
REPLACEMENT PARTS LIST
BURNER ASSEMBLY
Accessories
C2801/02/03/04VF
TROUBLESHOOTING
OBSERVED PROBLEM
POSSIBLE CAUSE
REMEDY
TROUBLESHOOTING
OBSERVED PROBLEM
POSSIBLE CAUSE
REMEDY
45D0080
45D0080
LIMITED LIFETIME WARRANTY POLICY
LIFETIME WARRANTY
FIVE YEAR WARRANTY
BASIC WARRANTY
Top
Page
Image
Contents