16” Bar 54 DL 6220-210816

18” Bar 60 DL 6220-210805

19
18
GUIDE BAR MAINTENANCE:
Most guide bar problems can be prevented merely by
keeping the chain saw well maintained.
Insufficient guide bar lubrication and operating the saw
with chain that is too tight will contribute to rapid bar wear.
To help minimize bar wear, the following guide bar
maintenance procedures are recommended.
BAR WEAR - Turn guide bar frequently at regular
intervals (for example, after 5 hours of use), to ensure
even wear on top and bottom of bar.
BAR GROOVES - Bar grooves (or rails which support and
carry the chain) should be cleaned if saw has been used
heavily or if saw chain appears dirty. Rails should always
be cleaned every time saw chain is removed.
OIL PASSAGES - Oil passages on the bar should be
cleaned to ensure proper lubrication of the bar and chain
during operation.
NOTE: The condition of the oil passages can be easily
checked. If the passages are clear, the chain will
automatically give off a spray of oil within
seconds of starting the saw. Your saw is
equipped with an automatic oiler system.
CHAIN MAINTENANCE

Chain Tension

Check the chain tension frequently and adjust as often as
necessary to keep the chain snug on the bar, but loose
enough to be pulled around by hand.

Breaking in a New Saw Chain

A new chain and bar will need chain readjustment after
as few as 5 cuts. This is normal during the break-in
period, and the interval between future adjustments will
begin to lengthen quickly.

Chain Lubrication

Always make sure the automatic oiler system is working
properly. Keep the oil tank filled with Genuine Factory
Parts Chain, Bar and Sprocket Oil.
Adequate lubrication of the bar and chain during cutting
operations is essential to minimize friction with the guide bar.
Never starve the bar and chain of lubricating oil. Running
the saw dry or with too little oil will decrease cutting
efficiency, shorten saw chain life, cause rapid dulling of
chain, and lead to excessive wear of bar from
overheating. Too little oil is evidenced by smoke or bar
discoloration.

Chain Sharpening

Chain sharpening requires special tools to ensure that
cutters are sharpened at the correct angle and depth. For
the inexperienced chain saw user, we recommend that
the saw chain be professionally sharpened by the
nearest Authorized Service Center. If you feel
comfortable sharpening your own saw chain, special
tools are available from your Authorized Service Center.
MAINTENANCE AND REPAIR INSTRUCTIONS

Never have more

than 3 links

removed from a loop of chain. This could

cause damage to the sprocket.

WARNING:
CHAIN REPLACEMENT INFORMATION
There may be other quality equivalent replacement
components for achieving kickback protection.
INERTIA CHAIN BRAKE®ACTION
NOTE: THIS SAW IS EQUIPPED WITH AN INERTIA
CHAIN BRAKE. IF THE SAW KICKS BACK
WHILE IN USE, THE INERTIA OF THE MOVING
SAW WILL ACTIVATE THE BRAKE. A BRAKE
BAND AROUND THE CLUTCH DRUM
ACTIVATES AND STOPS THE MOVING CHAIN.
CHAIN BRAKE®OPERATIONAL TEST
Test the Chain Brake®periodically to ensure proper
function.
Perform a Chain Brake®test prior to initial cutting,
following extensive cutting, and definitely following any
Chain Brake®service. Test the Chain Brake:
1. Place saw on a clear, firm, flat surface.
2. Start engine.
3. Grasp the rear handle (A) with your right hand (Fig. 33).
4. With your left hand, hold the front handle (B) [not
Chain Brake®lever (C)] firmly (Fig. 33).
5. Squeeze the throttle trigger to 1/3 throttle, then
immediately activate the Chain Brake®lever (C) (Fig. 33).
6. Chain should stop abruptly. When it does,
immediately release the throttle trigger.
A
C
B

Activate the Chain

Brake®slowly and

deliberately. Keep the chain from touching

anything; don’t let the saw tip forward.

WARNING:

If chain does not

stop, turn engine off

and take your unit to the nearest Authorized

Service Center for service.

WARNING:
Fig. 33
7. If Chain Brake®functions properly, turn the engine off
and return the Chain Brake®to the DISENGAGED
position.

Bar Length Drive Links Part Number

14” Bar 49 DL 6220-210803

MAINTENANCE AND REPAIR INSTRUCTIONS
STORING A CHAIN SAW
Storing a chain saw for longer than 30 days requires
storage maintenance. Unless the storage instructions are
followed, fuel remaining in the carburetor will evaporate,
leaving gum-like deposits. This could lead to difficult
starting and result in costly repairs.
1. Remove the fuel tank cap slowly to release any
pressure in tank. Carefully drain the fuel tank.
2. Start the engine and let it run until the unit stops to
remove fuel from carburetor.
3. Allow the engine to cool (approx. 5 minutes).
4. Using a spark plug wrench, remove the spark plug.
5. Pour 1 teaspoon of clean 2-cycle oil into the
combustion chamber. Pull starter rope slowly several
times to coat internal components. Replace spark
plug (Fig. 31).
NOTE: Store the unit in a dry place and away from
possible sources of ignition such as a furnace,
gas hot water heater, gas dryer, etc.
Fig. 31
REMOVING A UNIT FROM STORAGE
1. Remove spark plug.
2. Pull starter rope briskly to clear excess oil from
combustion chamber.
3. Clean and gap spark plug or install a new spark plug
with proper gap.
4. Prepare unit for operation.
5. Fill fuel tank with proper fuel / oil mixture. See Oil
and Fuel Information.

Never store a chain

saw for longer than

30 days without performing the following

procedures.

CAUTION:

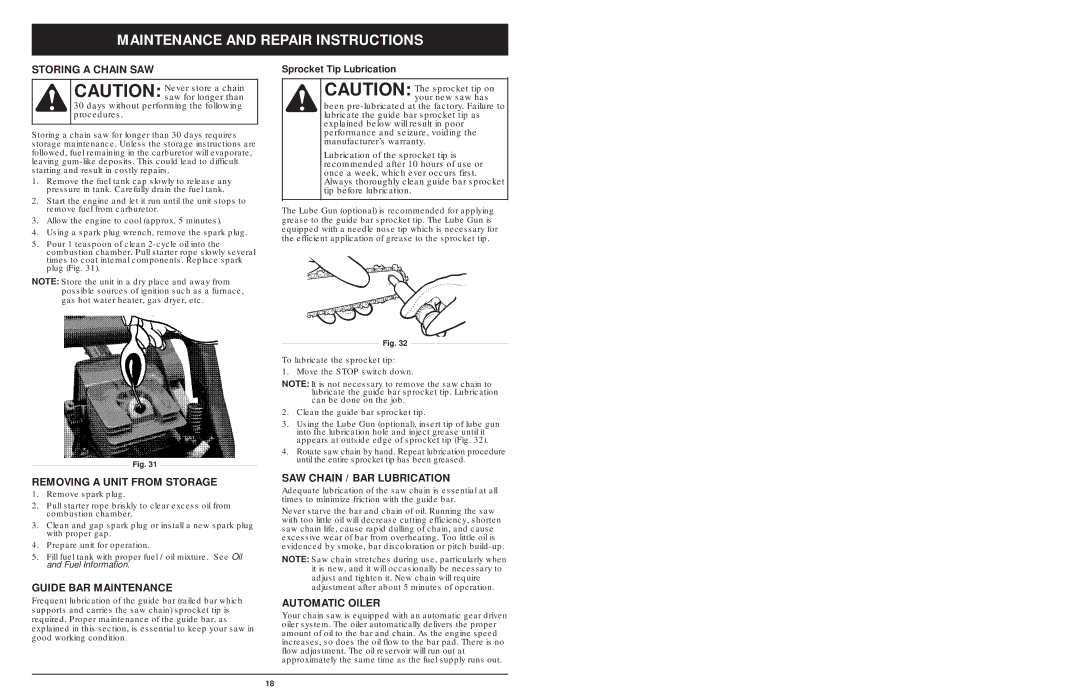
Sprocket Tip Lubrication

The Lube Gun (optional) is recommended for applying
grease to the guide bar sprocket tip. The Lube Gun is
equipped with a needle nose tip which is necessary for
the efficient application of grease to the sprocket tip.

The sprocket tip on

your new saw has

been pre-lubricated at the factory. Failure to

lubricate the guide bar sprocket tip as

explained below will result in poor

performance and seizure, voiding the

manufacturer’s warranty.

Lubrication of the sprocket tip is

recommended after 10 hours of use or

once a week, which ever occurs first.

Always thoroughly clean guide bar sprocket

tip before lubrication.

CAUTION:
Fig. 32
To lubricate the sprocket tip:
1. Move the STOP switch down.
NOTE: It is not necessary to remove the saw chain to
lubricate the guide bar sprocket tip. Lubrication
can be done on the job.
2. Clean the guide bar sprocket tip.
3. Using the Lube Gun (optional), insert tip of lube gun
into the lubrication hole and inject grease until it
appears at outside edge of sprocket tip (Fig. 32).
4. Rotate saw chain by hand. Repeat lubrication procedure
until the entire sprocket tip has been greased.
SAW CHAIN / BAR LUBRICATION
Adequate lubrication of the saw chain is essential at all
times to minimize friction with the guide bar.
Never starve the bar and chain of oil. Running the saw
with too little oil will decrease cutting efficiency, shorten
saw chain life, cause rapid dulling of chain, and cause
excessive wear of bar from overheating. Too little oil is
evidenced by smoke, bar discoloration or pitch build-up.
NOTE: Saw chain stretches during use, particularly when
it is new, and it will occasionally be necessary to
adjust and tighten it. New chain will require
adjustment after about 5 minutes of operation.
AUTOMATIC OILER
Your chain saw is equipped with an automatic gear driven
oiler system. The oiler automatically delivers the proper
amount of oil to the bar and chain. As the engine speed
increases, so does the oil flow to the bar pad. There is no
flow adjustment. The oil reservoir will run out at
approximately the same time as the fuel supply runs out.
GUIDE BAR MAINTENANCE
Frequent lubrication of the guide bar (railed bar which
supports and carries the saw chain) sprocket tip is
required. Proper maintenance of the guide bar, as
explained in this section, is essential to keep your saw in
good working condition.