SECTION 3: UNPACKING INSTRUCTIONS
Remove Unit From Carton
IMPORTANT: This unit is shipped WITHOUT GASOLINE or OIL in the engine. Be certain to service the engine with gasoline and oil as instructed in the separate engine manual before operating your mower.
NOTE: Reference to the right or left hand side of the mower is observed from the operating position.
•Remove staples, break glue on the top flaps, or cut the tape at carton end and peel along top flap to open the carton.
•Remove any loose parts included with the unit (i.e., operator’s manual, etc.).
•Cut the corners and lay the carton down flat.
•Remove packing material.
Roll or slide the unit out of carton. Check the carton thoroughly for loose parts.
REMOVE MANUAL & LOOSE PARTS
PUSH |
Figure 1
Disconnect Spark Plug Wire
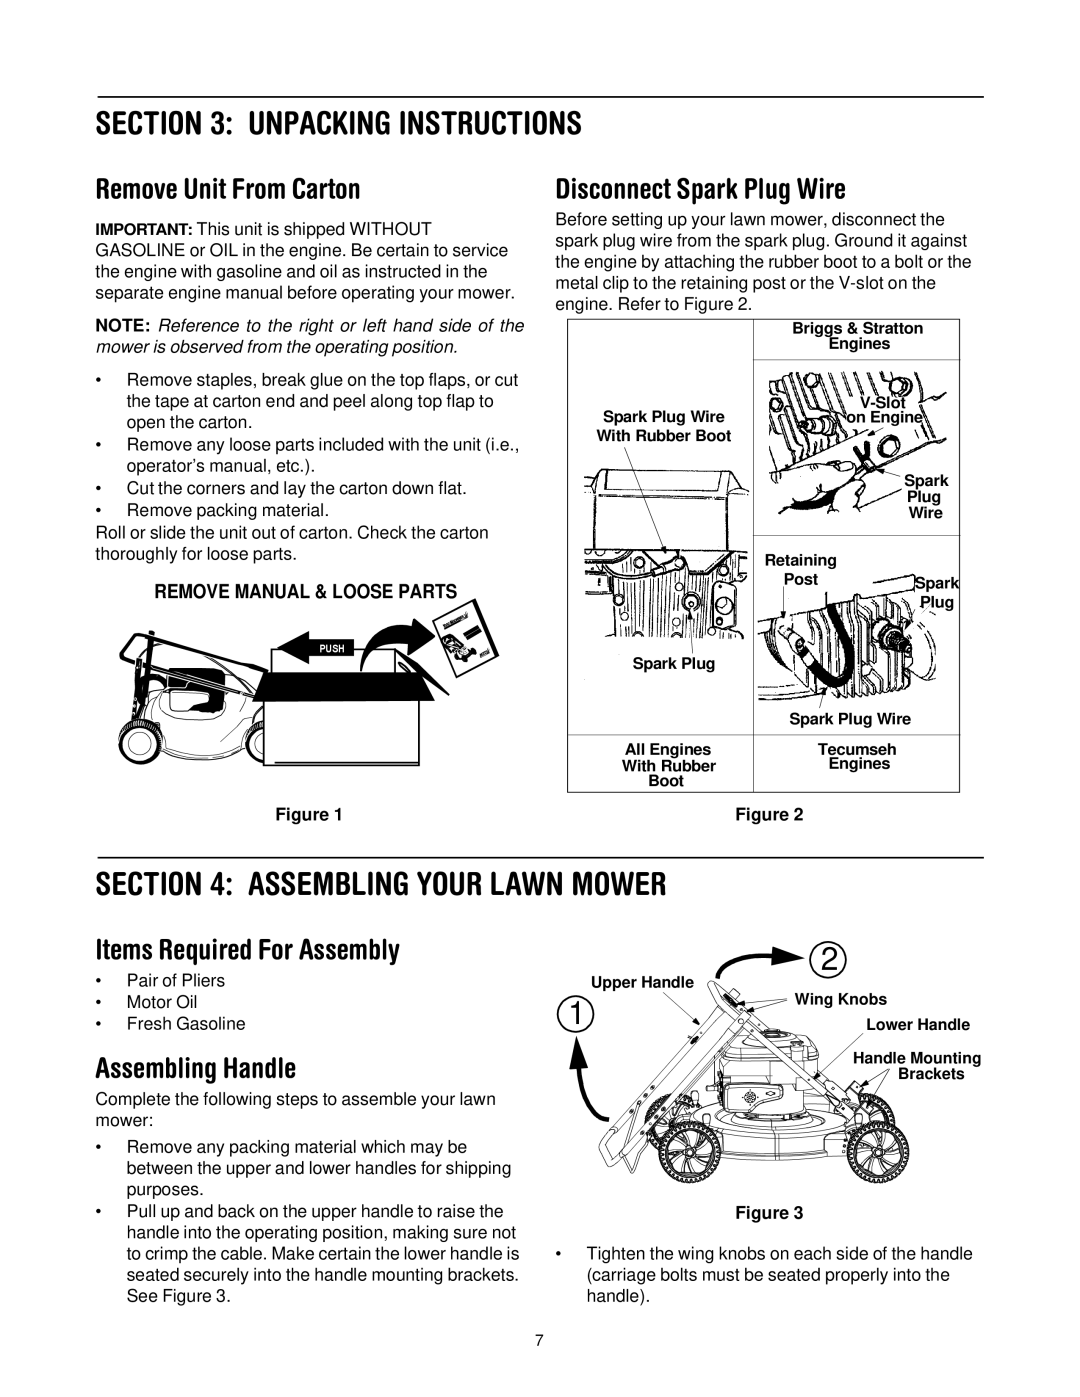
Before setting up your lawn mower, disconnect the spark plug wire from the spark plug. Ground it against the engine by attaching the rubber boot to a bolt or the metal clip to the retaining post or the
| Briggs & Stratton |
| Engines |
|
|
Spark Plug Wire | |
on Engine | |
With Rubber Boot |
|
Spark
Plug
Wire
Retaining
PostSpark
Plug
Spark Plug |
|
| Spark Plug Wire |
|
|
All Engines | Tecumseh |
With Rubber | Engines |
Boot |
|
Figure 2
SECTION 4: ASSEMBLING YOUR LAWN MOWER
Items Required For Assembly
•Pair of Pliers
•Motor Oil
•Fresh Gasoline
Assembling Handle
Complete the following steps to assemble your lawn mower:
•Remove any packing material which may be between the upper and lower handles for shipping purposes.
•Pull up and back on the upper handle to raise the handle into the operating position, making sure not to crimp the cable. Make certain the lower handle is seated securely into the handle mounting brackets. See Figure 3.
| 2 |
| ||||||||||||||||||||||||||||||||||
| Upper Handle | |||||||||||||||||||||||||||||||||||
1 |
|
|
|
|
|
|
|
|
|
|
|
|
|
|
|
|
|
|
|
|
|
|
|
|
|
| Wing Knobs | |||||||||
|
|
|
|
|
|
|
|
|
|
|
|
|
|
|
|
|
|
|
|
|
|
|
|
|
|
|
|
|
|
|
|
|
|
| Lower Handle | |
|
|
|
|
|
|
|
|
|
|
|
|
|
|
|
|
|
|
|
|
|
|
|
|
|
|
|
|
|
|
|
|
|
|
|
| Handle Mounting |
|
|
|
|
|
|
|
|
|
|
|
|
|
|
|
|
|
|
|
|
|
|
|
|
|
|
|
|
|
|
|
|
|
|
|
| |
|
|
|
|
|
|
|
|
|
|
|
|
|
|
|
|
|
|
|
|
|
|
|
|
|
|
|
|
|
|
|
|
|
|
|
| |
|
|
|
|
|
|
|
|
|
|
|
|
|
|
|
|
|
|
|
|
|
|
|
|
|
|
|
|
|
|
|
|
|
|
|
| |
|
|
|
|
|
|
|
|
|
|
|
|
|
|
|
|
|
|
|
|
|
|
|
|
|
|
|
|
|
|
|
|
|
|
|
| Brackets |
|
|
|
|
|
|
|
|
|
|
|
|
|
|
|
|
|
| |||||||||||||||||||
|
|
|
|
|
|
|
|
|
|
|
|
|
|
|
|
|
|
|
|
|
|
|
|
|
|
|
|
|
|
|
|
|
|
|
|
|
|
|
|
|
|
|
|
|
|
|
|
|
|
|
|
|
|
|
|
|
|
|
|
|
|
|
|
|
|
|
|
|
|
|
|
|
|
|
|
|
|
|
|
|
|
|
|
|
|
|
|
|
|
|
|
|
|
|
|
|
|
|
|
|
|
|
|
|
|
|
|
|
|
|
Figure 3
•Tighten the wing knobs on each side of the handle (carriage bolts must be seated properly into the handle).
7
