CONTROLS AND COMPONENTS

Figure 2 shows the location of the basic controls or components for the MP1 saw. Listed below is a brief explanation of each control or component.

1.

Ruler Backstop – When cutting, place material against


backstop. Use measurement rail (ruler) to determine where


material is to be cut.

2.

Water Tray – When wet cutting is required, fill with clean


fresh water.Make sure submersible is totally immersed in


water.

3.

Cutting Head Handle – Grab hold of this handle to move


the cutting blade head either up or down. To move the


cutting head, release the mounting plate release/lock lever.

4.

Carrying Handle (Head) – Grip this handle (front) to lift


the mounting plate.

5.

Blade Guard – Protects the user from the cutting blade.


NEVER operate the saw with the blade guard removed.

6.

Power ON/OFF Box – This box is used on electric


models saws only. To turn on the saw place in the ON


position. Place in the OFF position to shut-down the saw.

7.

V-belt Cover – Remove this cover to access the drive V-


belt. NEVER operate the saw with theV-belt cover removed.

8.

Mounting Plate Release/Lock Lever – Push this lever


backwards to release the mounting plate.This will allow


the cutting head to move either up or down. Push the lever


forward to lock the mounting plate in place.

9.

Electric Motor/Conduit Box– This unit uses 2 different


types of electric motors and voltages (seeTable 2).Always


make sure the voltage selector switch has been set to the


correct position for the voltage being supplied to the motor.


Plug the water pump (electric models only) power cord


into the AC receptacle located on the conduit box.

10.

Mounting Plate – Supports the electric motor/gasoline


engine. Plate has slotted holes for horizontal (right-side)


and vertical (left-side) adjustment of cutting head.

11.

Carrying Handle (Head) – Grip this handle (rear) to lift


the mounting plate.

12. Tie Rod – The tie rod length has been set at the factory for best blade guard position for the majority of the cutting that will be done.

13. Spring Tensioner – Allows for an easy up and down movement of the mounting plate.

14. Mounting Plate Lock/Release Knobs – Turn knob (2) clockwise to release the mounting plate. Turn counter- clockwise to tighten.

15. Stopper – Place stopper in tray when filling with water.

16. Carrying Handle (Tray) – Grip this handle (right-side) to trasport the saw.

17. Electric Water Pump – For best results place the pump between the splash shield and the rear of the water tray. This is for electric models only. Plug water pump power cord into AC receptacle on electric motor conduit box. NEVER run pump dry.Pump must be immersed in water.

18. Spindle Bolt/Outside Blade Flange – When mounting of the cutting blade is required, remove the spindle bolt and outside blade flange. Align cutting blade with inside flange arbor and reassemble spindle and outside blade flange.

19. Splash Guard – Keeps water and debris from leaving the water tray.

20. Carrying Handle (Tray) – Grip this handle (left-side) to trasport the saw.

21. MechanicalWater Pump – This pump is used on gasoline models only. Saw is shipped from the factor for wet cutting applications (pump handle down). Place pump handle upwards to disengage pump. NEVER run pump dry.

22. Engine – The gasoline model saws uses a 5.5 HP Honda GX160, 4-stroke, OHV, single cylinder, air cooled gasoline engine.

23. V-belt Cover (Gasoline Only) – Remove this cover to access the engine shaft-sideV-belt.NEVER operate the saw with the V-belt cover removed.

24. Water Lines – Replace the clear vinyl tubing water lines when they become brittle, worn or clogged. Water kits are available through your dealer.

25. Priming Bulb – Squeeze this bulb to prime the mechanical water pump (gasoline models only).

26. BladeWrench – Use this tool to mount and remove cutting blade.

27. Strainer – For best results place the strainer between the splash shield and the rear of the water tray. This is for gasoline models only.NEVER run pump dry.Strainer must be immersed in water.

28. Miter Box – For angled cuts, place the lip of the miter box on the measurement rail with the threaded thumb knob facing you and tighten.

MP1 — OPERATION AND PARTS MANUAL — REV. #3 (03/29/10) — PAGE 17

Page 17
Image 17
Multiquip MP1415E, MP1420E, MP1455H manual Material is to be cut

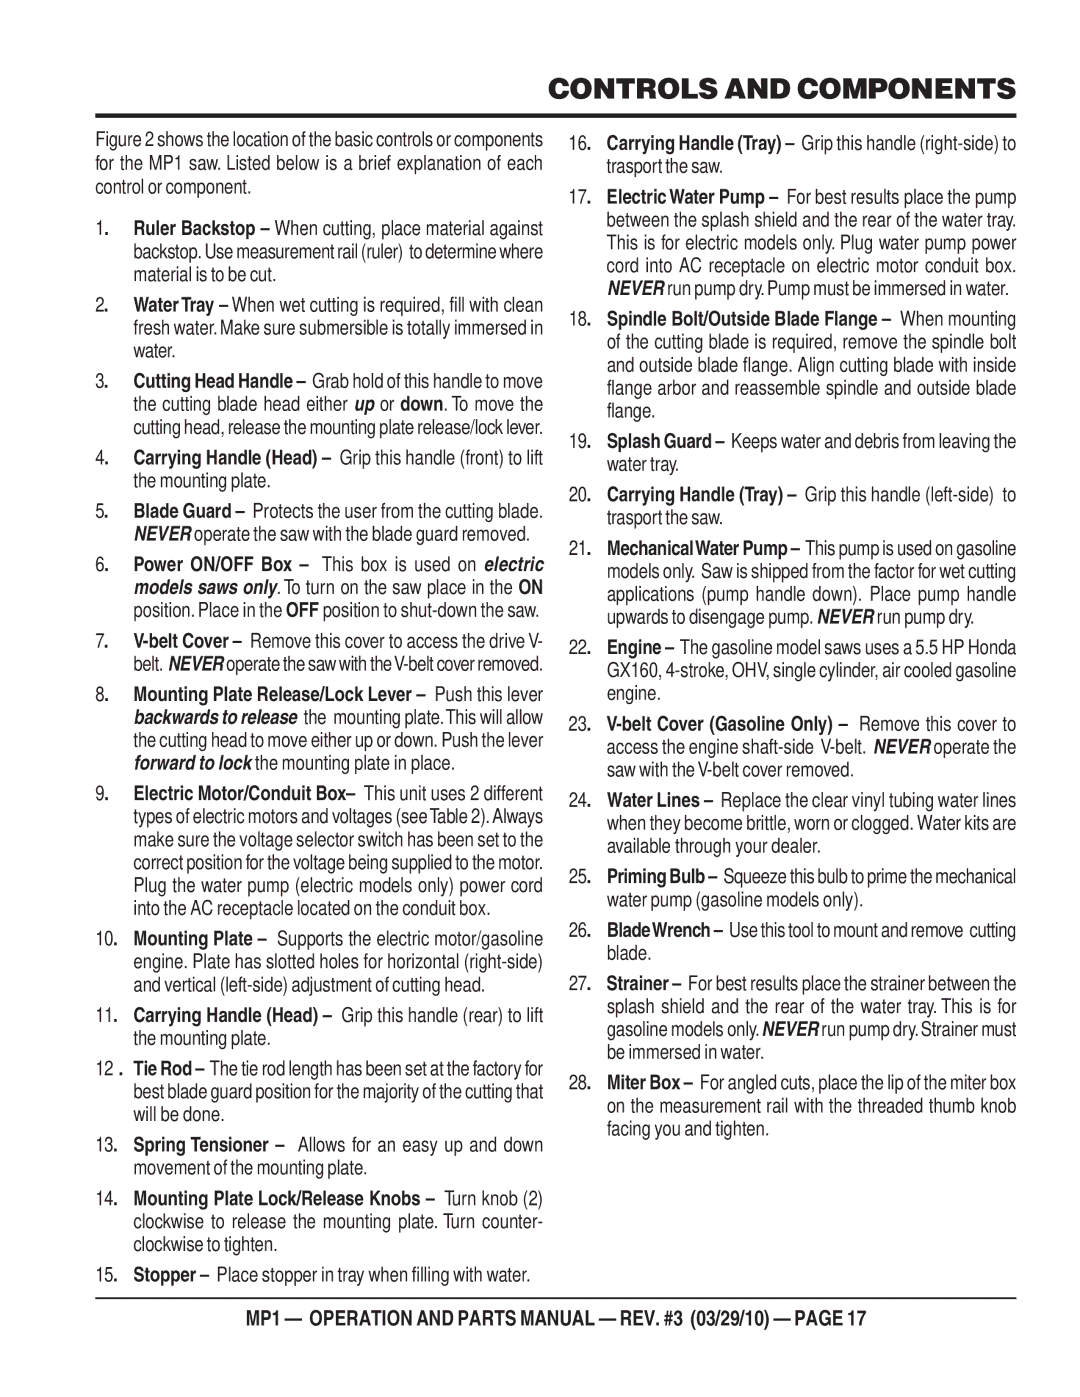
MP1420E, MP1415E, MP1455H specifications

The Multiquip MP1455H, MP1415E, and MP1420E are part of Multiquip’s line of high-performance concrete and masonry saws, designed to cater to the diverse needs of the construction industry. Each model offers unique features and technologies tailored to enhance productivity, efficiency, and user comfort.

Starting with the MP1455H, this saw is powered by a robust Honda GX390 engine, delivering reliable performance for heavy-duty cutting tasks. It boasts a 14-inch cutting blade capacity, enabling users to cut through various materials with ease. The MP1455H is equipped with a user-friendly depth control system, allowing for precise cuts and adjustments on the fly. Its rugged frame is constructed with durable materials, ensuring longevity even in the most challenging job site conditions.

The MP1415E is an electric-powered saw designed for quieter operation without compromising power. It features a 15-inch blade capacity, making it suitable for a variety of applications such as asphalt, concrete, and masonry. This model is particularly appreciated for its low vibration technology, significantly reducing operator fatigue. Additionally, the MP1415E includes an integrated water system that promotes clean cutting and minimizes dust, promoting a healthier work environment.

The MP1420E rounds out the lineup with enhanced features for improved power and efficiency. Like the MP1415E, this model is electric-powered, but it accommodates a 20-inch blade, making it ideal for larger cutting tasks. The saw is designed with a heavy-duty steel frame that provides stability and minimizes flex during operation. Featuring advanced electronic controls, the MP1420E allows users to monitor performance metrics easily, making it suitable for both experienced and novice operators.

All three models incorporate advanced cooling systems to prolong blade life and maintain optimal performance. Their compact designs ensure ease of transport, and they are suitable for both indoor and outdoor applications, providing versatility in various job sites.

In summary, the Multiquip MP1455H, MP1415E, and MP1420E concrete and masonry saws are engineered to meet the rigorous demands of the construction industry. With powerful engines, user-friendly features, and advanced technologies, these saws deliver exceptional performance, reliability, and ease of use.