Manuals
/
NEC
/
Computer Equipment
/
Computer Monitor
NEC
LCD1770V, LCD1770NX, LCD1770NXM
user manual
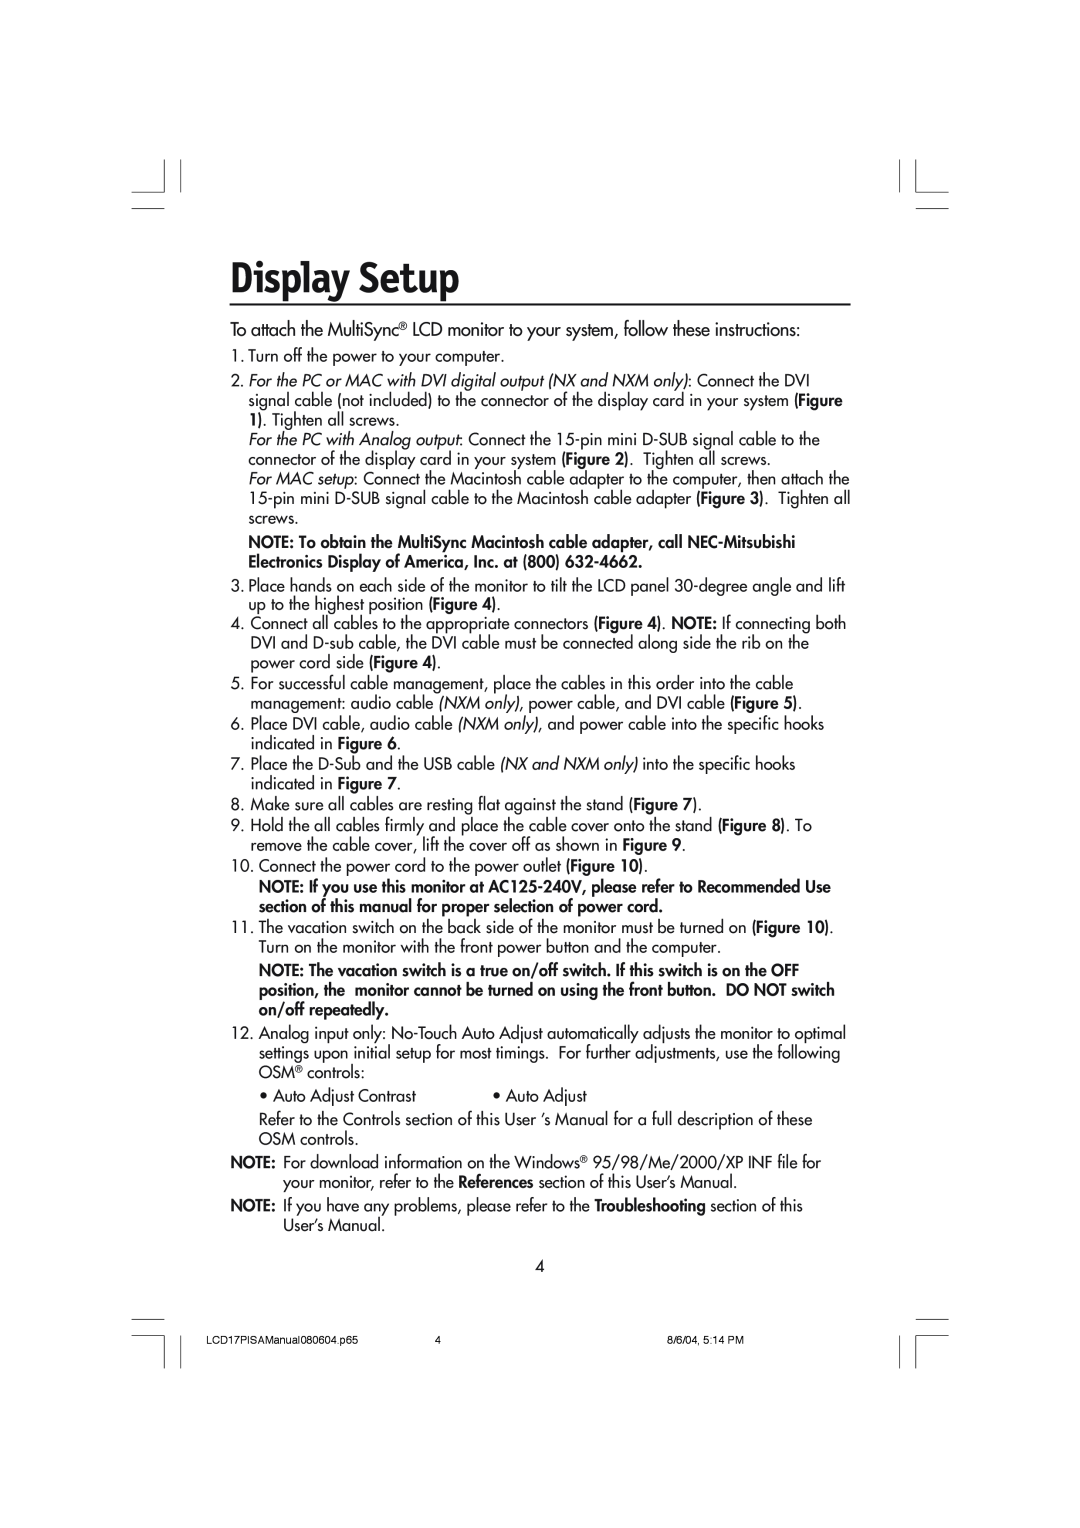
Display Setup
Models:
LCD1770V, LCD1770NX, LCD1770NXM
LCD1770V
1
6
55
55
Download
55 pages
40.03 Kb
3
4
5
6
7
8
9
10
Troubleshooting
Specification
Install
Warranty
Reset
Sound bar Setup
Commandes
Power Button
Features
Page 6
Image 6
Page 5
Page 7
Page 6
Image 6
Page 5
Page 7
Contents
MultiSync LCD1770NXM
Display Setup
Index
Sound bar Setup
Manufacturer’s Recycling and Energy Information
Canadian Department of Communications Compliance Statement
FCC Information
USB Cable NX/NXM only
Contents
Your new NEC MultiSync¨ LCD monitor box* should contain the following
NXM only
Sound bar Setup
Display Setup
NX and NXM only
Display Setup -continued
Power Cable Middle Audio Cable Bottom
NMX only
USB Cable
Power Button
Insert Top First Then Bottom
Flat
Raise and Lower Monitor Screen
Tilt and Swivel
Mounting
Remove Monitor Stand for Mounting
Flexible Arm Installation
AccuColor Control Systems
Controls
Brightness/Contrast Controls
RESET
Menu Tools
Controls -continued
Tools
Information
Safety Precautions and Maintenance
Recommended Use
Image Persistence
FOLLOWING WHEN YOU POSITION THE MONITOR
Recommended Use -continued
CORRECT PLACEMENT AND ADJUSTMENT OF THE MONITOR
CAN REDUCE EYE, SHOULDER AND NECK FATIGUE. CHECK THE
Monitor
Specifications
Specifications
MultiSync LCD1770V
Specifications -continued
MultiSync LCD1770NX
MultiSync LCD 1770NXM
Features
No picture
Troubleshooting
Power Button does not respond
Image Persistence
References
Customer Service and Technical Support
Limited Warranty
What does labelling involve?
Why do we have environmentally labelled computers?
TCO’99
Environmental Requirements
Cadmium
TCO’99 -continued
Lead
Mercury
TCO’03 -MultiSync LCD1770NX and LCD1770NXM White Models
Manufacturer’s Recycling and Energy Information
Declaration of the Manufacturer
Déclaration de conformité - Département des Communications du Canada
Informations FCC
AVERTISSEMENT
Cordon dalimentation Câble pour le signal vidéo Un cache-câbles
Contenu
La bo”te* de votre nouveau moniteur NEC MultiSync¨ contient
¥ C‰ble dÕaudio NXM seulement ¥ C‰ble dÕUSB NX et NXM seulement
Sound bar Setup
Display Setup
Câble audio
Display Setup suite
Nervure
NX et NXM seulement
Câble USB
Plat
Câble D-SUB
Bouton dÕalimentation
Levez et baissez l’écran du moniteur
Inclinaison et pivotement
Mounting
Mounting suite
Système de contrôle des couleurs AccuColor
Commandes
Commandes de luminosité/contraste
Commandes de image EntŽe analogique seulement
Commandes suite
Outils
Menu Outils
Usage recommandé
Consignes de sécurité et d’entretien
Usage recommandé suite
OBSERVER LES DIRECTIVES CI-APRéS LORS DU POSITIONNEMENT DU MONITEUR
Ergonomie
Nettoyage de lÕŽcran ACL
Moniteur
Fiche technique
Caractér. techn
Remarques
Fiche technique suite
Moniteur
Fonctions
¥ Check to see if the headphones connected No Sound from Headphones
Dépannage
¥ Check volume setting No Sound from Speakers
¥ Check to see if headphones are properly connected
Références
Garantie limitée
Qu’est-ce qu’implique l’éco-étiquetage?
TCO’99 C’est une traduction de portion Anglaise de TCO’99
Pourquoi des ordinateurs «éco-étiquetés»?
Exigences environnementales
Cadmium
TCO’99 suite
Plomb
Mercure
FŽlicitations
Approx. 3TBD w LCD1770NXM
DŽclaration du fabricant
DÉCLARATION DE CONFORMITÉ
Série LCD NEC
AVIS DE PROPRIÉTÉ EXCLUSIVE ET DE DÉGAGEMENT DE RESPONSABILITÉ
PROPRIETARY NOTICE AND LIABILITY DISCLAIMER
DECLARATION OF CONFORMITY
NEC LCD Series
We hereby declare that the equipment specified above
Top
Page
Image
Contents