Connecting PC as monitor
Picture adjustment |
|
| Contrast | |||
You can adjust picture Contrast, Brightness, |
|
| x |
| ||
Horizontal/Vertical position, | 0 | Ï 100 | q 100 | |||
Clock, Phase, Auto and Reset as you prefer. | ||||||
|
|
|
| |||
1. | Press the TV/AV or TV/PC button to select the PC |
|
| y |
| |
| mode. |
|
| 1024 X 768 | ||
|
|
| ||||
| AUTO | |||||
2. | Press the MENU button. | 48.4KHz | 60.0Hz | |||
|
| |||||
|
|
|
| |||
3. | Press the PRxy button to select the desired |
|
| |||
| picture item. |
|
| |||
|
|
|
|
| ||
4.Press the VOLÏq button to make appropriate adjustments.
Contrast | Clock |
Brightness | Phase |
Temperature | AUTO Auto |
Reset | |
|
Contrast
This function is to adjust picture to light/dark.
Brightness
This function is to adjust brightness of picture.
Temperature
Temperature is a measure of the warmth of the image color.
Horizontal Position/Vertical Position
This function is to adjust picture to left/right and up/down as you prefer.
Clock
This function is to minimize any vertical bars or stripes visible on the screen background. And the horizontal screen size will also change.
Phase
This function allows you to remove any horizontal noise and clear or sharpen the image of characters.
Auto
This function is for the automatic adjustment of the screen position, clock and clock phase. The displayed image will disappear for a few seconds while the
Note: Some signal from some graphics boards may not function properly. If the results are unsatisfactory, adjust your monitor’s position, clock and clock phase manually.
Reset
This function allows you to return to the good picture reproduction programmed at the factory and cannot be changed.
5. Press the TV/AV button to exit menu.
25
Connecting PC as monitor
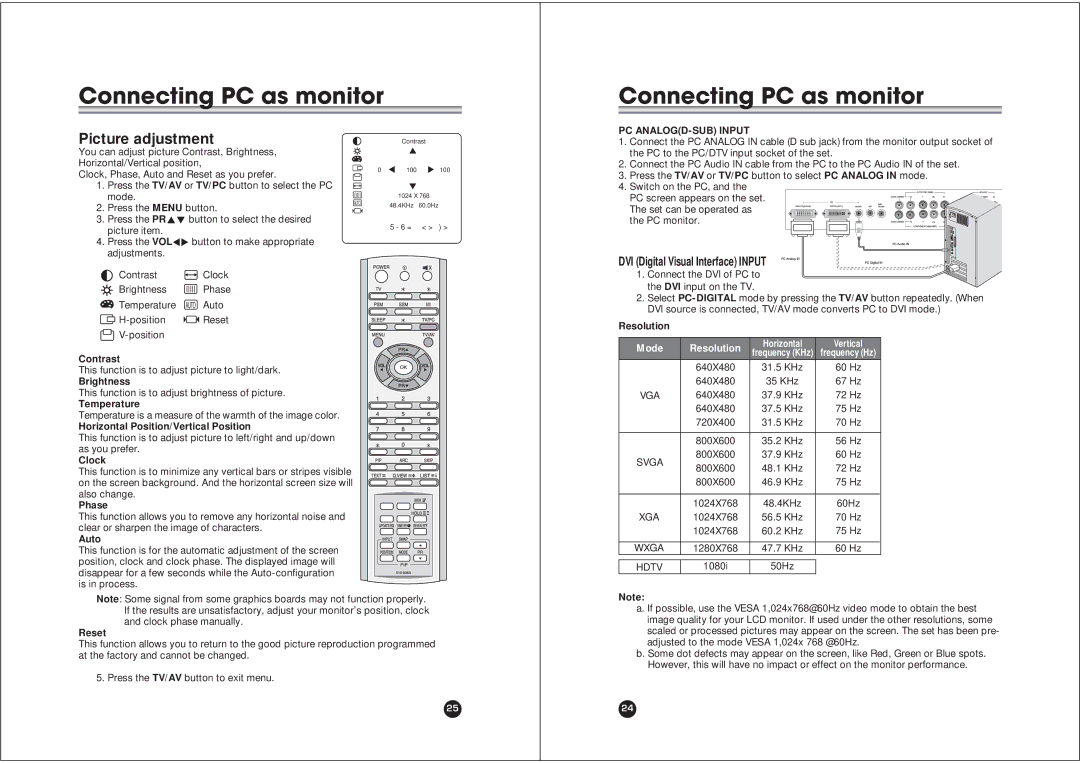
PC ANALOG(D-SUB) INPUT
1.Connect the PC ANALOG IN cable (D sub jack) from the monitor output socket of the PC to the PC/DTV input socket of the set.
2.Connect the PC Audio IN cable from the PC to the PC Audio IN of the set.
3.Press the TV/AV or TV/PC button to select PC ANALOG IN mode.
4.Switch on the PC, and the
PC screen appears on the set. The set can be operated as the PC monitor.
DVI (Digital Visual Interface) INPUT
1. Connect the DVI of PC to the DVI input on the TV.
2.Select
Resolution
Mode | Resolution | Horizontal | Vertical | |
frequency (KHz) | frequency (Hz) | |||
|
| |||
| 640X480 | 31.5 KHz | 60 Hz | |
| 640X480 | 35 KHz | 67 Hz | |
VGA | 640X480 | 37.9 KHz | 72 Hz | |
| 640X480 | 37.5 KHz | 75 Hz | |
| 720X400 | 31.5 KHz | 70 Hz | |
|
|
|
| |
| 800X600 | 35.2 KHz | 56 Hz | |
SVGA | 800X600 | 37.9 KHz | 60 Hz | |
800X600 | 48.1 KHz | 72 Hz | ||
| ||||
| 800X600 | 46.9 KHz | 75 Hz | |
|
|
|
| |
| 1024X768 | 48.4KHz | 60Hz | |
XGA | 1024X768 | 56.5 KHz | 70 Hz | |
| 1024X768 | 60.2 KHz | 75 Hz | |
|
|
|
| |
WXGA | 1280X768 | 47.7 KHz | 60 Hz | |
|
|
|
| |
HDTV | 1080i | 50Hz |
|
Note:
a. If possible, use the VESA 1,024x768@60Hz video mode to obtain the best image quality for your LCD monitor. If used under the other resolutions, some scaled or processed pictures may appear on the screen. The set has been pre- adjusted to the mode VESA 1,024x 768 @60Hz.
b. Some dot defects may appear on the screen, like Red, Green or Blue spots. However, this will have no impact or effect on the monitor performance.
24