Digital Camera
Trademark Information
Do not look at the sun through the viewfinder
For Your Safety
Use appropriate cables
Iii
E4200
Comply with copyright notices
Life-Long Learning
Use Only Nikon Brand Electronic Accessories
Before Taking Important Pictures
Table of Contents
Shooting Menu
More on Playback
Playback Menu
Vii
Technical Notes
Setup Menu
Viii
109
Setup Menu Technical Notes
Scene Mode
Introduction
Before You Begin First Steps
Attaching the Camera Strap
Parts of the Camera
Lens not extended
USB
Shooting
Monitor
Display in the Monitor
Playback
Mode Dial
Multi selector is used to navigate through the camera menus
Navigating the Menus
Shutter-Release Button
Inserting Batteries
Inserting Batteries
Alternative Power Sources
Read Battery Warnings
Ensure the cover is closed firmly
Replacing Batteries
Inserting Memory Cards
Power-on lamp should be off
Confirm that the camera is off
Open the memory card slot cover
Formatting Memory Cards
Write Protect Switch
Removing Memory Cards
Memory Cards
Battery Level
Checking the Battery Level
Check the battery level in the moni- tor
Turn the camera on
Power-On Lamp
When the power-on lamp is Camera is
Auto Power Off Standby Mode
Off
Highlight Yes
Basic Setup
Fied Chinese, or Korean, and press
Highlight D M Y
Display Date menu
Date not Set
Clock Battery
Camera Clock
Time Zones
Rotate the mode dial to Turn the camera on
Select Mode
Advanced Brightness Control LCD
Auto Shooting Mode
Number of Exposures Remaining
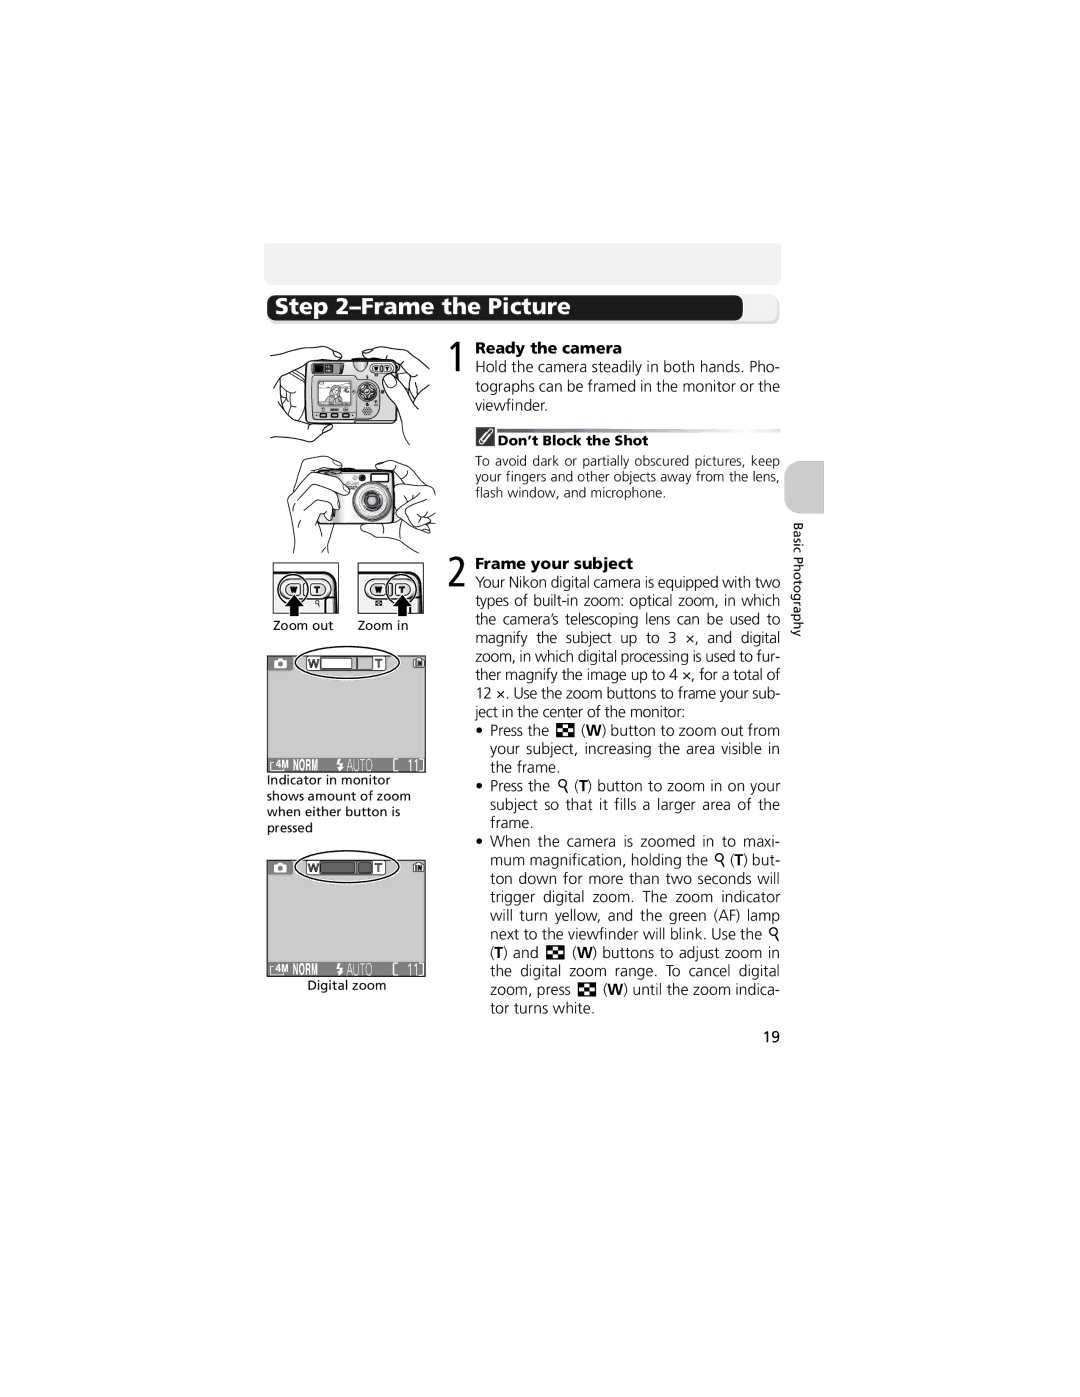
Ready the camera
Frame the Picture
Frame your subject
Next to the viewfinder will blink. Use
Monitor or Viewfinder?
When Lighting Is Poor
Digital Zoom
Take the picture
Focus and Shoot
Focus
During Recording
Low Battery
Getting Good Results with Autofocus
Sensitivity ISO Equivalency
AF/AE lock
Autofocus
Press the button View pictures in the monitor
View the Results Full-screen Playback
Playback Tip
Button
Deleting Your Last Shot
Picture type Identifier Extension
Image File and Folder Names
Assist Modes
Assist and Scene Modes
Scene Modes
Assist and Scene Modes
Image Quality and Image Size
Using the Guides
Framing Assist
Portrait Assist
Settings for Assist Modes
Landscape Assist
Sports Assist
Sports Assist
Night Portrait Assist
Follow the steps below
Scene Mode
Scene mode offers a menu of eleven scenes
Party/Indoor
Following scenes are available
Beach/Snow
Sunset
Night landscape
Dusk/Dawn
Museum
Close up
Back light
Fireworks show
Copy
Joining Panorama Pictures
Panorama assist
Taking Pictures for a Panorama
Storage Locations for Panoramas
Full-Screen Playback
Use a Tripod
Mode How it works When to use it
When Lighting Is Poor Using the Flash
Selecting Flash Mode While Using Manual Option
To select the flash mode
Flash Mode Selection
Auto with Red-eye Reduction
Taking a Self-Portrait Using the Self-Timer
Stopping the Self-Timer
Selecting Self-Timer While Using Manual Option
Macro Close-Up Mode
Easy Close-Ups Macro Close-Up Mode
Selecting Macro Close-Up Mode While Using Manual Option
Cancelling Exposure Compensation
Selecting Exposure Compensation While Using Manual Option
Controlling Exposure Exposure Compensation
Exposure Compensation
Choosing a Value for Exposure Compensation
Max. recording time
Selects Movie Types
Option Description Memory Memory card Approx 256MB 512MB
TV movie
Mode
Auto-focus Mode for Recording Movies
Start recording
Rotate the mode dial to
Recording Movies
Control Button Description
Viewing Movies
Viewing Multiple Pictures Thumbnail Playback
Viewing Pictures on the Camera
Viewing Pictures Full-Screen Playback
Folder name File name
Histogram
Images in the Memory
Shooting Information
Playback Zoom
Taking a Closer Look Playback Zoom
Photo Trim
Cropping Pictures
Description
Voice Memos Recording and Playback
Storage
Viewing Pictures on TV
Choosing Video Mode
Connect the A/V cable to the televi- sion or VCR
Tune the television to the video channel
Pictures transferred using
Before Connecting the Camera
Viewing Pictures on a Computer
Choose Mass storage
Choosing a USB Option
Connecting the USB Cable
Windows XP Home Edition/Windows XP Pro- fessional
Disconnecting the Camera
Printing Pictures
How to print Memory card
Print them
Printing the date and time of recording on pictures
Delete print set and press
Print Set
More on Playback
Difference Between Date Imprint and Date
Print Set
Date
Print-Order Icon
Printing via Direct USB Connection
Use a Reliable Power Source
Before Printing
PictBridge
Print selection
Option Description
Print all images
Dpof printing
Highlight Print selection and press
Error Messages
Dpof Printing
Using the Shooting Menu
To Make a Selection from the Shooting Menu
To Display the Shooting Menu
Option Format Description
Image Mode
Image Quality
Image Quality and Compression
Image Quality Setting
Image size pixels Print size cm
Image Size
Fine
Image Quality/Size and Number of Exposures Remaining
About White Balance
White Balance
Preset White Balance
Matrix
Metering
Sure for entire image
Best choice in most situations
Single
Continuous
Continuous
Shot buffer
Continuous
Restrictions on Camera Settings
Off BSS off camera functions normally. default setting
When the Best Shot Selector BSS is on, the cam
Best Shot Selector
Select On or Off and press
Normal
Image Adjustment
High
Image Sharpening
Low
Off
Sensitivity
Natural lighting not recommended when using flash
Select from the following five levels and press
Approximately equivalent to ISO 80 under normal condi
Roughly triples
Auto Bracketing
WB bracketing
Restrictions on Auto Bracketing
When Selecting Auto bracketing
Moderate
Saturation Control
Manual
AF Area Mode
Focus Area Display
Focus area
Auto-focus Mode while Recording Movies
Auto-focus Mode
Select from the following two options and press
Single AF
Memory or on the memory card more than
Noise Reduction
Usual
Restrictions on Noise Reduction
To Display the Playback Menu
Using the Playback Menu
Playback menu contains the following options
Press Description
Slide Show
Loop
Deleting Selected Pictures Erase selected images
Delete
Delete selected pictures
Or on the memory card
100
Deleting All Pictures Erase all images
By pressing
Protect
101
Protect Icon
All on
Auto Transfer
All off
Select
Icon
103
104
Marking Selected Pictures for Transfer Selected image
105
Small Pic
640×480
320×240
Marking Selected Pictures for Copy Selected images
Copy
107
108
Marking All Pictures for Copy All images
Image Copy
Print set Digital Print Order Format
109
Using the Setup Menu
Setup menu contains the following options
Nikon
Welcome Screen
Animation
Image
Select an Image
111
Small Pictures and Cropped Copies
Date
Date
Time Zone
112
113
GMT + Location
Camera supports the following time zones
GMT Azores
London, Casablanca
Option Description Monitor
Monitor Settings
Date and time
Date Imprint
Date
117
Brightness
Shutter sound
Sound Settings
Selector to highlight option
Start-up sound
Auto Off
To save battery power, the camera will enter stand
Format Memory/Card
119
To Format the Memory Card
Language
Reset All
Video Mode
Option Description Exit menu, leaving settings unchanged
Restore settings to default settings
Resetting File Numbering to
Following settings are affected
Firmware Version
122
Approved Memory Cards
Optional Accessories
124
Connecting the EH-62A AC Adapter Kit
Lock the power connector
125
Disconnecting the AC Adapter Kit
126
Caring for Your Camera
Avoid contact with liquid crystal
Cleaning
127
Batteries
Storage
128
129
Error Messages
130
Display Problem Solution
131
132
Transfer Error
Electronically-Controlled Cameras
Troubleshooting
133
Appears in monitor memory card is locked
134
BSS is On Auto bracketing is set
135
136
Specifications
Storage media
137
Exif Version
138
Design Rule for Camera File System DCF
Index
Symbols
Numerics
139
ISO JPEG, 26 Lamp, green AF, 3, 7, 12, 21
140
Welcome screen, 109 White balance, 73
141
6MA00911-02

 Don’t Block the Shot
 (W) until the zoom indica- tor turns white.