Nokia 6102i User Guide
0434
Export Controls
Contents
Battery information
Settings
Care and maintenance Additional safety Information Index
Address Book
Only qualified personnel may install or repair this product
For your safety
Your phone is not water-resistant. Keep it dry
About your device
Network services
Enhancements
Shared memory
General information
Access codes
Overview of functions
Security code
Restriction password
Configuration settings service
PUK codes
Download content and applications
This device is intended for use with BL-4C battery
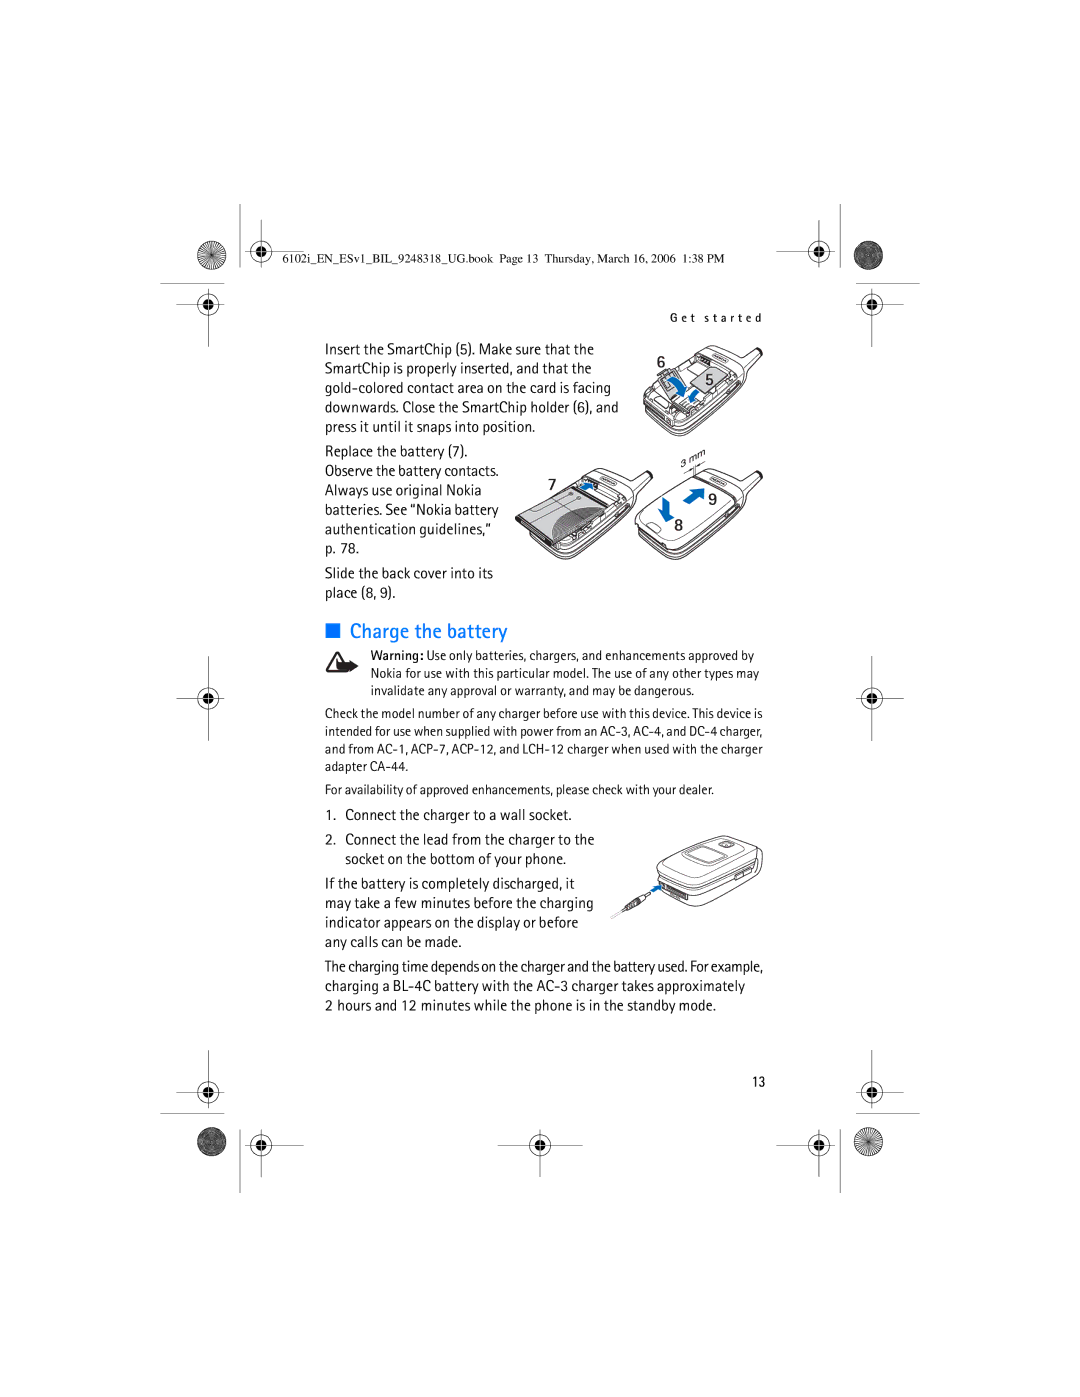
Install the SmartChip and battery
Get started
Open the fold
Hours and 12 minutes while the phone is in the standby mode
Charge the battery
Slide the back cover into its place 8
Connect the charger to a wall socket
Proper operating position
Switch the phone on and off
Keys and parts
Your phone
Mini display
Standby mode
Main display
Personal shortcut list
Power saving
Shortcuts in the standby mode
Indicators
For Automatic keyguard and Security keyguard, see Phone, p
Keypad lock keyguard
Make a call
Call functions
Answer or decline a call
Speed dialing
Call waiting
Options during a call
To activate the Call waiting function, see Call, p
Press and hold #, and select Number mode
Settings
Write text
Predictive text input
Write compound words
Traditional text input
Navigate the menus
Recent calls
Counters and timers
Text messages SMS
Messaging
Read and reply to an SMS message
Write and send an SMS message
Templates
Select Menu Messages New message Text
Write and send a multimedia message
Multimedia messages
Text messages Templates
Select Menu Messages New message Multimedia
Read and reply to a multimedia message
Folders
Memory full
Start Mobile Email
Mobile Email
Select Menu Messages E-mail
Write and send
View the inbox and other folders
Reply and forward
Delete
Info messages
Voice mail
Notification
Message settings
Service commands
Delete messages
Text
Message counter
Other settings
Games
Games & Apps
Collection
You can download new Java applications in different ways
Cingular Mall
Connect to a service
Set up browsing
MEdia Net
Browse pages
Appearance settings
Browse with phone keys
Direct calling
Scripts over secure connection
Cookies
Screen size Full or Small-to set the screen size
To allow the scripts, select Allow
Bookmarks
Service inbox
Download files
Receive a bookmark
Select Menu MEdia Net Settings Service inbox settings
Service inbox settings
Cache memory
Browser security
Certificates
Security module
Digital signature
Icons and menu items
Register with an IM service
Log
IM menus
Begin an IM session
Offline menu
Return to chat session
Receive and reply to messages
Contacts
Add a new contact
Chat session options
Log off service
Set your availability
Remove a contact
From the IM online menu, select Logout OK
Log out of IM
To see the list of folders, select Menu My Stuff
My Stuff
Find a contact
Address Book
Save names and phone numbers
Save numbers, items, or an image
Edit contact details
Copy contacts
Delete contacts or contact details
Business cards
Voice dialing
Groups
Add and manage voice tags
Speed dialing
Make a call with a voice tag
Select Menu Address Book and from the following functions
Info, service, and my numbers
Profiles
Settings
Themes
Tones
Main display
My shortcuts
Time and date
Mini display
Call
Phone
Send my caller ID network service Yes, No, or Set by network
Connectivity
Bluetooth wireless technology
Infrared
Bluetooth wireless connection
Packet data Egprs
IR connection indicator
Configuration
Security
Restore factory settings
Stop the alarm
Alarm clock
Applications
Calendar
Make a calendar note
To-do list
Synchronize from your phone
Synchronization
Mark the data to be synchronized
Select Menu Applications Sync Server sync Synchronize
Calculator
Synchronization settings
Synchronize from a compatible PC
Stopwatch
To stop the timer, select Stop timer
Countdown timer
Camera
Tools
Take a photo
Record a video clip
Radio
To change the volume, press the volume keys
Save radio channels
Listen to the radio
Record sound
Recorder
List of recordings
Select Menu Tools Recorder
Create and send an audio message
Audio messages
Receive an audio message
PC Suite
PC connectivity
Packet data, HSCSD, and CSD
Data communication applications
Charging and discharging
Battery information
Authenticate hologram
Nokia battery authentication guidelines
What if your battery is not authentic?
Use chargers indoors
Care and maintenance
Pacemakers
Additional safety information
Hearing aids
Vehicles
To make an emergency call
Potentially explosive environments
Certification information SAR
97 g 3.42 oz
Volume 77 cm 3 4.7
Length 85 mm 3.35
Width 45 mm 1.77
Index
Functions
Switched data
Data
Delete
Java applications. See applications
Message settings
Messages
Names. See contacts
Service
Safety
Settings
Phone lock. See keypad lock
Xhtml
Nokia 6102i Manual del Usuario
Declaración DE Conformidad
Control DE Exportaciones
Contenido
Galería Contactos
Configuraciones
Organizador
Multimedia
Encienda EL Teléfono EN Forma Segura
Para su seguridad
Servicios de red
Acerca de su dispositivo
Su teléfono no es resistente al agua. Manténgalo seco
Peligro
Accesorios
Memoria compartida
Visión general de las funciones
Información general
Códigos de acceso
Código de seguridad
Códigos PUK
Servicio de ajustes de configuración
Contraseña de restricción
100
101
Descargar contenido y aplicaciones
Abrir la tapa
Introducción
Instalar la tarjeta SmartChip y la batería
102
Vuelva a colocar la batería
Cargar la batería
Deslice la cubierta posterior en su sitio 8
Conecte el cargador a un enchufe de pared
104
Encender y apagar el teléfono
Nota al igual que al usar otros
Teclas y partes
Su teléfono
105
Mini pantalla
Modo standby
Pantalla principal
Lista de accesos directos personales
Ahorro de energía
Accesos directos en el modo standby
Indicadores
107
Bloquear el teclado Bloqueo de teclas
La alarma está configurada en Activar. Consulte Alarma, pág
108
Realizar una llamada
Funciones de llamada
Contestar o rechazar una llamada
Marcación rápida
Llamada en espera
Opciones durante una llamada
Teléfono
110
Escribir texto
Configuraciones
Ingreso de texto predictivo
Deseada, confírmela
Escribir palabras compuestas
Ingreso de texto tradicional
Empiece a escribir la siguiente palabra
112
113
Navegar por los menús
Contadores y cronómetros
Llamadas recientes
114
Mensajes de texto SMS
Mensajería
115
Leer y contestar un mensaje SMS
Escribir y enviar un mensaje SMS
Seleccione Menú Mensajes Crear mensaje Mensaje de texto
Mensaje que desea leer. indica un mensaje no leído
Plantillas
Mensajes multimedia
Escribir y enviar un mensaje multimedia
Seleccione Menú Mensajes Crear mensaje Mens. multimedia
118
Leer y contestar un mensaje multimedia
Seleccione Opc. para acceder a las opciones disponibles
Memoria llena
119
Mail móvil
Carpetas
Iniciar e-mail móvil
La carpeta Buzón de salida
Escribir y enviar
Ver el buzón de entrada y otras carpetas
121
Eliminar
Contestar y desviar
Preferencias
122
Mensajes de información
Correo de voz
Comandos de servicio
Borrar mensajes
Texto
Configuraciones de mensajes
124
Contador de mensajes
Otras configuraciones
125
Juegos
Juegos y Aplicaciones
Colección
127
Descargar una aplicación
128
Conectarse a un servicio
Configurar el explorador
129
Explorar con teclas del teléfono
Explorar páginas
Llamada directa
130
131
Configuraciones de apariencia
Favoritos
Scripts sobre conexión segura
Descargar archivos
Recibir un favorito
Buzón de servicio
Configuraciones del buzón de servicio
133
Seguridad del explorador
Memoria caché
Módulo de seguridad
134
También consulte Códigos de acceso, pág
Certificados
135
136
Firma digital
Iconos y elementos del menú
Registrarse con un servicio IM
137
Conectarse
Menús IM
Iniciar una sesión IM
Menú fuera de línea
Regresar a la sesión chat
Recibir y responder mensajes
Contactos
139
Opciones para la sesión chat
Configurar su disponibilidad
Agregar un nuevo contacto
Eliminar un contacto
Salir de IM
Desconectarse del servicio
Desconectarse de IM
Desde el menú en línea I M, seleccione Finalizar sesión OK
142
Galería
Buscar un contacto
Contactos
Guardar nombres y números telefónicos
Guardar números, elementos o una imagen
Editar detalles de contactos
Copiar contactos
Eliminar contactos o detalles de contacto
144
Grupos
Tarjetas de negocios
Marcación por voz
145
Realizar una llamada usando una etiqueta de voz
Agregar y administrar etiquetas de voz
146
Números de información, números de servicio y mis números
Marcación rápida
147
Perfiles
Configuraciones
Temas
Tonos
Pantalla principal
Mis accesos directos
149
Hora y fecha
Mini pantalla
150
151
Llamadas
Conectividad
Teléfono
152
153
Tecnología inalámbrica Bluetooth
154
Infrarrojos
Indica una conexión de paquete de datos
Paquete de datos Egprs
155
156
Configuración
157
Seguridad
158
Restaurar configuraciones de fábrica
Detener la alarma
Alarma
Organizador
Agenda
Lista de tareas
Una alarma de nota
Crear una nota de agenda
Reunión, Llamada, Cumpleaños, Memo o Recordatorio
Sincronización
Notas
Sincronizar desde su teléfono
161
Marque los datos a sincronizar
Configuraciones de sincronización
162
Cronómetro
Calculadora
Sincronizar desde una PC compatible
Nacional o a extranjera
164
Temporizador
Cámara
Multimedia
Tomar una foto
Grabar un videoclip
Escuchar la radio
Guardar canales de radio
Pulse brevemente o
Ingrese el nombre del canal y seleccione OK
Grabar sonido
Grabadora
Seleccione Menú Multimedia Grabad. voz
167
168
Lista de grabaciones
Crear y enviar un mensaje de voz
Mensajes de voz
Recibir un mensaje de voz
169
Paquete de datos, Hscsd y CSD
Conectividad PC
Aplicaciones para la comunicación de datos
Consulte Paquete de datos EGPRS, pág
Carga y descarga
Información sobre las baterías
171
Autenticación del holograma
Normas de autenticación de baterías Nokia
172
3 y 4 puntitos en cada lado respectivamente
173
¿Qué ocurre si la batería no es auténtica?
174
Cuidado y mantenimiento
No use los cargadores a la intemperie
Marcapasos
Información adicional de seguridad
175
176
Aparatos auditivos
177
Para hacer una llamada de emergencia
Pulse la tecla Llamar
178
Información de certificación SAR
179
180
Índice
Aplicaciones Java. Consulte aplicaciones
Batería
181
182
183
184
Nokia 6102i User Guide Nokia 6102i Manual del Usuario