BSR252_QIG_1.pdf 12/21/2006 10:24:58 AM
BusinessBSR252Secure Router 252 Quick Install Guide
Detailed documentation for this Quick | Steps 1 4 | ||
Installation Guide can be downloaded at | |||
www.nortel.com. |
|
| Before you start |
1 | 1. Contact your Internet Service Provider (ISP) to get the | ||
following information: |
| ||
a. Encapsulation type |
| ||
| b. Multiplex Mode, VPI, VCI | ||
| c. ISP IP addresses: WAN, DNS servers, Gateway, and WAN | ||
| MAC address |
|
|
| 2 | 2. Get your Domain Name from the User | |
| Accounts dialog box in the Control Panel. | ||
| For details, see your operating system Help | ||
files. Get your Computer Name from the System Properties dialog box on your computer.
C | 3 | 3. (Optional) Get the IP addresses of DNS |
| ||
Y | and remote servers on your LAN. | |
M |
|
|
CM | Steps 4 | 7 |
MY | Install the hardware | |
CY |
|
|
CMY |
| 4 |
K |
| |
| 4. Mount the | |
| BSR252 on a wall, | |
| or place it |
|
| horizontally or vertically (using the supplied holder) on a flat surface. | |
5 |
| 5. Connect your PC and up to three other | |
| computers or network devices to the four | ||
6 | Ethernet ports. |
| |
| 6. Connect your ADSL Internet service to the | ||
|
| ||
|
| telephone port next to the Power LED. | |
|
| 7 | 7. Snap the appropriate power clip |
|
| into the supplied power adapter. | |
|
| Connect the power adapter to the rear | |
of the BSR252 and to an AC power source.
N0143490
| Step 8 |
8 | Assign TCP/IP addresses |
|
8.Set up the IP addresses on each computer connected to the BSR252:
a. Set each computer to dynamically obtain an IP address, or assign unique static IP addresses. If you choose to assign unique static IP addresses for each computer, choose IP addresses between 192.168.1.129 and 192.168.1.254.
b. If you assign a static IP address in step 8a, assign a subnet mask of 255.255.255.0 and a default gateway of 192.168.1.1.
c. If you chose to dynamically obtain IP addresses in step 8a, you have an option of using Obtain a DNS server address automatically, or assigning the DNS server IP addresses.
d. If you chose to assign unique static IP addresses in step 8a, you must assign DNS Server IP addresses.
Steps 9 ![]() 12
12
Access the BSR252
9
10 10. Enter the default user name (nnadmin) and password (PlsChgMe!) to log onto the BSR252.
11
11.You can replace the default password (recommended) or use it as it is.
| 12 | 12. Replace the |
Steps 13 16 | certificate. | |
| ||
Start the wizard |
| |
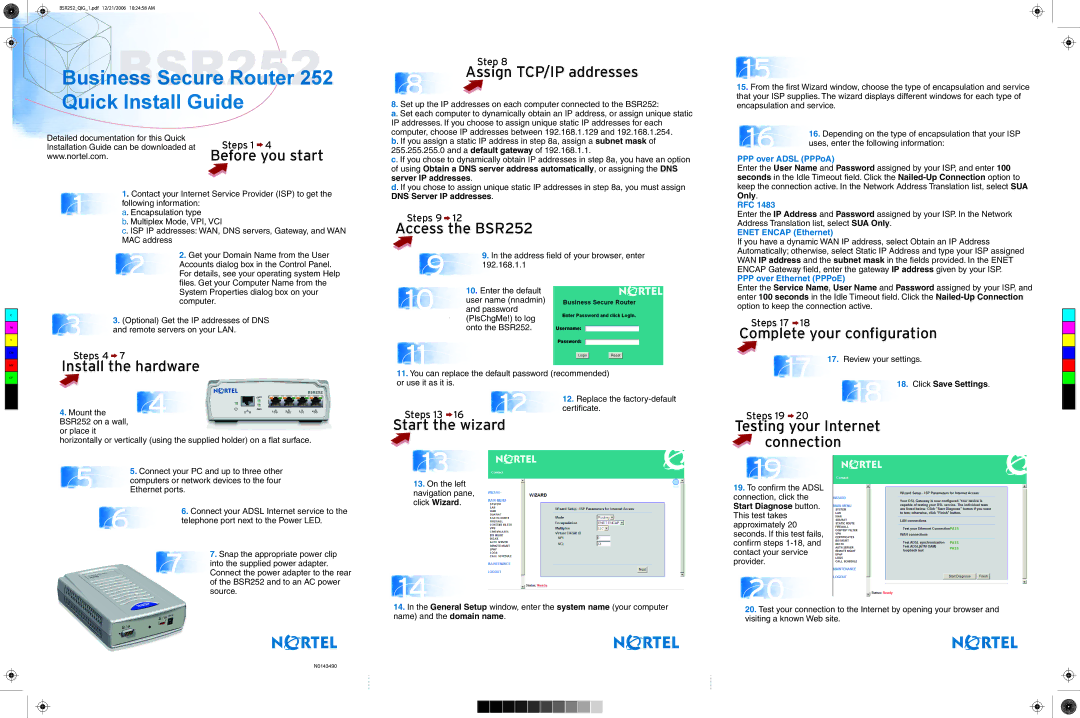
13
13.On the left navigation pane, click Wizard.
14
14.In the General Setup window, enter the system name (your computer name) and the domain name.
15
15. From the first Wizard window, choose the type of encapsulation and service that your ISP supplies. The wizard displays different windows for each type of encapsulation and service.
16 | 16. Depending on the type of encapsulation that your ISP |
| |
| uses, enter the following information: |
PPP over ADSL (PPPoA)
Enter the User Name and Password assigned by your ISP, and enter 100 seconds in the Idle Timeout field. Click the
RFC 1483
Enter the IP Address and Password assigned by your ISP. In the Network Address Translation list, select SUA Only.
ENET ENCAP (Ethernet)
If you have a dynamic WAN IP address, select Obtain an IP Address Automatically; otherwise, select Static IP Address and type your ISP assigned WAN IP address and the subnet mask in the fields provided. In the ENET ENCAP Gateway field, enter the gateway IP address given by your ISP.
PPP over Ethernet (PPPoE)
Enter the Service Name, User Name and Password assigned by your ISP, and enter 100 seconds in the Idle Timeout field. Click the
Steps 17 ![]() 18
18
Complete your configuration
17 | 17. Review your settings. |
|
| ||
18 18. Click Save Settings. |
| |
|
|
Steps 19 ![]() 20
20
Testing your Internet
connection
19
19.To confirm the ADSL connection, click the Start Diagnose button. This test takes approximately 20 seconds. If this test fails, confirm steps
20
20.Test your connection to the Internet by opening your browser and visiting a known Web site.