MOUNTING THE HOUSING

NOTE: These ventilators are designed for installation between 16" O.C. ceiling joists with no framing necessary. If the building structure has 24" O.C. joists construction, framing will be required.

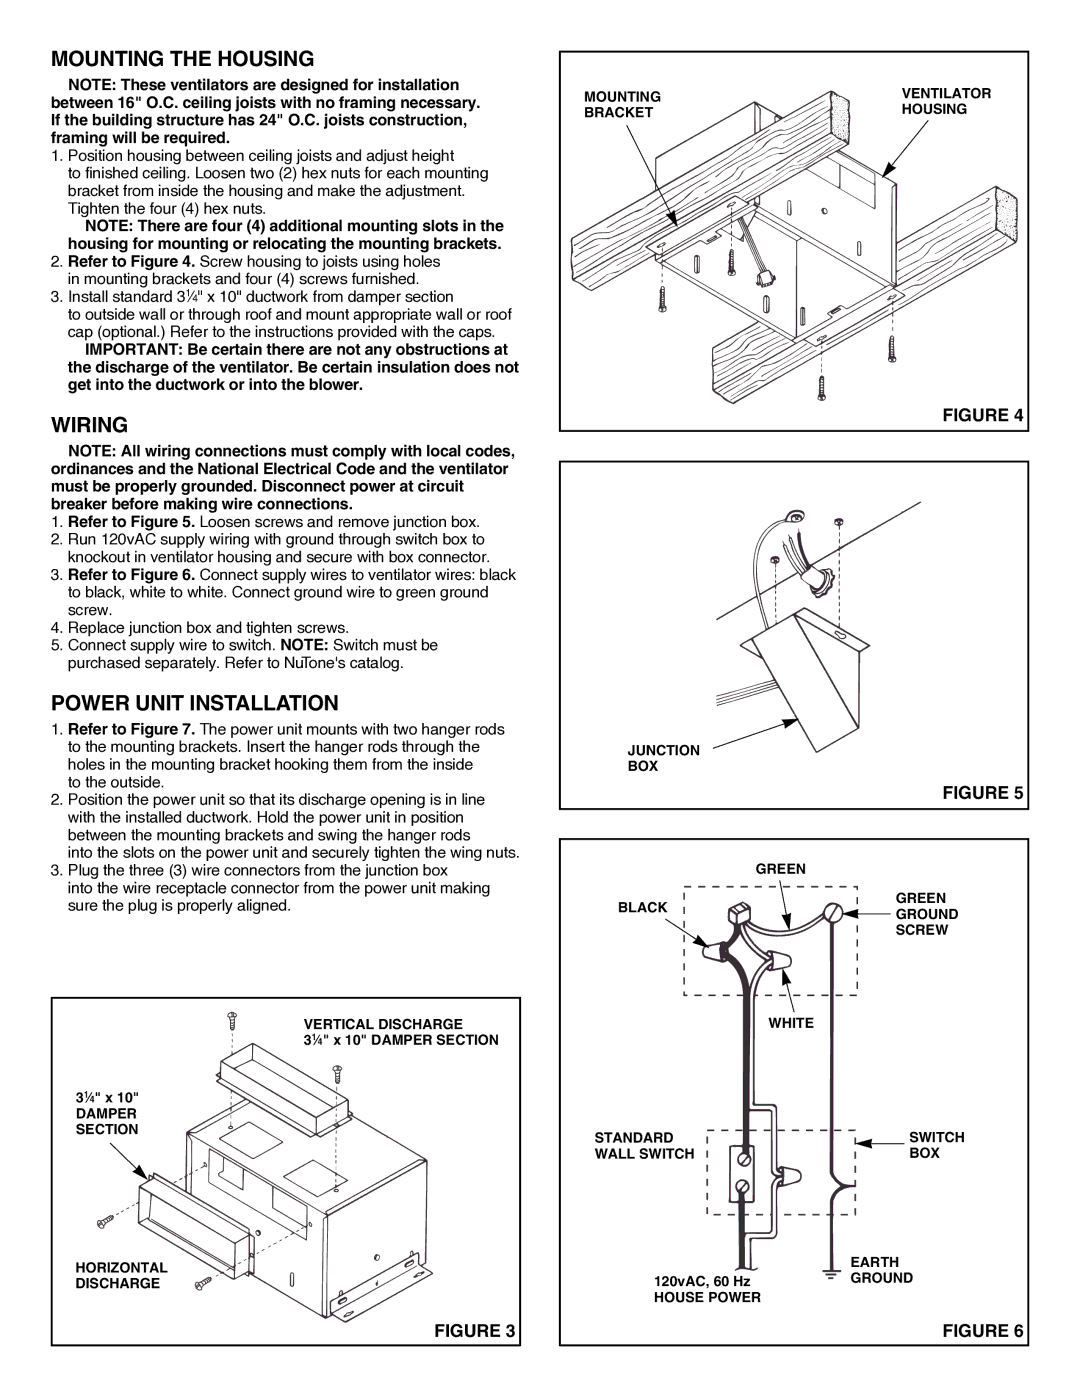
1.Position housing between ceiling joists and adjust height

to finished ceiling. Loosen two (2) hex nuts for each mounting bracket from inside the housing and make the adjustment. Tighten the four (4) hex nuts.

NOTE: There are four (4) additional mounting slots in the housing for mounting or relocating the mounting brackets.

2.Refer to Figure 4. Screw housing to joists using holes in mounting brackets and four (4) screws furnished.

3.Install standard 314" x 10" ductwork from damper section

to outside wall or through roof and mount appropriate wall or roof cap (optional.) Refer to the instructions provided with the caps.

IMPORTANT: Be certain there are not any obstructions at the discharge of the ventilator. Be certain insulation does not get into the ductwork or into the blower.

WIRING

NOTE: All wiring connections must comply with local codes, ordinances and the National Electrical Code and the ventilator must be properly grounded. Disconnect power at circuit breaker before making wire connections.

1.Refer to Figure 5. Loosen screws and remove junction box.

2.Run 120vAC supply wiring with ground through switch box to knockout in ventilator housing and secure with box connector.

3.Refer to Figure 6. Connect supply wires to ventilator wires: black to black, white to white. Connect ground wire to green ground screw.

4.Replace junction box and tighten screws.

5.Connect supply wire to switch. NOTE: Switch must be purchased separately. Refer to NuTone's catalog.

POWER UNIT INSTALLATION

1.Refer to Figure 7. The power unit mounts with two hanger rods to the mounting brackets. Insert the hanger rods through the holes in the mounting bracket hooking them from the inside

to the outside.

2.Position the power unit so that its discharge opening is in line with the installed ductwork. Hold the power unit in position between the mounting brackets and swing the hanger rods

into the slots on the power unit and securely tighten the wing nuts.

3.Plug the three (3) wire connectors from the junction box

into the wire receptacle connector from the power unit making sure the plug is properly aligned.

VERTICAL DISCHARGE

314" x 10" DAMPER SECTION

314" x 10"

DAMPER SECTION

HORIZONTAL

DISCHARGE

FIGURE 3

MOUNTING

VENTILATOR

BRACKET

HOUSING


FIGURE 4

JUNCTION

BOX

FIGURE 5


GREEN

BLACK


GREEN


GROUND


SCREW

WHITE

STANDARD


SWITCH

WALL SWITCH


BOX

EARTH

120vAC, 60 Hz GROUND HOUSE POWER

FIGURE 6

Page 2
Image 2
NuTone QT130, QT200 & QT300 installation instructions Mounting the Housing, Wiring, Power Unit Installation

QT130, QT200 & QT300 specifications

NuTone has been at the forefront of residential ventilation solutions for years, and its QT series provides an exceptional blend of performance, quiet operation, and modern design. Among the products in this series, the QT200, QT300, and QT130 stand out for their unique features and technologies, catering to various consumer needs for a comfortable home environment.

The NuTone QT200 is designed with a powerful yet quiet operation in mind. Its 200 CFM blower ensures effective air movement, making it ideal for larger bathrooms or spaces requiring superior ventilation. One of the main characteristics of the QT200 is its Ultra Silent technology, which minimizes noise, allowing for a peaceful atmosphere while maintaining optimal airflow. The sleek, modern grill design complements any decor, making it a stylish addition to your home.

In contrast, the Qt300 offers an upgraded performance with a higher CFM rating. The 300 CFM capacity makes it suitable for multifunctional spaces and larger areas where humidity control is essential. It features the same Ultra Silent technology, significantly reducing noise levels. The QT300 also supports various ducting options, providing flexibility in installation and allowing homeowners to customize their ventilation solution as per their specific requirements.

Lastly, the NuTone QT130 is renowned for its energy efficiency and compact size. With a CFM rating of 130, it is an excellent choice for smaller bathrooms or areas requiring moderate ventilation. It retains the ultra-quiet operation characteristic of the QT series while consuming less energy. This model is perfect for eco-conscious consumers looking to enhance indoor air quality without overspending on energy bills.

All three models incorporate a durable construction that promises longevity and reliable performance. They also feature easy-to-replace filters, ensuring maintenance is hassle-free. Additionally, installation is simplified with adjustable mounting brackets that accommodate various ceiling types, giving homeowners the flexibility they need.

In summary, the NuTone QT series, which includes the QT200, QT300, and QT130 models, offers distinct options for ventilation needs, from powerful airflow and quiet operation to energy efficiency. Each model boasts innovative technologies and characteristics designed to enhance the indoor climate, making them an excellent choice for anyone looking to improve their home environment.