Connecting 
 -compatible
With ![]()
![]() (Remote Interactive) you can control your
(Remote Interactive) you can control your ![]()
![]() - compatible Onkyo cassette tape deck or MD recorder with the
- compatible Onkyo cassette tape deck or MD recorder with the
special ![]()
![]() functions:
functions:
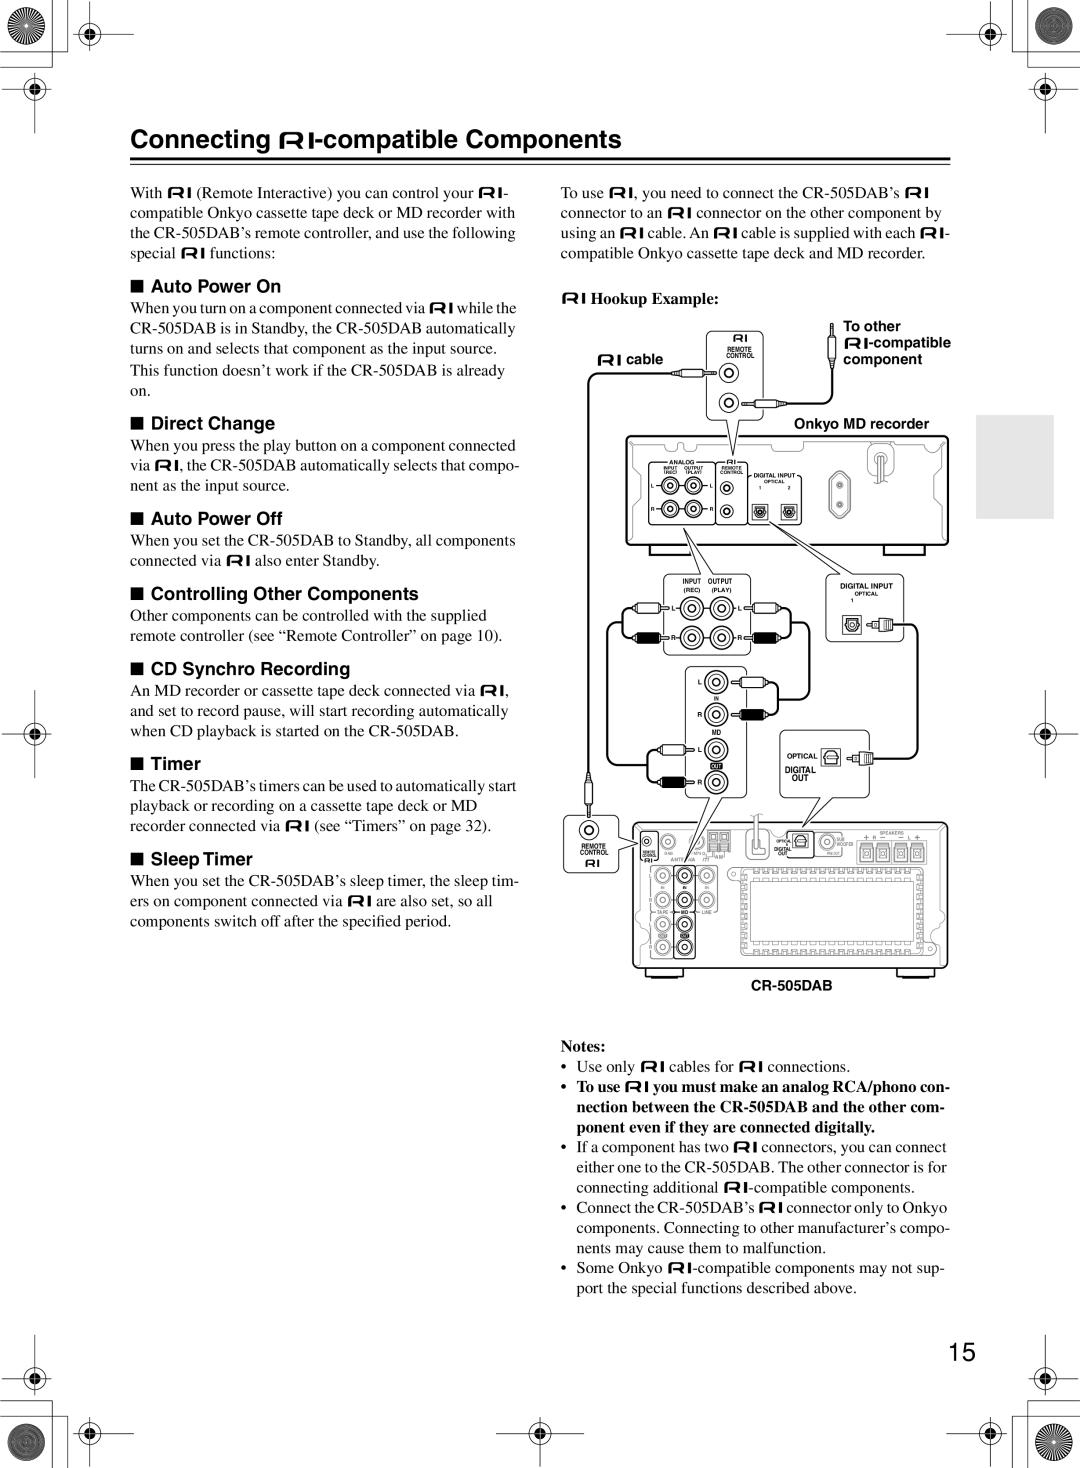
To use ![]()
![]() , you need to connect the
, you need to connect the ![]()
![]()
connector to an ![]()
![]() connector on the other component by
connector on the other component by
using an ![]()
![]() cable. An
cable. An ![]()
![]() cable is supplied with each
cable is supplied with each ![]()
![]() - compatible Onkyo cassette tape deck and MD recorder.
- compatible Onkyo cassette tape deck and MD recorder.
■Auto Power On
When you turn on a component connected via ![]()
![]() while the
while the
This function doesn’t work if the
■Direct Change
When you press the play button on a component connected via ![]()
![]() , the
, the
■Auto Power Off
When you set the
connected via ![]()
![]() also enter Standby.
also enter Standby.

 Hookup Example:
|
|
|
| To other |
|
| REMOTE |
| |
cable |
| CONTROL | component | |
|
|
| ||
|
|
|
| Onkyo MD recorder |
ANALOG |
|
|
| |
INPUT | OUTPUT | REMOTE |
|
|
(REC) | (PLAY) | CONTROL | DIGITAL INPUT | |
|
|
| ||
L |
| L |
| OPTICAL |
| 1 | 2 | ||
R |
| R |
|
|
| INPUT | OUTPUT |
| DIGITAL INPUT |
| (REC) | (PLAY) |
| |
|
| OPTICAL | ||
|
|
|
| |
Other components can be controlled with the supplied remote controller (see “Remote Controller” on page 10).
■CD Synchro Recording
An MD recorder or cassette tape deck connected via ![]()
![]() , and set to record pause, will start recording automatically when CD playback is started on the
, and set to record pause, will start recording automatically when CD playback is started on the
■Timer
The
![]() L
L
![]() R
R
L
IN
R
MD
![]() L
L
OUT
![]() R
R
1
L ![]()
![]()
R![]()
OPTICAL
DIGITAL
OUT
recorder connected via ![]()
![]() (see “Timers” on page 32).
(see “Timers” on page 32).
■Sleep Timer
When you set the
ers on component connected via ![]()
![]() are also set, so all components switch off after the specified period.
are also set, so all components switch off after the specified period.
|
|
|
|
|
| R | SPEAKERS |
|
|
|
| OPTICAL | SUB | L | |
REMOTE |
|
|
| DIGITAL | WOOFER |
|
|
CONTROL | CONTROL | DAB | FM75 | OUT | PRE OUT |
|
|
| REMOTE |
|
| AM |
|
|
|
|
| ANTENNA |
|
|
| ||
|
|
|
|
|
| ||
L
IN IN IN
R
TAPE MD LINE
L
OUT OUT
R
Notes:
•Use only ![]()
![]() cables for
cables for ![]()
![]() connections.
connections.
•To use ![]()
![]() you must make an analog RCA/phono con- nection between the
you must make an analog RCA/phono con- nection between the
•If a component has two ![]()
![]() connectors, you can connect either one to the
connectors, you can connect either one to the ![]()
![]() -compatible
-compatible
•Connect the ![]()
![]() connector only to Onkyo components. Connecting to other manufacturer’s compo- nents may cause them to malfunction.
connector only to Onkyo components. Connecting to other manufacturer’s compo- nents may cause them to malfunction.
•Some Onkyo ![]()
![]() -compatible
-compatible
15
