CONNECTIONS
Connection to an Audio System
•When you change the connections, all devices should be turned off.
•Refer to the manual accompanying external devices for more information.
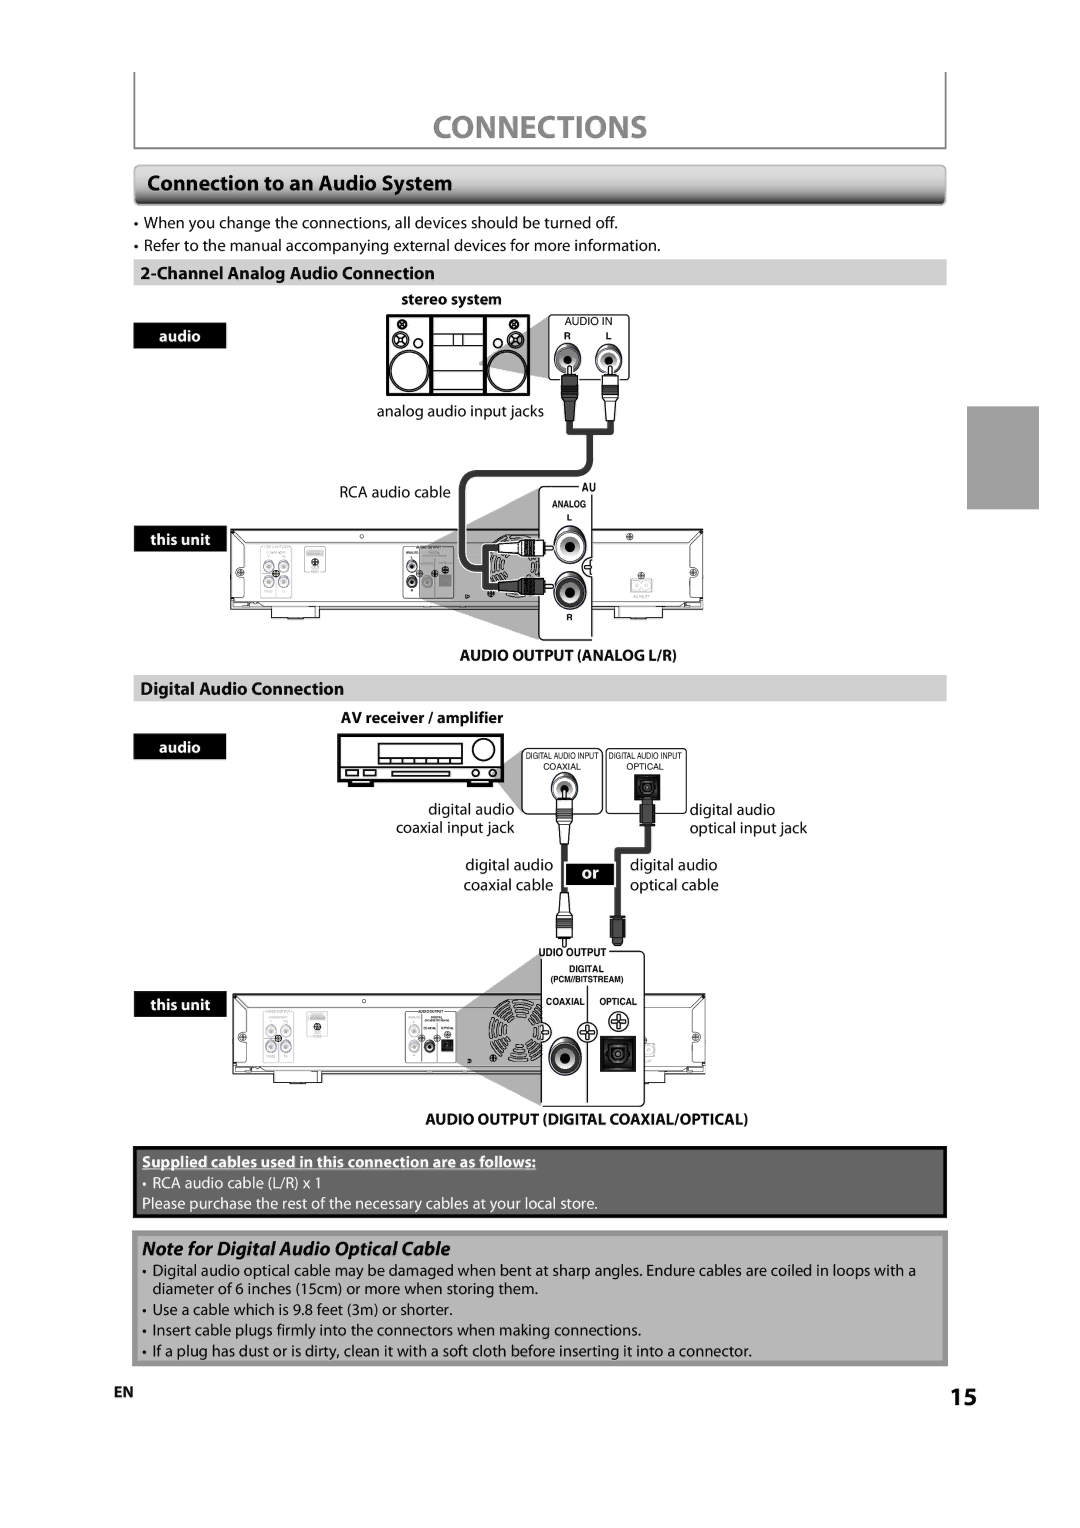
2-Channel Analog Audio Connection
stereo system
audio
AUDIO IN
R L
analog audio input jacks
this unit
RCA audio cable | AU | ||
ANALOG | |||
|
| ||
|
| L | |
AUDIO OUTPUT |
| ||
ANALOG | DIGITAL |
| |
L | (PCM//BITSTREAM) |
| |
| COAXIAL |
| |
R |
|
| |
AC INLET
R
AUDIO OUTPUT (ANALOG L/R)
Digital Audio Connection
AV receiver / amplifier
audio | DIGITAL AUDIO INPUT | DIGITAL AUDIO INPUT | ||||||||||||
| COAXIAL |
|
|
| OPTICAL | |||||||||
|
|
|
|
|
|
|
|
| ||||||
| digital audio |
|
|
|
|
|
|
|
| digital audio | ||||
|
|
|
|
|
|
|
|
|
|
| ||||
| coaxial input jack |
|
|
|
|
|
|
|
|
|
|
|
| optical input jack |
|
|
|
|
|
|
|
|
|
|
|
| |||
|
| |||||||||||||
| digital audio |
|
|
|
|
|
|
| digital audio | |||||
|
|
|
| or |
| |||||||||
| coaxial cable |
|
|
|
|
|
| optical cable | ||||||
|
|
|
|
|
|
|
| |||||||
|
|
|
|
|
|
|
|
|
|
|
|
|
|
|
|
|
|
|
|
|
|
|
|
|
|
|
|
|
|
|
|
|
|
|
|
|
|
|
|
|
|
|
|
|
|
|
|
|
|
|
|
|
|
|
|
|
|
|
|
|
|
|
|
|
|
|
|
|
|
|
|
|
|
|
this unit
|
|
| UDIO OUTPUT | |
|
|
| DIGITAL | |
|
|
| (PCM//BITSTREAM) | |
|
|
| COAXIAL | OPTICAL |
VIDEO OUTPUT | AUDIO OUTPUT |
| ||
COMPONENT | ANALOG | DIGITAL |
| |
Y | PR | L | (PCM//BITSTREAM) |
|
|
|
| COAXIAL OPTICAL |
|
|
| OUT |
|
|
|
| HDMI |
|
|
|
| R |
|
|
|
|
|
| AC INLET |
AUDIO OUTPUT (DIGITAL COAXIAL/OPTICAL)
Supplied cables used in this connection are as follows:
• RCA audio cable (L/R) x 1
Please purchase the rest of the necessary cables at your local store.
Note for Digital Audio Optical Cable
•Digital audio optical cable may be damaged when bent at sharp angles. Endure cables are coiled in loops with a diameter of 6 inches (15cm) or more when storing them.
•Use a cable which is 9.8 feet (3m) or shorter.
•Insert cable plugs firmly into the connectors when making connections.
•If a plug has dust or is dirty, clean it with a soft cloth before inserting it into a connector.
EN | 15 |