Connecting speakers
Connecting speakers
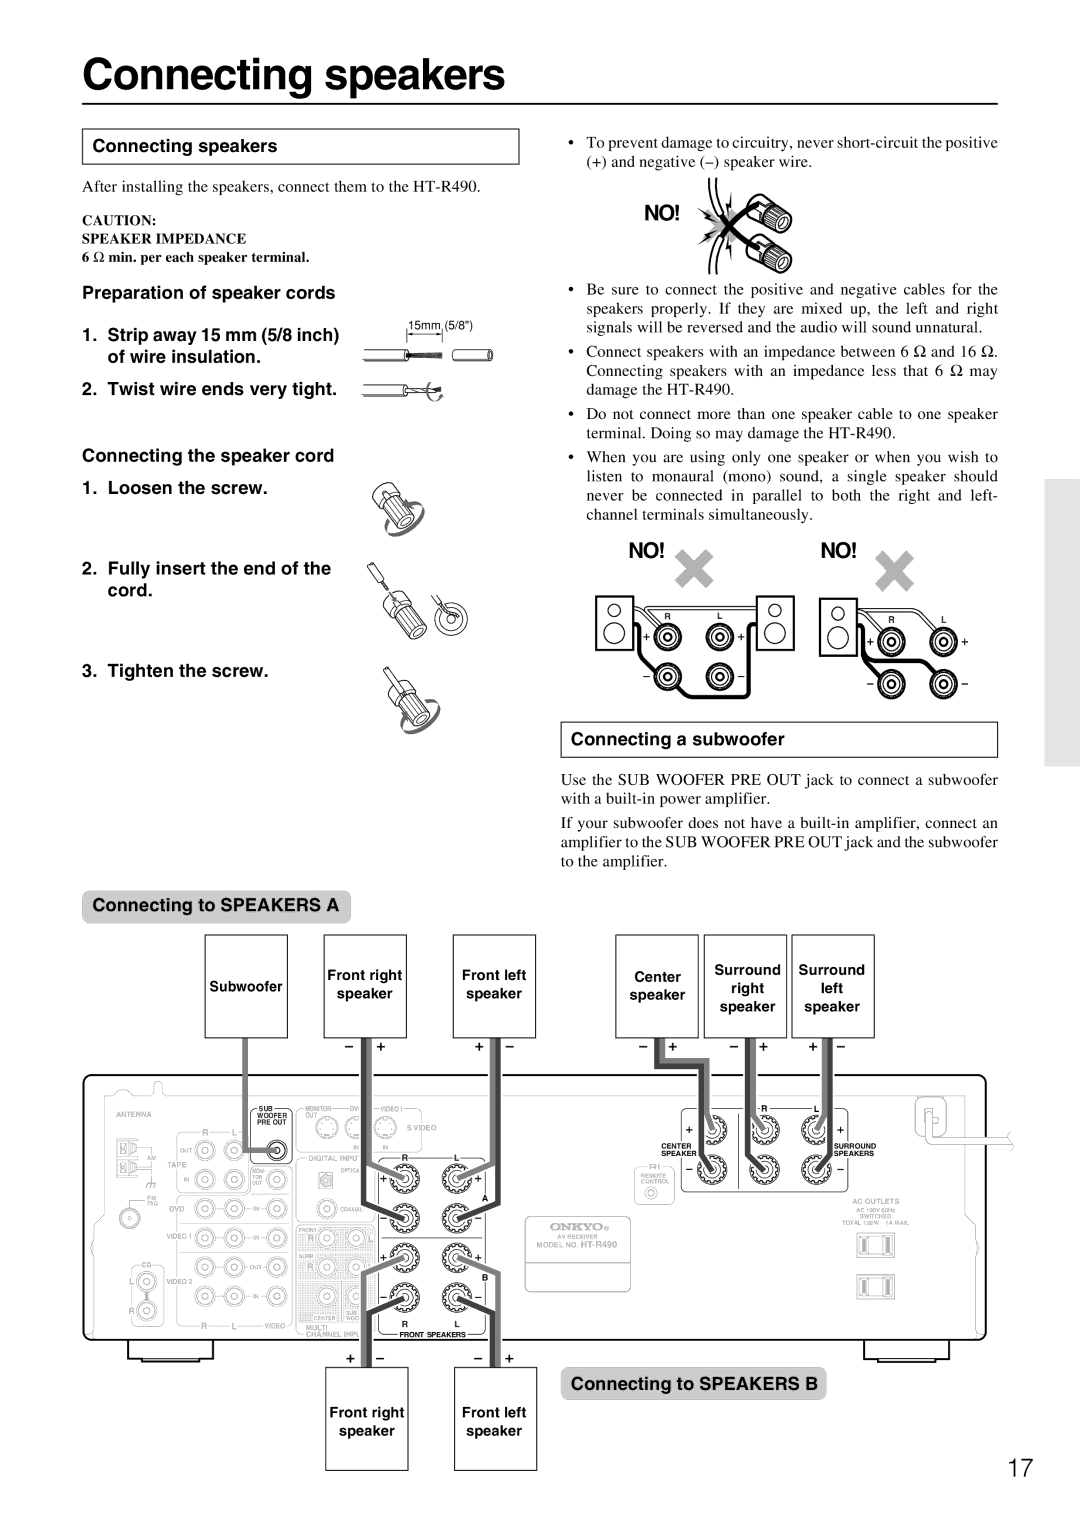
After installing the speakers, connect them to the
CAUTION:
SPEAKER IMPEDANCE
6 Ω min. per each speaker terminal.
•To prevent damage to circuitry, never
(+) and negative
NO!
Preparation of speaker cords |
|
|
| • | Be sure to connect the positive and negative cables for the | |
|
|
|
|
|
| speakers properly. If they are mixed up, the left and right |
1. Strip away 15 mm (5/8 inch) |
| 15mm (5/8") | signals will be reversed and the audio will sound unnatural. | |||
|
|
| • Connect speakers with an impedance between 6 Ω and 16 Ω. | |||
of wire insulation. |
|
|
| |||
|
|
|
| Connecting speakers with an impedance less that 6 Ω may | ||
2. Twist wire ends very tight. |
|
|
|
|
| |
|
|
|
|
| damage the | |
|
|
|
|
| ||
|
|
|
|
| • | Do not connect more than one speaker cable to one speaker |
|
|
|
|
|
| terminal. Doing so may damage the |
Connecting the speaker cord 1. Loosen the screw.
•When you are using only one speaker or when you wish to listen to monaural (mono) sound, a single speaker should never be connected in parallel to both the right and left- channel terminals simultaneously.
2.Fully insert the end of the cord.
NO! ![]()
RL
NO!
RL
3. Tighten the screw.
Connecting a subwoofer
Use the SUB WOOFER PRE OUT jack to connect a subwoofer with a
If your subwoofer does not have a
Connecting to SPEAKERS A
|
| Subwoofer | |
ANTENNA |
|
| SUB |
|
| WOOFER | |
|
|
| PRE OUT |
| R | L |
|
| OUT |
|
|
AM | TAPE |
|
|
|
| MONI- | |
|
|
| |
| IN |
| TOR |
|
| OUT | |
|
|
| |
FM |
|
|
|
75 | DVD |
| IN |
|
| ||
| VIDEO 1 |
| IN |
CD |
|
| OUT |
L | VIDEO 2 |
|
|
|
|
| IN |
R |
|
|
|
| R | L | VIDEO |
Front right |
| Front left |
| Center |
| Surround |
| Surround | ||||||||||||||||||||||||||||||
|
|
|
| right |
|
|
|
|
| left | ||||||||||||||||||||||||||||
speaker |
| speaker |
| speaker |
|
|
|
|
|
|
| |||||||||||||||||||||||||||
|
|
| speaker |
| speaker | |||||||||||||||||||||||||||||||||
|
|
|
|
|
|
|
|
|
|
|
|
|
|
|
|
|
|
|
|
|
|
|
|
| ||||||||||||||
|
|
|
|
|
|
|
|
|
|
|
|
|
|
|
|
|
|
|
|
|
|
|
|
|
|
|
|
|
|
|
|
|
|
|
|
|
|
|
|
|
|
|
|
|
|
|
|
|
|
|
|
|
|
|
|
|
|
|
|
|
|
|
|
|
|
|
|
|
|
|
|
|
|
|
|
|
|
MONITOR | DVD | VIDEO 1 | R | L |
OUT |
|
|
|
|
|
|
| S VIDEO |
|
IN | IN |
| CENTER | SURROUND |
DIGITAL INPUT | R | L | SPEAKER | SPEAKERS |
|
|
OPTICAL
REMOTE
CONTROL
| A | AC OUTLETS | |
| COAXIAL | AC 120V 60Hz | |
|
| SWITCHED | |
|
| TOTAL 120W 1A MAX. | |
FRONT |
| AV RECEIVER | |
R | L | ||
MODEL NO. | |||
|
|
SURR |
|
R | L |
| B |
SUB |
|
|
CENTER WOOFER | R | L |
MULTI | ||
CHANNEL INPUT | FRONT SPEAKERS | |
Front right
speaker
Front left
speaker
Connecting to SPEAKERS B
17