First Time Setup—Continued

Digital Audio Input Setup


1


2, 3


MASTER VOLUME

STANDBY/ON


TUNING

PRESET


STANDBY


MULTI CH


DVD

VCR/DVR

CBL/SAT

AUX

TAPE

TUNER

C D

SETUP

ENTER

RETURN


AUX INPUT


PHONES


SETUP MIC

VIDEO

L AUDIO

R

A

SPEAKERS

B

TONE


STEREO

LISTENING MODE

DISPLAY DIGITAL INPUT

DIMMER

MEMORY TUNING MODE


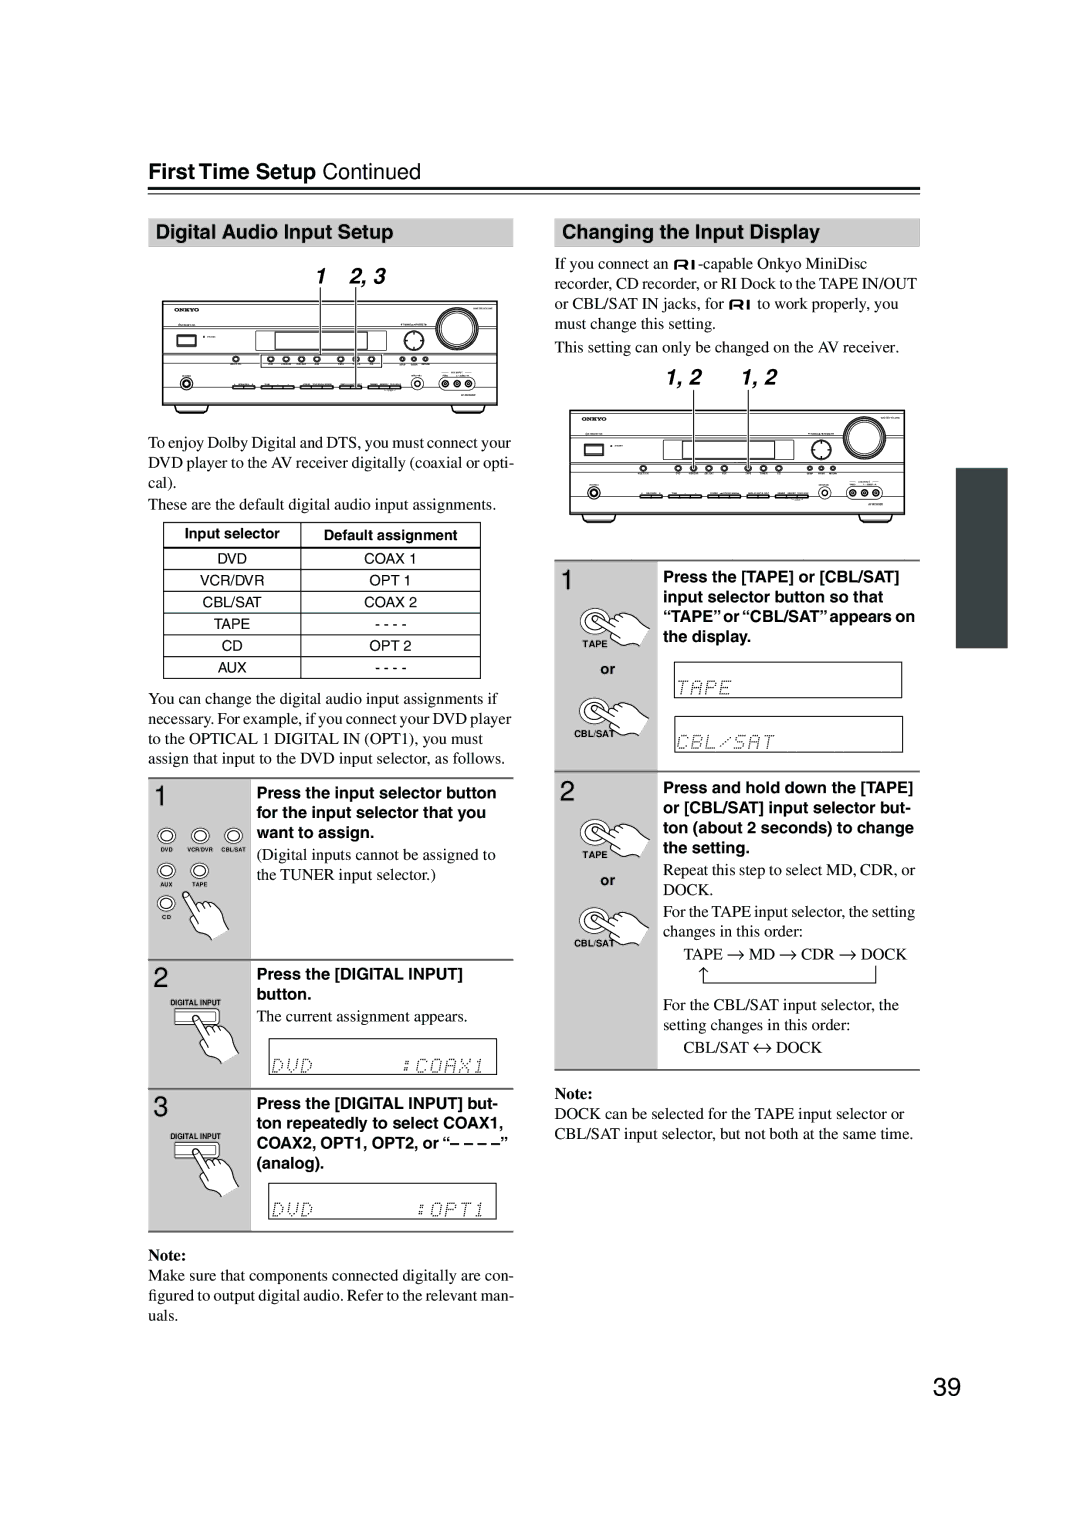
To enjoy Dolby Digital and DTS, you must connect your DVD player to the AV receiver digitally (coaxial or opti- cal).

These are the default digital audio input assignments.

Changing the Input Display

If you connect an -capable Onkyo MiniDisc recorder, CD recorder, or RI Dock to the TAPE IN/OUT

or CBL/SAT IN jacks, for to work properly, you must change this setting.

This setting can only be changed on the AV receiver.

1, 2

1, 2


MASTER VOLUME

STANDBY/ON


TUNING

PRESET


STANDBY


MULTI CH


DVD

VCR/DVR

CBL/SAT

AUX

TAPE

TUNER

C D

SETUP

ENTER

RETURN


AUX INPUT


PHONES


SETUP MIC

VIDEO

L AUDIO

R

A

SPEAKERS

B

TONE


STEREO

LISTENING MODE

DISPLAY DIGITAL INPUT

DIMMER

MEMORY TUNING MODE


Input selector

Default assignment


DVD

COAX 1


VCR/DVR

OPT 1


CBL/SAT

COAX 2


TAPE

- - - -


CD

OPT 2


AUX

- - - -


You can change the digital audio input assignments if necessary. For example, if you connect your DVD player to the OPTICAL 1 DIGITAL IN (OPT1), you must assign that input to the DVD input selector, as follows.

1

TAPE

or

CBL/SAT

Press the [TAPE] or [CBL/SAT] input selector button so that “TAPE” or “CBL/SAT” appears on the display.

1

Press the input selector button


for the input selector that you


want to assign.

DVD

VCR/DVR CBL/SAT (Digital inputs cannot be assigned to

AUX

the TUNER input selector.)

TAPE

C D


2

Press the [DIGITAL INPUT]


button.

DIGITAL INPUT

The current assignment appears.

2

TAPE

or

CBL/SAT

Press and hold down the [TAPE] or [CBL/SAT] input selector but- ton (about 2 seconds) to change the setting.

Repeat this step to select MD, CDR, or DOCK.

For the TAPE input selector, the setting changes in this order:

TAPE MD CDR DOCK

For the CBL/SAT input selector, the setting changes in this order:

CBL/SAT DOCK

3


Press the [DIGITAL INPUT] but-


DIGITAL INPUT

ton repeatedly to select COAX1,


COAX2, OPT1, OPT2, or “– – – –”


(analog).

Note:

Make sure that components connected digitally are con- figured to output digital audio. Refer to the relevant man- uals.

Note:

DOCK can be selected for the TAPE input selector or CBL/SAT input selector, but not both at the same time.

39

Page 39
Image 39
Onkyo TX-SR505E, TX-SR8550, SR575 instruction manual Digital Audio Input Setup, Changing the Input Display

TX-SR505E, TX-SR505, SR575, TX-SR8550 specifications

The Onkyo SR575, TX-SR505, TX-SR8550, and TX-SR505E are all noteworthy audio/video receivers from Onkyo, a brand renowned for its commitment to high-quality sound and advanced features. Each model offers unique characteristics that appeal to various home theater enthusiasts.

Starting with the Onkyo SR575, this model boasts a power output of 70 watts per channel over five channels, making it suitable for most home theater setups. It supports various audio formats, including Dolby TrueHD and DTS-HD Master Audio, enabling a rich surround sound experience. The SR575 also features four HDMI inputs, ensuring compatibility with multiple high-definition sources. With Audyssey MultEQ room calibration technology, the receiver can analyze your room’s acoustics and optimize sound output accordingly, providing a tailored listening experience.

The TX-SR505 is another impressive model, featuring a straightforward yet powerful design. With 70 watts per channel, it supports 5.1 channel surround sound, offering a great entry point for those looking to enhance their home audio experience. It includes a user-friendly graphical user interface (GUI) for easy navigation through settings and options. The TX-SR505 is also equipped with Dolby Pro Logic II and DTS decoding capabilities, ensuring compatibility with a wide range of media formats. This model emphasizes simplicity and performance, making it ideal for users who may be new to home theater systems.

Moving on to the TX-SR8550, this receiver amps up the performance with a robust power output of 100 watts per channel across seven channels. The TX-SR8550 supports the latest audio technologies, including Dolby Atmos and DTS:X, allowing for immersive soundscapes that wrap around listeners. The device's multiple HDMI inputs and video upscaling capabilities enhance video quality for 4K and other high-definition formats. With built-in Wi-Fi and Bluetooth connectivity, users can easily stream music from their devices, while the Onkyo Controller app allows for convenient control over the receiver from a smartphone or tablet.

Lastly, the TX-SR505E retains many of the TX-SR505’s best features while offering additional enhancements for the European market. This model comes with an updated graphical interface and enhanced compatibility with European broadcasting standards. The TX-SR505E also includes zone 2 audio outputs, allowing users to enjoy music in another room while watching a different program in the main listening area.

In summary, the Onkyo SR575, TX-SR505, TX-SR8550, and TX-SR505E stand out in their class by incorporating advanced audio technologies, user-friendly interfaces, and plenty of connectivity options. Whether you’re a casual listener or a dedicated audiophile, these receivers provide a variety of features to enhance your home entertainment experience.