Charging the Battery
Connect input source - (Video in)
1 |
2 |
VGA\ |
|
|
USB IN | DC IN | 3 |
| ||
|
|
![]() 4
4
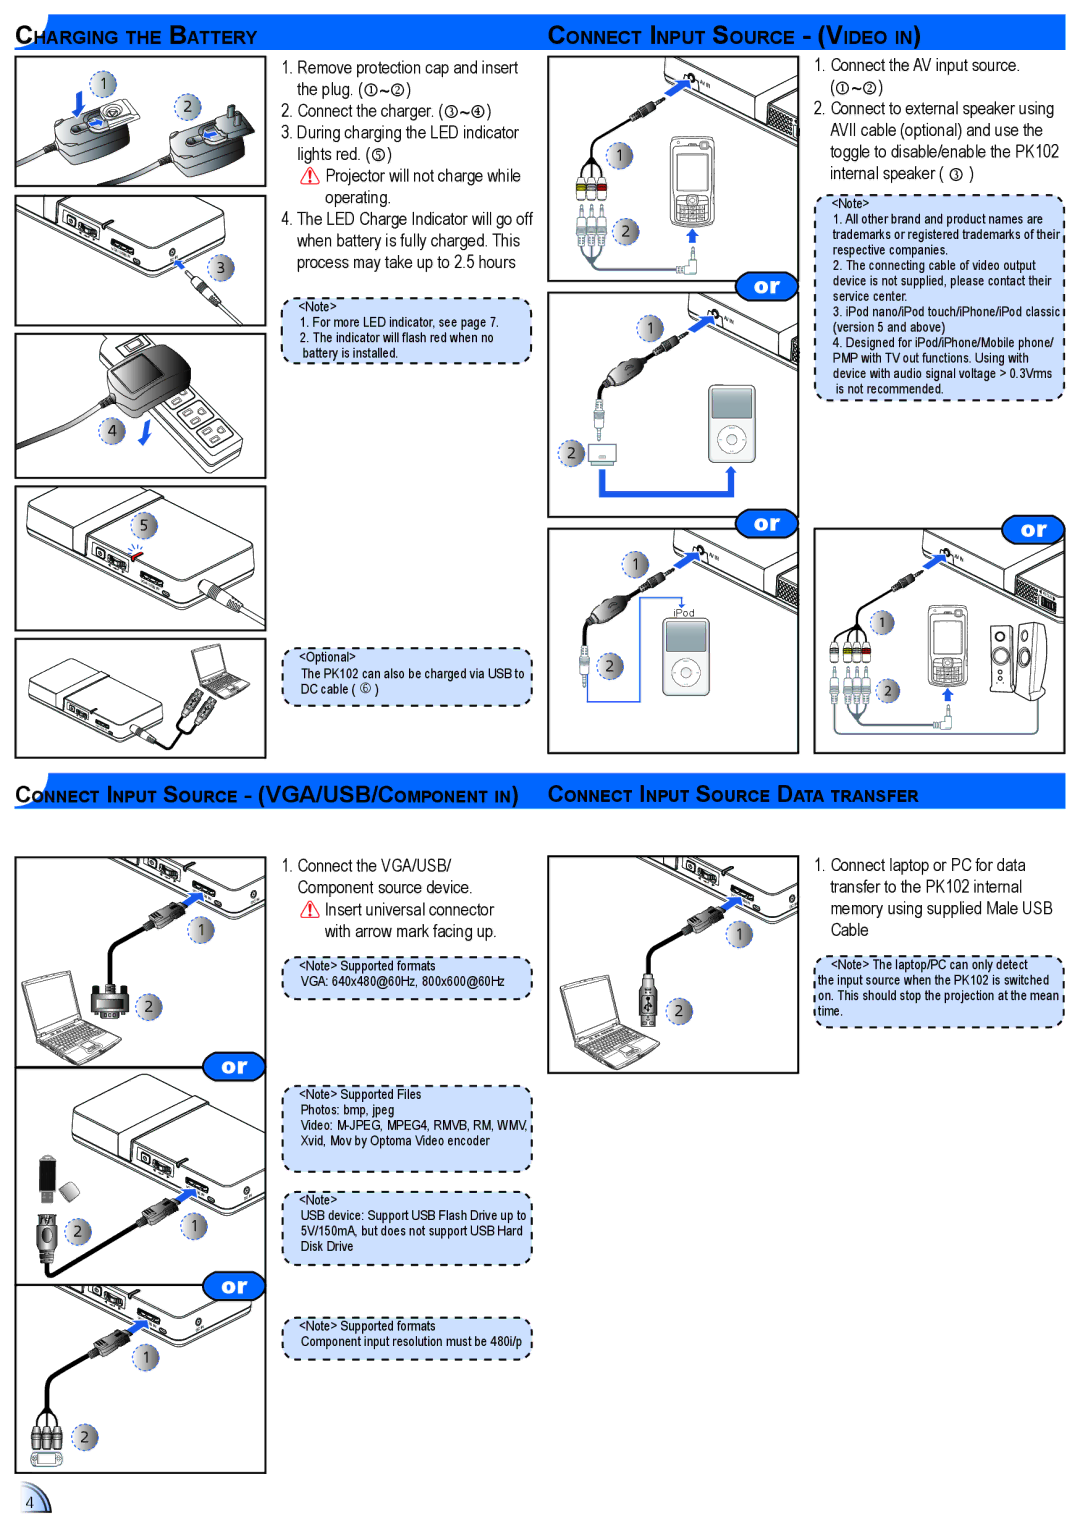
1.Remove protection cap and insert the plug. (~)
2.Connect the charger. (~)
3.During charging the LED indicator lights red. ()
![]() Projector will not charge while operating.
Projector will not charge while operating.
4.The LED Charge Indicator will go off when battery is fully charged. This process may take up to 2.5 hours
<Note>
1. For more LED indicator, see page 7.
2. The indicator will flash red when no battery is installed.
| AVIN |
| F |
1 |
|
2 |
|
| or |
1 | AVIN |
|
2 |
1. Connect the AV input source. (~)
2. Connect to external speaker using AVII cable (optional) and use the toggle to disable/enable the PK102 internal speaker ( )
<Note>
1.All other brand and product names are trademarks or registered trademarks of their respective companies.
2.The connecting cable of video output device is not supplied, please contact their service center.
3.iPod nano/iPod touch/iPhone/iPod classic (version 5 and above)
4.Designed for iPod/iPhone/Mobile phone/ PMP with TV out functions. Using with device with audio signal voltage > 0.3Vrms is not recommended.
5 |
VGA\ |
USB IN |
DC IN |
<Optional>
The PK102 can also be charged via USB to DC cable ( )
VGA\ |
USB IN |
| or |
1 | AVIN |
| |
| iPod |
2 |
|
or |
AVIN |
FOCUS |
1 |
2 |
Connect input source - (VGA/USB/Component in) |
Connect input source Data transfer
|
|
|
| 1. Connect the VGA/USB/ |
| VGA\USB IN |
| Component source device. | |
|
|
| DC IN | Insert universal connector |
|
|
|
| |
| 1 |
| with arrow mark facing up. | |
|
|
|
| <Note> Supported formats |
|
|
|
| VGA: 640x480@60Hz, 800x600@60Hz |
2 |
|
|
|
|
|
|
| or |
|
|
|
|
| <Note> Supported Files |
|
|
|
| Photos: bmp, jpeg |
|
|
|
| Video: |
|
|
|
| Xvid, Mov by Optoma Video encoder |
| VGA\ |
|
|
|
| USB IN | DC IN | <Note> | |
|
|
| ||
|
|
|
| |
| 1 |
|
| USB device: Support USB Flash Drive up to |
2 |
|
| 5V/150mA, but does not support USB Hard | |
|
|
|
| Disk Drive |
|
|
| or |
|
VGA\ |
|
|
| <Note> Supported formats |
USB |
| IN |
| |
IN | DC |
| ||
1 |
|
|
| Component input resolution must be 480i/p |
|
|
|
| |
2 |
|
|
|
|
4 |
|
|
|
|
VGA\ |
USB IN |
DC IN |
1 |
2 |
1.Connect laptop or PC for data transfer to the PK102 internal memory using supplied Male USB Cable
![]() <Note> The laptop/PC can only detect
<Note> The laptop/PC can only detect ![]() the input source when the PK102 is switched on. This should stop the projection at the mean time.
the input source when the PK102 is switched on. This should stop the projection at the mean time.