Congratulations on your purchase of an Orion 6" Newtonian Imaging Reflector.
Your 6" Newtonian Imaging Reflector is a Newtonian reflec tor telescope with high quality optics and excellent mechani cal construction. It has been specially optimized for use with astronomical CCD imaging cameras. These instructions will help you set up and use your telescope.
Getting Started
The 6" Newtonian Imaging Reflector comes nearly fully assembled from the factory. The telescope’s optics have been installed and collimated, so you should not have to make any adjustments to them.
Please keep the original shipping box! In the unlikely event you should need to ship the telescope back to Orion for war ranty repair service, you should use the original packaging. The box also makes a very good container for storing the tele scope when it is not in use.
Attaching the 6" Newtonian Imaging Reflector to a Mount
The 6" Newtonian Imaging Reflector can be attached to a mount by the use of optional tube rings. Tube rings with an inner diameter of 182mm (7.16"), such as Orion item #7375, are needed. First attach the tube rings to your telescope mount, then place the optical tube in the tube rings.
Use of Optional Finder Scope and Eyepieces
The 6" Newtonian Imaging Reflector OTA does not come with a finder scope or eyepieces in order to grant the user the great est versatility in customizing the instrument to suit their tastes. However, certain rules for using accessories still apply.
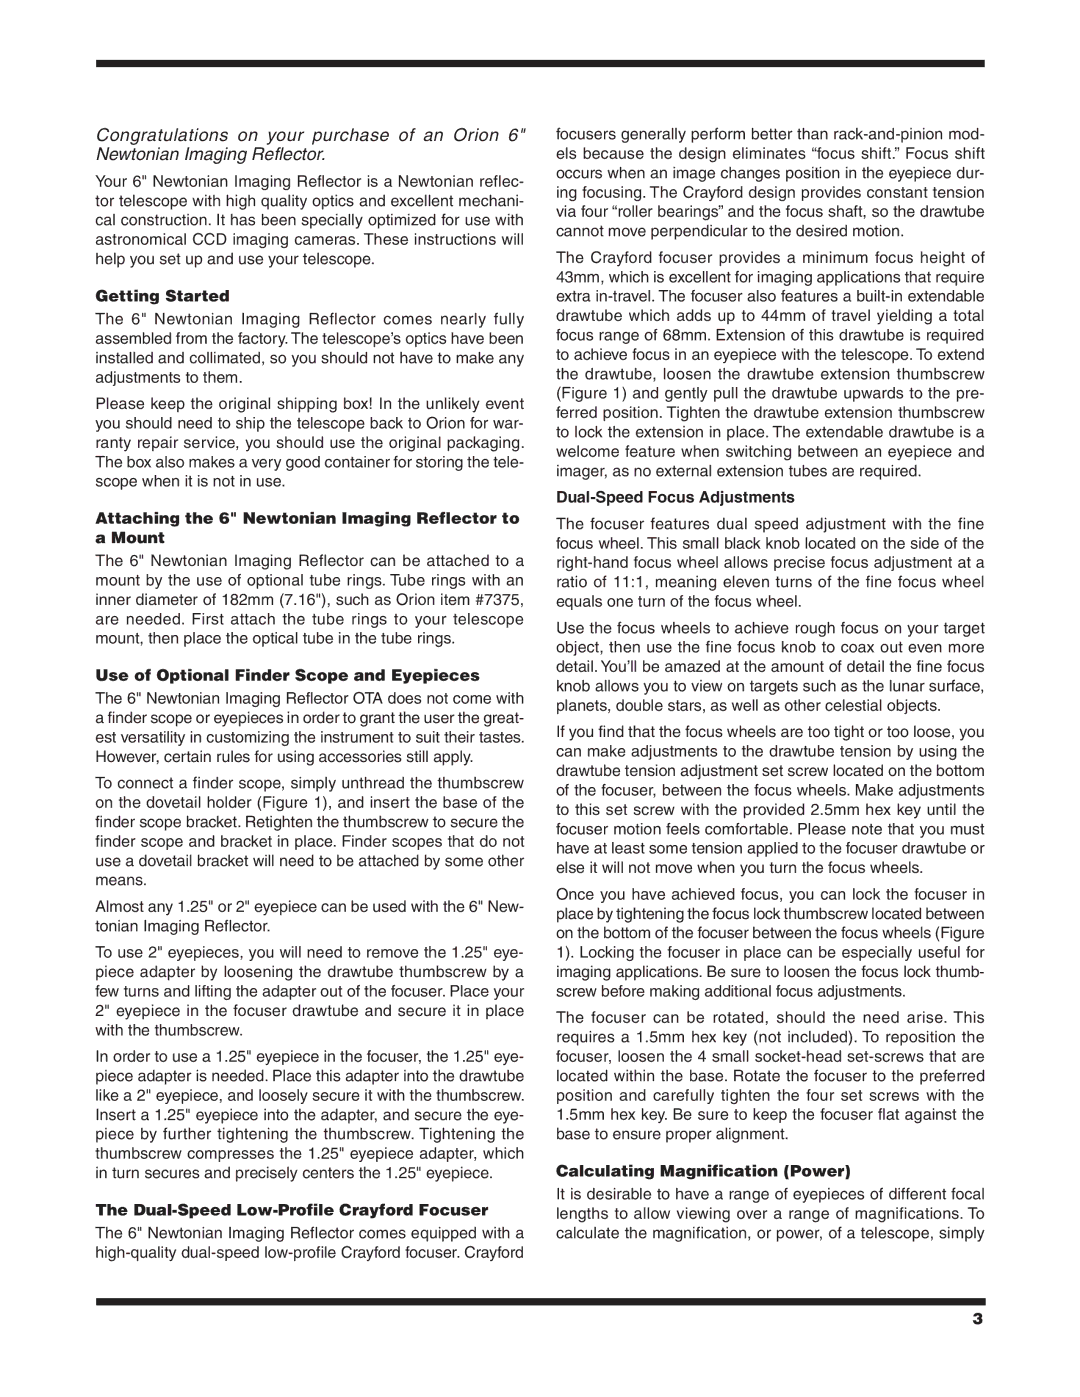
To connect a finder scope, simply unthread the thumbscrew on the dovetail holder (Figure 1), and insert the base of the finder scope bracket. Retighten the thumbscrew to secure the finder scope and bracket in place. Finder scopes that do not use a dovetail bracket will need to be attached by some other means.
Almost any 1.25" or 2" eyepiece can be used with the 6" New tonian Imaging Reflector.
To use 2" eyepieces, you will need to remove the 1.25" eye piece adapter by loosening the drawtube thumbscrew by a few turns and lifting the adapter out of the focuser. Place your 2" eyepiece in the focuser drawtube and secure it in place with the thumbscrew.
In order to use a 1.25" eyepiece in the focuser, the 1.25" eye piece adapter is needed. Place this adapter into the drawtube like a 2" eyepiece, and loosely secure it with the thumbscrew. Insert a 1.25" eyepiece into the adapter, and secure the eye piece by further tightening the thumbscrew. Tightening the thumbscrew compresses the 1.25" eyepiece adapter, which in turn secures and precisely centers the 1.25" eyepiece.
The Dual-Speed Low-Profile Crayford Focuser
The 6" Newtonian Imaging Reflector comes equipped with a high-quality dual-speed low-profile Crayford focuser. Crayford
focusers generally perform better than rack-and-pinion mod els because the design eliminates “focus shift.” Focus shift occurs when an image changes position in the eyepiece dur ing focusing. The Crayford design provides constant tension via four “roller bearings” and the focus shaft, so the drawtube cannot move perpendicular to the desired motion.
The Crayford focuser provides a minimum focus height of 43mm, which is excellent for imaging applications that require extra in-travel. The focuser also features a built-in extendable drawtube which adds up to 44mm of travel yielding a total focus range of 68mm. Extension of this drawtube is required to achieve focus in an eyepiece with the telescope. To extend the drawtube, loosen the drawtube extension thumbscrew (Figure 1) and gently pull the drawtube upwards to the pre ferred position. Tighten the drawtube extension thumbscrew to lock the extension in place. The extendable drawtube is a welcome feature when switching between an eyepiece and imager, as no external extension tubes are required.
Dual-Speed Focus Adjustments
The focuser features dual speed adjustment with the fine focus wheel. This small black knob located on the side of the right-hand focus wheel allows precise focus adjustment at a ratio of 11:1, meaning eleven turns of the fine focus wheel equals one turn of the focus wheel.
Use the focus wheels to achieve rough focus on your target object, then use the fine focus knob to coax out even more detail. You’ll be amazed at the amount of detail the fine focus knob allows you to view on targets such as the lunar surface, planets, double stars, as well as other celestial objects.
If you find that the focus wheels are too tight or too loose, you can make adjustments to the drawtube tension by using the drawtube tension adjustment set screw located on the bottom of the focuser, between the focus wheels. Make adjustments to this set screw with the provided 2.5mm hex key until the focuser motion feels comfortable. Please note that you must have at least some tension applied to the focuser drawtube or else it will not move when you turn the focus wheels.
Once you have achieved focus, you can lock the focuser in place by tightening the focus lock thumbscrew located between on the bottom of the focuser between the focus wheels (Figure 1). Locking the focuser in place can be especially useful for imaging applications. Be sure to loosen the focus lock thumb screw before making additional focus adjustments.
The focuser can be rotated, should the need arise. This requires a 1.5mm hex key (not included). To reposition the focuser, loosen the 4 small socket-head set-screws that are located within the base. Rotate the focuser to the preferred position and carefully tighten the four set screws with the 1.5mm hex key. Be sure to keep the focuser flat against the base to ensure proper alignment.
Calculating Magnification (Power)
It is desirable to have a range of eyepieces of different focal lengths to allow viewing over a range of magnifications. To calculate the magnification, or power, of a telescope, simply