Note: The following appendices apply to the Atlas EQ-G with GoTo hand controller only.

Appendix A: Enhancing the Pointing Accuracy

The Atlas EQ-G produces pointing accuracy and tracking accuracy adequate for most applications. If higher precision is required, “cone” error calibration may be necessary.

Cone Error Calibration

“Cone” error is a common inaccuracy found on all German equatorial mount designs. Cone error results from the optical axis of the telescope not being aligned to the R.A. axis of the mount. This affects the pointing accuracy of the Atlas EQ-G. Three-star alignment automatically compensates for some of the cone error, but pointing accuracy will be optimized by mechanically minimizing the cone error. The following calibra- tion procedure should be performed before the initial use of the telescope and periodically thereafter to ensure peak accu- racy.

Testing for Cone Error

This test is performed at night using two bright stars located on opposite hemispheres of the night sky. Confirm that the telescope is properly polar-aligned using the polar axis finder scope. Perform the one-star alignment using an eastern star as the alignment star (see “One-Star Alignment”). After com- pleting the star alignment, choose a bright star in the western sky from the Atlas EQ-G object database and press ENTER to slew the telescope to the star. If the optical axis is perfectly aligned to the R.A. axis, the telescope will accurately put the star in the center of the eyepiece. This shows that there is no cone error in your telescope setup and you will not need to perform the calibration. It is acceptable if the star is slightly off- center as long as it appears in the eyepiece field of view and reasonable close to the center. Many factors determine the pointing accuracy of the Atlas EQ-G. Incorrect star alignment, loose R.A. or Dec. lock-knobs, or cone error. If the Atlas EQ-G puts the star outside the eyepiece field of view, you need to determine which of these factors is causing the pointing inac- curacy. To determine if the inaccuracy is caused by cone error, simply move the telescope about the R.A. axis by pressing the Left or Right direction button. If the star can be moved into the eyepiece field of view without adjusting the Dec. axis, it is likely that cone error exists in your telescope setup.

Calibration Procedure

1.Insert an illuminated reticle eyepiece (not supplied) into the focuser (or diagonal) of the telescope. Confirm the tele- scope is properly set up and balanced, and the finderscope is aligned with the optical tube of the telescope.

Note: Steps 2 to 4 are to identify R.A. and DEC movements in the reticle eyepiece. If you are already familiar with the move- ments, proceed to step 5.

2.Find a bright star and position the telescope so the star is centered in the eyepiece field of view.

3.Look into the eyepiece. Move the telescope about the R.A. axis using the R.A. direction buttons on the hand controller while carefully observing the movement of the star.

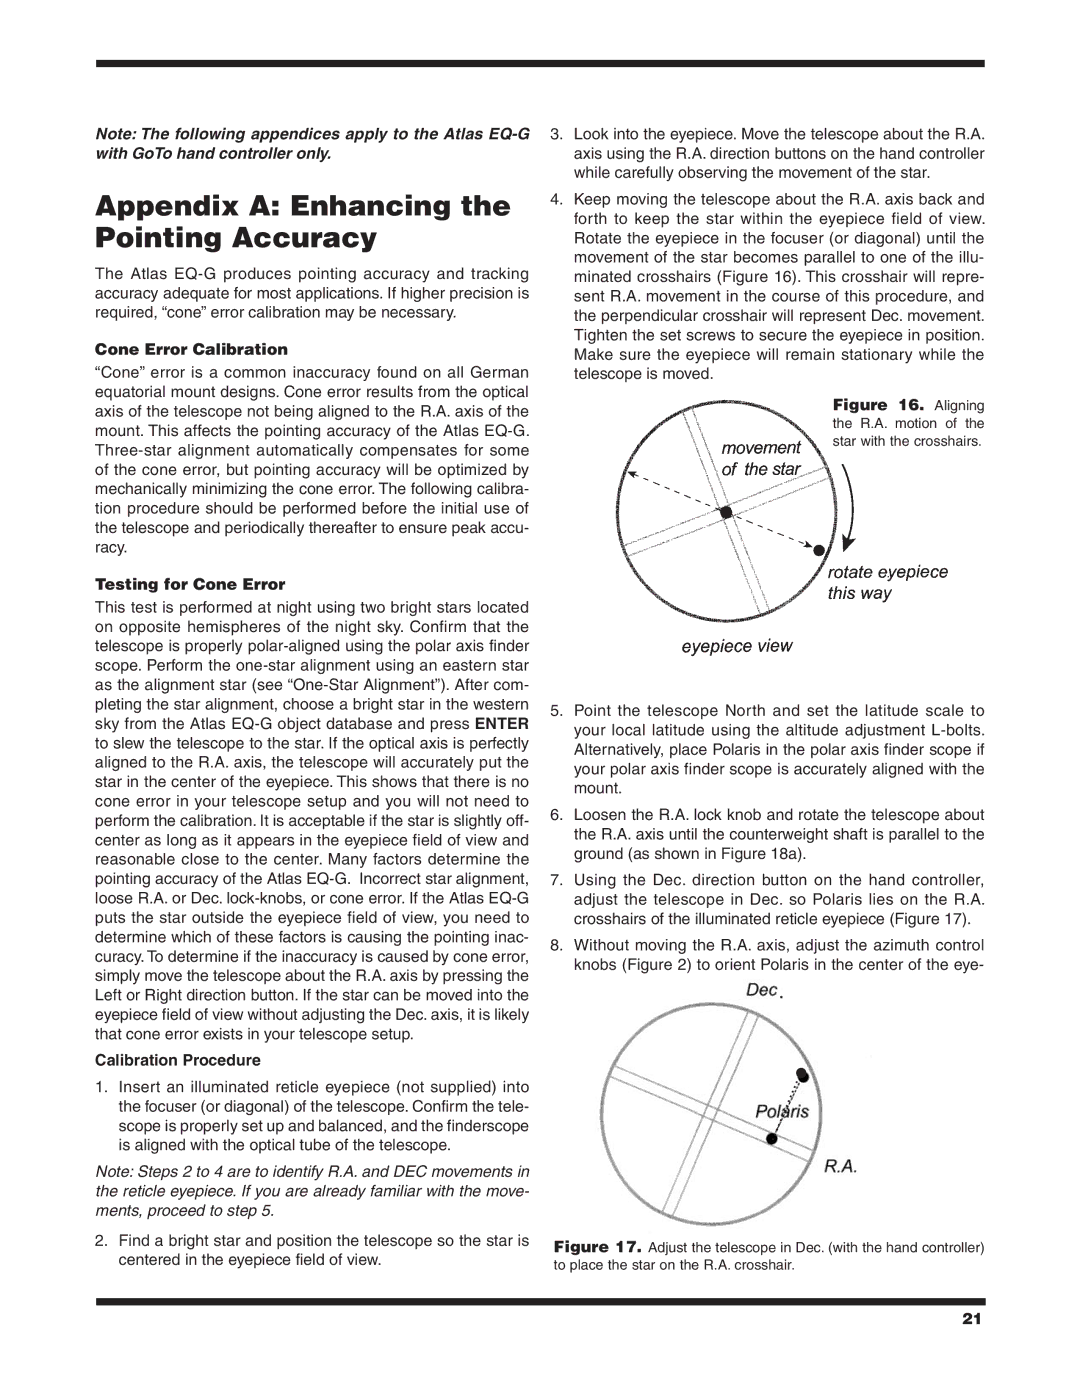
4.Keep moving the telescope about the R.A. axis back and forth to keep the star within the eyepiece field of view. Rotate the eyepiece in the focuser (or diagonal) until the movement of the star becomes parallel to one of the illu- minated crosshairs (Figure 16). This crosshair will repre- sent R.A. movement in the course of this procedure, and the perpendicular crosshair will represent Dec. movement. Tighten the set screws to secure the eyepiece in position. Make sure the eyepiece will remain stationary while the telescope is moved.

Figure 16. Aligning the R.A. motion of the star with the crosshairs.

5.Point the telescope North and set the latitude scale to your local latitude using the altitude adjustment L-bolts. Alternatively, place Polaris in the polar axis finder scope if your polar axis finder scope is accurately aligned with the mount.

6.Loosen the R.A. lock knob and rotate the telescope about the R.A. axis until the counterweight shaft is parallel to the ground (as shown in Figure 18a).

7.Using the Dec. direction button on the hand controller, adjust the telescope in Dec. so Polaris lies on the R.A. crosshairs of the illuminated reticle eyepiece (Figure 17).

8.Without moving the R.A. axis, adjust the azimuth control knobs (Figure 2) to orient Polaris in the center of the eye-

.

Figure 17. Adjust the telescope in Dec. (with the hand controller) to place the star on the R.A. crosshair.

21

Page 21
Image 21
Orion EQ-G instruction manual Appendix a Enhancing the Pointing Accuracy, Cone Error Calibration, Testing for Cone Error

EQ-G specifications

The Orion EQ-G Equatorial Mount is a popular choice among amateur astronomers and astrophotographers seeking a reliable and versatile platform for their telescopes. Known for its robust build and advanced technology, the EQ-G mount can support a wide range of telescope sizes, making it ideal for both visual observations and astrophotography.

One of the standout features of the Orion EQ-G is its precision go-to capability. Equipped with a computer-controlled system, users can easily locate and track celestial objects with remarkable accuracy. The mount comes with a database that includes thousands of celestial objects, allowing users to automatically point their telescope to stars, planets, galaxies, and more with the push of a button.

The EQ-G mount features a sturdy aluminum construction, ensuring stability even under heavy loads. It can support telescopes weighing up to 30 lbs, making it suitable for medium to large telescopes. The mount's adjustable altitude and azimuth motions allow for smooth tracking of celestial objects as they move across the sky, a vital characteristic for long-exposure astrophotography.

To enhance user experience, the EQ-G is equipped with a built-in dual-axis servo motor drive system. This drive system delivers precise movement control, ensuring that the telescope can be accurately guided to desired targets. Furthermore, the mount is compatible with various control options, including hand controllers and computer software, allowing for a customizable and convenient observing experience.

Another notable technology within the EQ-G is the polar alignment scope. This feature aids in achieving accurate polar alignment, which is crucial for minimizing tracking errors during long exposures. By correctly aligning the mount, users can take stunning astrophotographs with minimal star trails.

For portability, the EQ-G mount comes with a quick-release design that allows for easy setup and takedown. Its adjustable tripod legs provide a stable base on various terrains, making it possible to observe from different locations, whether in the backyard or at a remote dark-sky site.

In summary, the Orion EQ-G Equatorial Mount combines an intuitive design with high-quality features, making it a fantastic choice for astronomy enthusiasts. With its go-to capability, sturdy construction, precise tracking, and user-friendly setup, the EQ-G stands out as a reliable and effective tool for exploring the wonders of the night sky. Whether you are capturing stunning images of celestial objects or simply enjoying visual astronomy, the Orion EQ-G meets the diverse needs of astronomers at all levels.