The polar axis finder scope is now ready to be used. When not in use, replace the plastic protective cover to prevent the polar finder from getting bumped.

Using the Polar Axis Finder Scope

The reticle of the polar axis finder scope for the Atlas EQG has a tiny star map printed on it that makes precise polar align- ment quick and easy. To polar align the mount using the polar axis finder scope, follow these instructions:

1.Approximately polar-align the mount as outlined in the pro- cedure above.

2.Loosen the Dec. lock lever and rotate the optical tube on the declination axis so the tube is at a 90° angle to the right ascension axis (Figure 8). Tighten the Dec. lock lever.

3.Focus the polar finder by rotating the eyepiece. Now, sight Polaris in the polar axis finder scope. If you have followed the approximate polar alignment procedure accurately, Polaris will probably be within the field of view. If not, move the tripod left-to-right, and adjust the latitude up-and down until Polaris is somewhere within the field of view of the polar axis finder scope.

4.The mount has a built-in illuminator that allows you to see the reticle pattern in the polar axis finder scope at night. Simply turn on the power switch on the Atlas EQ-G mount (see “Powering the Atlas EQ-G Mount”) and the polar axis finder scope reticle will be illuminated. Note the constel- lation Cassiopeia and the Big Dipper in the reticle. They do not appear in scale, but they indicate the general posi- tions of Cassiopeia and the Big Dipper relative to the north celestial pole (which is indicated by the cross at the cen- ter of the reticle). Rotate the reticle so the constellations depicted match their current orientation in the sky when viewed with the naked eye. To do this, release the R.A. lock lever and rotate the main telescope around the R.A. axis until the reticle is oriented with sky. For larger optical tubes, you may need to remove the tube from the mount to pre- vent it from bumping into the mount. Once the reticle is cor- rectly oriented, use the right ascension lock lever to secure the mount’s position.

5.Now use the azimuth adjustment knobs (Figure 2) and the latitude adjustment L-bolts (Figure 5) on the mount to posi- tion the star Polaris inside the tiny circle marked “Polaris” on the finder’s reticle. You must first loosen the knob under- neath the equatorial mount on the center support shaft to use the azimuth adjustment knobs. Once Polaris is properly

positioned within the reticle, you are precisely polar aligned. Retighten the knob underneath the equatorial mount.

If you do not have a clear view of Polaris from your observing site, you will not be able to use the polar-axis finder to pre- cisely polar align the telescope.

Note: From this point on in your observing session, you should not make any further adjustments in the azimuth or the latitude of the mount, nor should you move the tripod. Doing so will undo the polar alignment. The telescope should be moved only about its right ascension and declination axes.

Additional Note Regarding Focusing the Polar Axis Finder Scope

The polar axis finder scope is normally focused by simple rota- tion of the eyepiece focus ring. However, if after adjusting the focus ring you find that the image of the reticle is sharp, but the stars are out of focus, then you must adjust the focus of the polar axis finder’s objective lens. To do this, first remove the polar axis finder from the mount by unthreading it. Look through the polar axis finder at a star (at night) or distant object at least 1/4 mile away (during daylight). Use the eyepiece focus ring to bring the reticle into sharp focus. Now, loosen the focus lock ring (Figure 7) and thread the entire objective end of the finder inward or outward until images appear sharp. Re-tighten the focus lock ring. Once the polar axis finder’s objective lens is focused, it should not need to be adjusted again.

Confused About Pointing the Telescope?

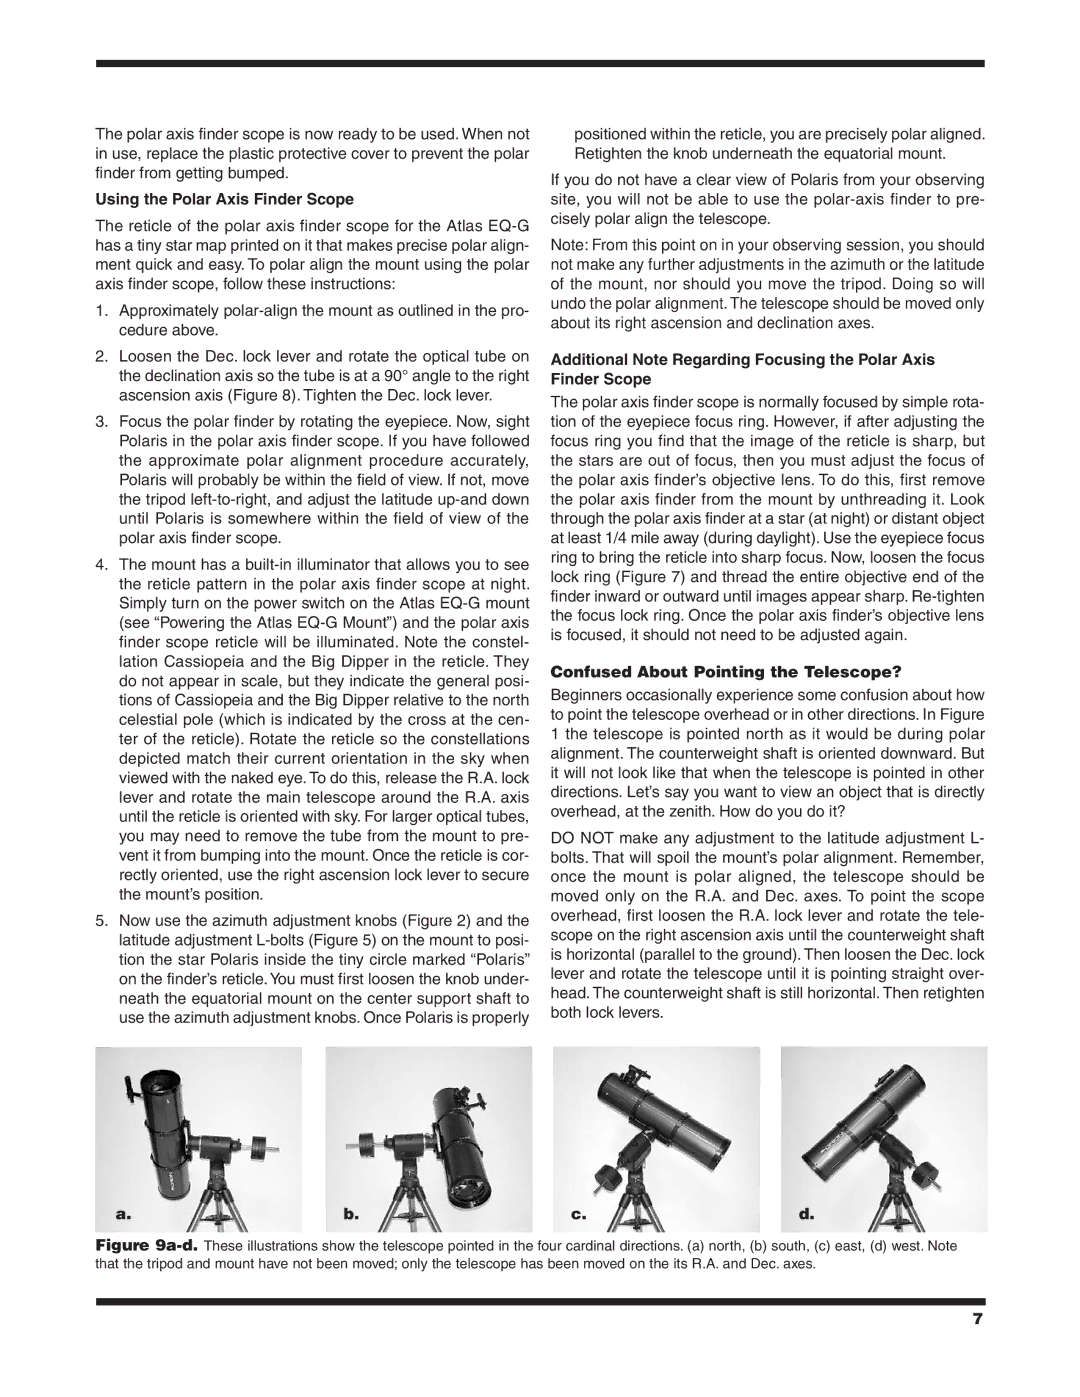
Beginners occasionally experience some confusion about how to point the telescope overhead or in other directions. In Figure 1 the telescope is pointed north as it would be during polar alignment. The counterweight shaft is oriented downward. But it will not look like that when the telescope is pointed in other directions. Let’s say you want to view an object that is directly overhead, at the zenith. How do you do it?

DO NOT make any adjustment to the latitude adjustment L- bolts. That will spoil the mount’s polar alignment. Remember, once the mount is polar aligned, the telescope should be moved only on the R.A. and Dec. axes. To point the scope overhead, first loosen the R.A. lock lever and rotate the tele- scope on the right ascension axis until the counterweight shaft is horizontal (parallel to the ground). Then loosen the Dec. lock lever and rotate the telescope until it is pointing straight over- head. The counterweight shaft is still horizontal. Then retighten both lock levers.

a.

b.

c.

d.

Figure 9a-d.These illustrations show the telescope pointed in the four cardinal directions. (a) north, (b) south, (c) east, (d) west. Note that the tripod and mount have not been moved; only the telescope has been moved on the its R.A. and Dec. axes.

7

Page 7
Image 7
Orion EQ-G instruction manual Using the Polar Axis Finder Scope, Confused About Pointing the Telescope?

EQ-G specifications

The Orion EQ-G Equatorial Mount is a popular choice among amateur astronomers and astrophotographers seeking a reliable and versatile platform for their telescopes. Known for its robust build and advanced technology, the EQ-G mount can support a wide range of telescope sizes, making it ideal for both visual observations and astrophotography.

One of the standout features of the Orion EQ-G is its precision go-to capability. Equipped with a computer-controlled system, users can easily locate and track celestial objects with remarkable accuracy. The mount comes with a database that includes thousands of celestial objects, allowing users to automatically point their telescope to stars, planets, galaxies, and more with the push of a button.

The EQ-G mount features a sturdy aluminum construction, ensuring stability even under heavy loads. It can support telescopes weighing up to 30 lbs, making it suitable for medium to large telescopes. The mount's adjustable altitude and azimuth motions allow for smooth tracking of celestial objects as they move across the sky, a vital characteristic for long-exposure astrophotography.

To enhance user experience, the EQ-G is equipped with a built-in dual-axis servo motor drive system. This drive system delivers precise movement control, ensuring that the telescope can be accurately guided to desired targets. Furthermore, the mount is compatible with various control options, including hand controllers and computer software, allowing for a customizable and convenient observing experience.

Another notable technology within the EQ-G is the polar alignment scope. This feature aids in achieving accurate polar alignment, which is crucial for minimizing tracking errors during long exposures. By correctly aligning the mount, users can take stunning astrophotographs with minimal star trails.

For portability, the EQ-G mount comes with a quick-release design that allows for easy setup and takedown. Its adjustable tripod legs provide a stable base on various terrains, making it possible to observe from different locations, whether in the backyard or at a remote dark-sky site.

In summary, the Orion EQ-G Equatorial Mount combines an intuitive design with high-quality features, making it a fantastic choice for astronomy enthusiasts. With its go-to capability, sturdy construction, precise tracking, and user-friendly setup, the EQ-G stands out as a reliable and effective tool for exploring the wonders of the night sky. Whether you are capturing stunning images of celestial objects or simply enjoying visual astronomy, the Orion EQ-G meets the diverse needs of astronomers at all levels.