Owner’s Manual
Model 200 Connection Diagram
Model 200 Connection Diagram
������� ��
�����������
�� ���
������
������
|
|
|
|
|
|
|
|
|
| ������� �� |
|
|
|
|
|
|
|
|
|
|
|
|
|
| ��� ������� |
|
|
|
|
|
|
|
|
|
|
|
|
| ���� ������� |
|
|
|
| |
|
|
|
|
|
|
|
|
|
| �� ����� |
|
|
|
|
|
|
|
|
|
|
|
|
|
| ������ |
|
|
|
|
������ ����� | ����� | ���� ������� | ������� | ������� ������� |
|
| ����� |
| ����� | ���� ���� |
| |||
| �������� �� ������ ��� ���� �� ���� �� �������� |
|
|
| ||||||||||
������� ������ |
|
|
| ��� ���� |
| |||||||||
|
| �� | ��� |
| ���� | � | � |
| ������ �� ��� ������ ���� ��������� �� ���� �� �������� | ������� |
|
| ������ ���� |
|
|
|
|
|
|
|
|
|
| ������� |
|
|
| ��� ���� |
|
������ ��� ����� ��������� |
|
|
|
| ����� |
|
|
| ���� | �� |
| ��� |
| |
|
|
| �� | ��� |
|
|
|
|
| |||||
|
|
|
|
|
| � |
| � | ���� �� �������� ����� |
|
| ���� |
| |
|
|
|
|
|
|
| �� ��� ���� |
|
|
|
| ���� ���� � ���� ����� | ||
|
|
|
|
|
|
|
|
|
|
|
| |||
|
|
|
|
|
|
| �������� ����� ��������� ��� ����� |
| �������� ��� ��������� ���������� ������� | ���� | ||||
|
|
|
|
|
|
| ����� ������ �� ���� ������������� ��� ������� |
| ���� ������� ������� ���� ���� ���� ���� ���� ���� |
| ||||
� | � |
������� ���
������� ����
�������� ��
����������
�������� ��
����������
Cables with a gauge of 16 may be used for short runs of less than ten feet. We do not recommend that you use any cables with an AWG equivalent of 18 or higher due to the power loss and degradation in performance that will occur.
Cables that are run inside walls should have the appropriate markings in indicate listing with UL, CSA or other testing agency standards. Questions about cables inside walls should be referred to a qualified installer or a licensed electrical contractor who is familiar with the NEC and/or the applicable local building codes in your area.
If bare wire is used for the connections, strip approximately 1/2 inch to 3/4 inch (20mm) of insulation from the end of each wire and carefully twist the strands of each conductor together. Be careful not to cut the individual strands or twist them off; for optimal performance, all strands must be used.
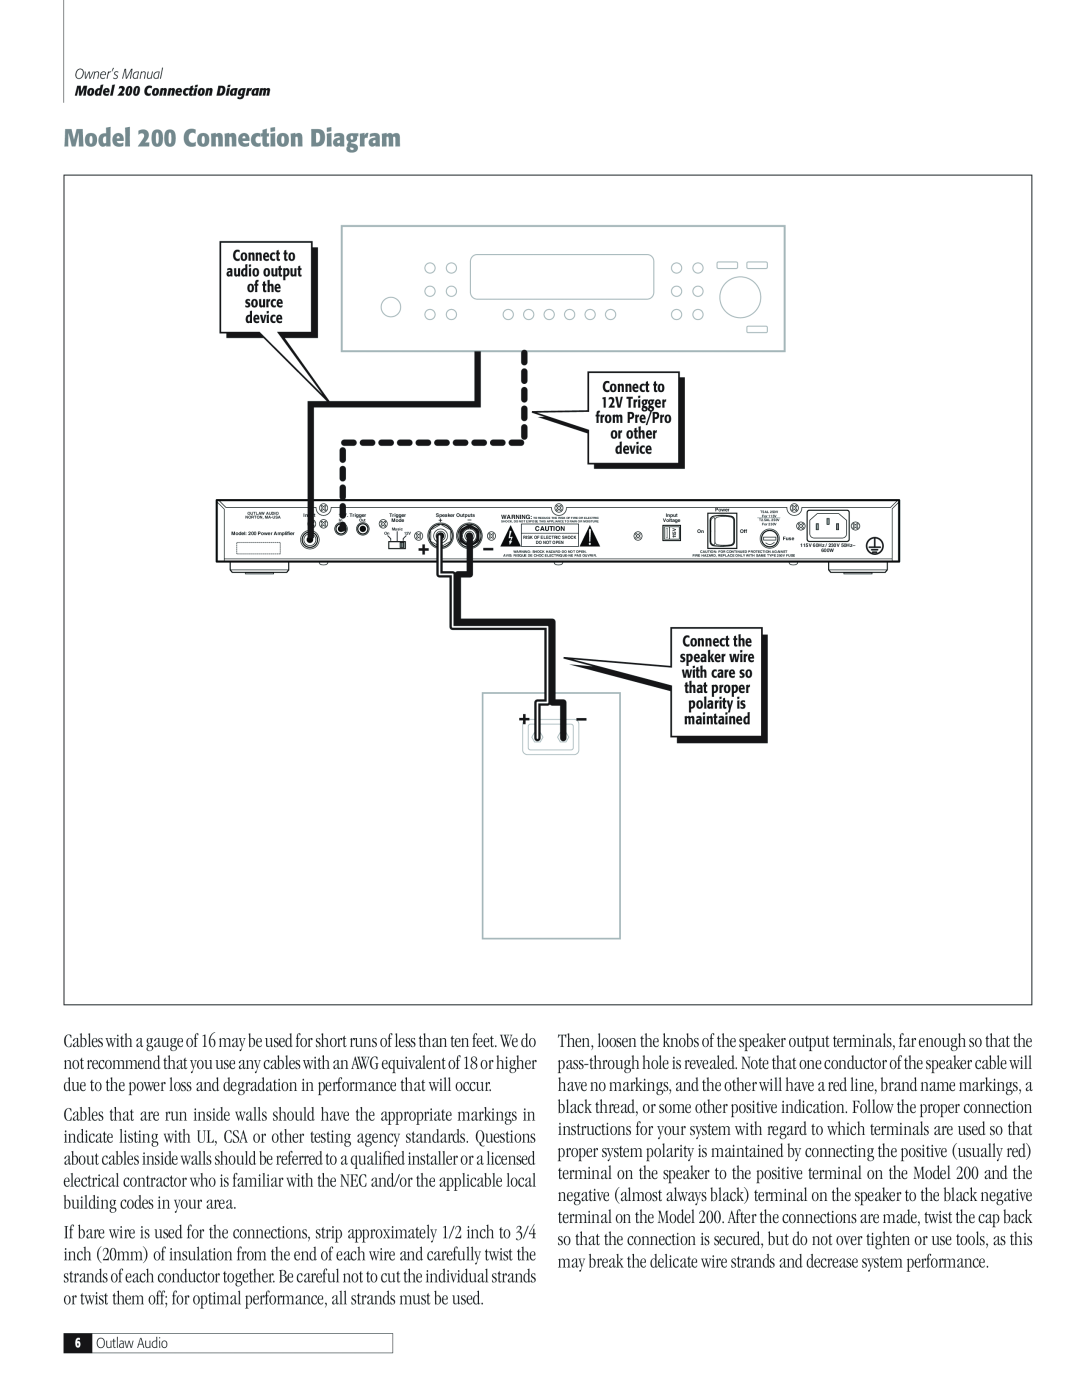
Then, loosen the knobs of the speaker output terminals, far enough so that the
6
Outlaw Audio
